Wednesday, 23 July 2025

Fnurban #37 : Zulus, Sir - Paintings of 'em!

On Saturday afternoon I braved the torrential rain showers which broke our recent heatwave, for a trip to the National Army Museum, Chelsea. Their current exhibition is called Myth and Reality: Military Art in the Age of Queen Victoria , and a series of talks were run during the day in support of it. I booked for one of them - Military Art of the Zulu War, given by Ian Knight. As many of you will know, Ian is THE expert on  Zulu military history - I just checked, and found that I have a series of  articles by him starting in issue 16 of Miniature Wargames magazine, from 1984!  I am no expert on the Zulus (clearly I have failed to read all those articles!), but it's always worth hearing someone who really knows their subject - and so it proved.   Please excuse my poor-quality phone picture of Ian in full flow ( well, it was 'darkest Africa', I suppose)  


The museum website described the talk like this :

Ian Knight examines artistic representations of the Zulu War of 1879 and how they continue to influence our understanding of the conflict today.

The Zulu War was fought between the British Empire and the Zulu Kingdom in the furthest reaches of southern Africa. The Zulus demonstrated remarkable resilience, and the war became notable for its ferocious battles. Today, the conflict holds a prominent place in Britain’s collective memory of colonial warfare.

Artists of the time attempted to influence opinion of the Army and its exploits against the Zulus. Charles Edwin Fripp’s romanticised depiction of the British defeat at Isandlwana failed to capture the Victorian public’s imagination. But paintings of the successful defence of Rorke’s Drift by Lady Elizabeth Butler and Alphonse de Neuville proved more popular. Butler’s piece in particular attracted a ‘great crush’ of onlookers at the Royal Academy of Arts in 1881.

As part of our Victorian Soldier Spotlight, historian Ian Knight will examine the different ways that artists of the era portrayed the Zulu War, showing how their work has helped these events to enter British folklore.

Ian is a good, very articulate but unstuffy speaker and gave us a 75-minute tour of his subject (over-running by 15 minutes, but no-one minded!). I didn't take notes, but can remember some sailent points and will try to give them here. 

The Anglo-Zulu War of 1879 was essentially an unprovoked  invasion of the Zulu Kingdom by British forces led by Lord Chelmsford.  How was it portrayed back in Britain? Well, photography was possible but difficult, as photographers still needed to transport bulky kit and chemicals, and the war zone was isolated and undeveloped - and a war zone! So 'action' photos were rare, though pictures of British troops and some Zulu prisoners were made in camps well away from the front. Even if photographs had been easily available, the newspapers of the time could not print them; they relied on drawings and sketches sent back from the war, which would then be turned into engravings for publication in The Daily Graphic, Illustrated London News etc.  Ian showed us a pencil sketch (see below) made by Melton Prior at the battlefield of Isandlwana about a month after the event,  and the published engraving made from it - from  which the original's images of dead and decaying British soldiers were of course omitted.


 There was of course a lot of public interest in the war, and this soon led to the commissioning of paintings recording the main events - these would be put on public display and could draw large crowds to view them.   Ian took us through some of these, and pointed out salient features:

First out of the blocks was this, Siege of Rorke's Drift by William Henry Dugan:

From Art UK (Image credit: The Regimental Museum of The Royal Welsh ) 

 This was painted in 1879, quite soon after the event and when very little information was available -which explains why you little or no detail of the location!  Ian pointed out that the Zulus are not accurately portrayed - the artist just didn't have sufficient information. 

 As timew went by, a lot more detail of the events of the battle became available and could be included in paintings.  In 1880, French artist Alphonse de Neuville produced The Defence of Rorke's Drift 1879'  ( French artists seemed to feature prominently; it seems many had learned their craft depicting the events of 1870-71 ).   


Ian pointed out that this sort of picture works a bit like a film - it includes many different episodes which people would have read about in the newspapers: Chaplain Smith handing out ammunition; Surgeon Reynolds attending to wounded; Lieutenants Chard and Bromhead, the highest-ranking officers present; the hospital set on fire by the Zulus and wounded being carried out, etc. All these incidents are included in the picture, though they actually took place at different times during the 12-hour siege. Notice of course, that events are seen very much through British eyes - the Zulu attackers are barely visible, the focus is of course entirely on the heroic British defenders. 

However, it seems that Queen Victoria was not too impressed with a Frenchman producing the definitive representation of a British battle, so she commissioned a British artist to paint the same subject. This was Lady Elizabeth Butler, whose  The Defence of Rorke's Drift  was also painted in 1880.


 In many ways a similar approach to de Neuville,  with several of the well-known characters on view : Chard and Bromhead (both VC) right at the Centre, Chaplain Smith behind them,  wounded Private Frederick Hitch (VC)  in right foreground, also handing out ammunition,  Surgeon Reynolds ( in black) attending to wounded, his assistant  Storekeeper Byrne dramatically falling, shot,  and  Corporal Ferdinand Schiess (VC) climing onto  the barricade to use his bayonet (khaki uniform, to left of the officers ). Plus of course the hospital on fire, and wounded being escorted away,  and again of course the Zulus don;t get much of a look-in, all the focus is on 'our brave boys'.  Many of these men had been interviewed by Lady Butler, and showed her the uniforms they wore at the battle - though Ian pointed out that Bromhead and Chard would very likely have worn  full beards on campaign, which would then have been shaved off on their return to Britain.  The painting attracted large crowds when put on public display,  and you too can now see it 'in the flesh', as it has fairly recently  been cleaned and restored,  and is part of the exhibition at the NAM. Well worth looking at it full-size and in person! 

The final battle of the war, and  the final defeat of the Zulus, was at Ulundi, in July 1879, and of course there is a large-scale painting of it, which belongs to the National Army Museum collection; it was for some years on display on the wall of a corridor in the museum  This is The Battle of Ulundi by Adolphe Yvon  ( another Frenchman!)  , also painted in 1880.


Ian said he had been puzzled for a while, as the  picture seems to show the British force in a battle line, whereas in fact Lord Chelmsford drew up his army in a large square formation;  it seems that the painting was most probably painted as a 'panorma',  designed to be displayed on the wall of circular chamber, with the audience at the centre. That would explain, for example, the way that the smoke of battle seems to be drifting in different directions(!).   Also note one or two   dark-coated British lancers at the bottom left - these would be from the 17th Lancers, who charged in pursuit of the fleeing Zulus. A few years ago, he said, he was shown a painting in South Africa depicting the 17th at Ulundi, and  realised that it was probably a missing panel from this picture, showing the 17th about to charge.         

 Of course the other famous event of the Zulu War was the catastrophic defeat of Chelmsford's army at Isandlwana, on the same day as Rorke's Drift, and this too has been the subect of several artworks, the most famous being by Charles Edwin Fripp, first exhibited in 1885: 


 Perhaps unsurprisingly, this picture was not as popular as the Rorke's Drift paintings - the public were much more keen on the latter miraculous victory than this disastrous defeat!  Ian talked us through some interesting points.  As ever, the focus is on our brave boys, who must be seen as heroic even in defeat, hence the 'last stand' nature of the foreground group, though the background scenes of slaughter would probably be more like the reality,  One detail he pointed out was the young drummer boy in the left centre, when in fact the British drummers would have been adults. Also note that there are no officers shown - so the heroic  other ranks are left to 'do and die' by their incompetent (and fleeing ) officers?  This painting also belongs to the National Army Museum, and they have a web page about its recent restoration.     

The attempts to find consolation in catastprophe continued in several other contemporary  paintings which focussed especially on the story of Lieutenants Teignmouth Melvill and Nevill Coghill, who were killed attempting to save the Queen's Colour of the 1st Battalion, 24th Foot.- as Wikipedia puts it , the colour was carried off the field by Lieutenant Melvill on horseback but lost when he crossed the river, despite Lieutenant Coghill having come to his aid. Both Melvill and Coghill were killed after crossing the river, and received posthumous Victoria Crosses in 1907 as the legend of their gallantry grew. Here is Last Sleep of the Brave by Alphonse de Neuville (1881) - Lancers find the bodies of the dead heroes, united in death and still protecting the colours:. 

 Except,  as Ian Knight pointed out,  the bodies were found some distance apart, the colours were not saved but dropped in the river, and that's the wrong colours in the picture! 

And what about the poor old Zulus in all this? As stated already, the paintings tend to show the heroics of the redcoats, and ignore the zulus and their point of viw- at least partly, it seems because artists had little first-hand knowledge of them and their appearance and equipment. Ian as able to show us one image of Rorkes Drift,  drawn from a viewpoint amongst the Zulu army - I haven't been able to find a copy of that one, but it was, Ian said, almost certainly based on this watercolour  sketch made by Lieutenant Chard, who was  in command on the day :  


And finally, I think Ian said that this drawing, A Zulu Regiment Attacking at Isandlwana, again by C E Fripp, was a rare, good accurate portrayal of Zulu warriors - Fripp had been to South Africa and seen the battlefields, and met the Zulus. 


 So on that note, I'll finish - many thanks to Ian Knight for a really interesting talk, and to  the NAM for organising it. If you are anywhere near Chelsea in the near future, the exhibition is no doubt worth a look too - I only had a few minutes spare to look at it on the day, but  will certainly be  going back. 

I also noticed that if you are very keen on all this, you can spend 14 days in November in the company of Ian Knight, on a Zulu War tour run by Cultural Experience the historic tour company. But I should point out that it will cost you over £6,000 - I paid a fiver for the talk, that will do me!  Until next time, keep well, everyone. 

Saturday, 12 July 2025

Minifigs, Sir - hundreds of 'em!

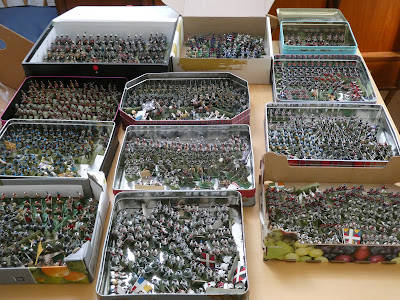
I have recently made an interesting acquisition, which I am very pleased with - and here is a picture of it (or rather, them). 


What we have here is a selection of vintage Minifigs 25mm figures, painted as units of various nations from the Seven Years War and American War of Independence (or Revolution, if you prefer) periods.  How I came about them is a story that began at the recent Broadside show at Gillingham last month. One of the 'flea market' stalls there was run by the Whitehall Warlords club, and I noticed a box of figures on their table - Minifigs 25mm, painted as Bavarians of the War of Austrian Succession, I was told ( see below, but  note, they seem to have fictitious French regimental colours ) 


I admit I was interested, especially when the chap  (Bob Walker) doing the selling  said 'if you like those, we've got loads more we want to dispose of, 7YW and AWI mostly'.  After a bit of chat we swapped phone numbers, and over the course of a few days Bob sorted them out and 'Whatsapped'  me a series of pictures of several boxes and tins full of vintage Minifigs. - French, British, Americans, Germans, Austrians, Prussians, Russians.. The range of different nations was quite a selling point, for me - not just big contingents  of one or two armies, but manageable numbers of various nations, so loads of scope for campaigning with multiple or coalition forces,  perhaps?  Or perhaps  a sort of 'Imagi-nations' approach? All ready-painted, in a nice old-school style and easily as good as I would be able to achieve myself,  they would go perfectly with the 'mostly Minifigs' 7YW period figures I already have.

So, after a little time to think it over, I decided to buy the whole lot - the price was very reasonable, I thought - so earlier this week, on a very warm afternoon,  I took a trip to Basildon to collect and pay for my new/old recruits. In the course of looking through them and a pleasant conversation about them, I have learned their 'back-story', which itself is of some interest to me.  

As stated earlier,  these figures were being sold by the Whitehall Warlords club, and it turns out that they are from the collections of several of their members - in particular the sadly now deceased Seamus Bradley, Phil Hoare and George Warren,  and (very much alive)  current member Andrew Maxfield. It so happens that for a short period in the late 1980s I was a member of the same club - they met in the Civil Service staff sports/leisure club at Marsham Street, Victoria, and I worked nearby.  As I've mentioned before, I remember Seamus very well, and I can recall Phil and George too. I'm not sure I wiould have been involved in games with these figures ( in my memory they were having a Marlburian phase at the time ),  but all the same I think that acquiring them  is a nice connection with a piece of my wargaming past.  It's also, I hope, great  to be able to offer a 'good home' to this collection, lovingly painted long ago, and be able to make use of them and give them a new lease of life.  And from a purely practical point of view, at a stroke I have quite large forces available, for much bigger games and campaigns than I have been able to put on before - it would have taken many years to acquire and paint anywhere near this sort of collection!              

For now, of course I have the mother of all 'sorting out' jobs to do, going through them box by box and identifying nations and units - I should here give many thanks to Bob, who has given me quite a lot of information and organised the boxes and tins sensibly.  One of my early favourites is this box - Russians! 


I do like the green and red colour scheme, and especially the grenadiers, and these will be a great opponent for my existing  Prussian forces.    

There are some interesting features of the collection which are worth mentioning; as you may have noticed from the pictures infantry predominate, but there is a good number of assorted cavalry, and at least a dozen guns and crews of various nations.  There are indeed AWI/Revolution forces - a box of various Americans including some Native Americans, and British, French  and Hessian units. So I can have a go at refighting that conflct, while also using many of the figures for Seven Years War in Europe games - I'm not that fussy about absolute uniform accuracy! In the course of discussions with Bob we recalled how Charles Grant in The War Game etc would happily use historical French, Austrian and Prussian regiments in his fictitious  'VFS' and 'Duchy of Lorraine' armies, as well as for re-fighting hostorical battles, and that approach has some appeal for me, too. Another feature is that there are several alternative command stands with different regimental colours and standards, so the original owners were clearly going for multi-purpose forces themselves. Indeed, it seems that from Bob's inspection of the Minifigs  code numbers engraved on the figure bases, quite a large proportion  are from the AWI range, simply painted as different nations  - I wonder if some bulk buying was done, or were the AWI figures the only ones available at first, perhaps the specific 7YW ranges came later? A question for the real Minifigs nerds out there  ( it seems likely that some of  thesefigures may date from the 1970s).

All in all, I am very happy indeed to have these chaps in my collection, and look forward to putting them together on the table with my existing troops ( many of which were  from another  deceased veteran wargamer, Eric Knowles, so there is a common theme emerging - 'legacy armies'?).  I'm quite tempted to just try to put on a large and entirely fictitious  game with some old school rules, as simple as possible - the basic rules in Young and Lawford's Charge! would seem ideal - simply to enjoy the spectacle!  I'm also thinking about a multi-nation  7YW campaign, probably going back to the Soldier King boardgame  that I used a couple of years ago.  For dipping a toe into AWI, I have treated myself to a copy of  Osprey's  Rebels and Patriots rules, and I had a fortuitous find in my local Oxfam shop the other day too - a nice vintage Osprey 'Men at Arms', published 1972 and written by none other than Brigadier Peter Young.  


So that's my update - quite a big update, as it turns out!  Many thanks once again to Bob Walker and the Whitehall Warlords, very nice doing business with you!   I'm very much looking forward to 'sorting out' and organising the new troops (and I have to work out a storage solution too..) and getting them into action. As I do that, I will post updates showing what I've got, so watch this space.  

For now, we have something of a heatwave in the UK, and the best place to be is sat in the garden shade with a good book ( Washington's Army, perhaps? ) - I hope everyone else is keeping suitably cool.  I suspect my next post may feature Minifigs 7YW figures, inevitably! Meanwhile keep well, everyone.


Tuesday, 1 July 2025

Risorgimento 1859: Primo Incontro

 In my last-but-one post  I set out the initial deployments for my first game using 6mm scale armies for the Italian war of 1859 - now the game has been completed, and I can report how things went. 

To quickly recap, I used the 'Minigame' scenario fron Neil Thomas' excellent Wargaming Nineteenth Century Europe   - and of course the rules from the same book.  The defending Piedmontese are nearest the camera in the picture below, with attacking Austrians in the entirely fictional village of Primo Incontro and ranged along the road at the top.  


 Unbeknown to the Italians, a flanking force of Austrian cavalry and Jagers would arrive from  the East (right) on turn three.  Whoever controlled the village and the hill after ten turns would be the winner. 

 The attacker always goes first, so on Turn 1 the Austrian 1st Infantry (on the road East of the village) formed column and began to advance on the hill, while their 2nd Infantry deployed for the defence of the  village. Their artillery (on the road between the two infantry units) opened fire on the Piedmontese (2nd) Infantry unit on the hill.  The general idea was to 'pin' the Piedmontese near the hill and keep them busy until the flanking force arrived, while simply holding the village against any attack.  It seems that the Austrian gunners were somewhat  out of practise, missing with their first shot.  

The firing mechanism is simple - assuming in range and line-of-sight, roll a number of D6 dice per firing base (artillery have one base), which in the case of Smoothbore Artillery is 2 dice. The score required to hit depends on the target type - in this case Loose Order Infantry ( i.e. lots of  skirmishers backed by a formed 'main body' )  in Line, among  the hardest to hit. Needing 5 or 6 on each D6, the gunners rolled a 1 and a 3 - better luck next time. 

In response, the Piedmontese  Grenadiers advanced up the road towards the village, with the 1st Infantry unit following them up.  Piedmont's artillery near the hill opened fire on the advancing Austrian 1st Infantry - a slightly easier target as the Austrians were in column formation - and were clearly more practised than their opposite numbers, scoring  2 hits with 2 dice.  If a unit suffers 4 hits, it will lose a base ( infantry have  4 bases ), so no immediate effect, but the Austrian foot were taking casualties..  What's more, their advance had brought them within range of the Piedmontese 2nd Infantry's  rifled muskets - these let loose a volley ( muskets get 1 D6 per base, so the fresh unit rolled 4D6 ) and scored a further two hits.  Thus the Austrian foot had suffered 4 hits and must lose one of its four bases:  this in turn triggered a morale test. 

Morale tests are very simple, triggered by (a) losing a base to fire (b) cavalry fired on by a unit they are charging, or (c) losing a hand-to-hand combat. The procedure is a simple 1D6 roll, with poorer quality troops less likely to pass. If the test is failed, a complete base is removed - simple but quite 'impactful'.  The Austrians rolled - and failed, losing another base, as men presumably dropped out of the formation rather than face the withering fire.  So this Austrian unit was reduced to half-strength by concentrated fire in one turn - clearly these rules lean towards the 'fast and furious'!

With apologies for the strong shadows of a sunny afternoon in Lombardy, above  are the somewhat battered Austrian foot (top)  facing musketry and cannonade at the end of the first turn.

 For Turn Two, the Austrian 1st Infantry came to a shocked halt and formed firing line, rather than trying to advance further.  Their  artillery  and 2nd Infantry (in the village) held position. All three units gave fire:  the artillery and 1st Infantry versus Piedmont 2nd Infantry on the hill, and the 2nd Infantry from the village fired on the Piedmont Grenadiers column. The diminshed 1st Infantry and obviously poorly-trained gunners both missed, but the 2nd Infantry scored two hits on the advancing Grenadiers. In Piedmont's turn these same Grenadiers thought better of advancing under more fire, and formed line to return fire. 1st  Infantry came up on their right in column, to give support. The Grenadiers opened fire on the village - and missed.  On and around the hill, the Piedmontese guns and 2nd Infantry kept pounding Austrian 1st Infantry, between them inficting three more hits. That Austrian unit was looking very ragged by now - the flanking force couldn't arrive too soon!  Piedmont's general may have had some reasons for confidence, having almost shattered one Austrian unit and massing infantry for a possible attack on the village - hopefully his artillery could switch to fire in support. 

End of Turn 2 : Piedmont looking strong

 And so to Turn Three - and things started to happen very quickly!  The Austrian flanking force could appear anywhere on the Eastern (right) edge of the table - of course they chose to arrive near the hill. They were close enough to allow the Austrian cavalry to immediately charge the Piedmont (2nd) Infantry on the hill, taking them in the flank! In these rules, cavalry are pretty vulnerable to fire, and must check morale if fired on during their charge ( even if no bases lost ), so frontal charges look authentically ill-advised : but from the flank, the infantry have no chance to fire..   The accompanying Jagers, in skirmish formation, advanced in support on the cavalry's left (South).   

Before the cavalry attack could be resolved, the remaining Austrian firing must be carried out - and the appearance of support must have raised morale along the line.  The 2nd Infantry in the village inflicted another hit on the Piedmont Grenadiers, the  Austrian gunners finally found their mark, and the battered 1st Infantry also scored a hit - these latter two on Piedmont 2nd Infantry, to add to their woes as the cavalry thundered in! 

Turn 3 : Cavalry charge - to the flank! 

 For Hand-to-Hand combat, each unit rolls a number of dice per base, and for cavalry vs, foot in Line that is 3 dice, plus one dice per base for the flank attack. Which gave the Austrians 16 dice.. needing 4,5 or 6 to hit. This is what 16 dice looked like: 


Seven hits, that will be pretty devastating. The Piedmont infantry had a basic one D6 per base, and I generously gave them a couple of extra dice because half the Cavalry unit was downhill of them - 6 dice. They did relatively better -  4 hits - but not well enough to stave off disaster...

Having already taken 2 hits from firing, the Piedmontese foot suffered 9 hits in all, therefore lost 2 bases.  Suffering 7 hits to 4 in the melee, they had lost the hand-to-hand combat round, and had to take two morale tests as a result.  One of these tests was failed, so another base gone, leaving only one base. The shattered remnants of the unit must retreat 12cm, and fell back alongside their artillery (which was now looking very vulnerable!).  The victorious Austrian Cavalry, having taken 4 hits, lost one base, but needed no morale check having won the combat, and might now inflict further mayhem.  A disasterous blow for Piedmont! 

On Piedmont's turn,  frantic re-aligning was needed, the guns swinging around 90 degrees to face the rampaging cavalry - but as a result, could not fire. The threatened attack on the village had to be abandoned,  with 1st Infantry turning East and marching hurriedly to support their comrades on the right.  The Grenadiers pulled back from the village, out of musketry range.  The only firing was from the shattered 2nd Infantry's sole remaining base, which did at least score a hit on their Austrain cavalry nemesis. Small compensation..

End of Turn 3 - quite a change!
 

Turn Four, and  the inevitable happened: the Austrian Cavalry just kept going, charging at the Piedmont guns! Now the procedure is that the defenders fire first, before the chargers move in. So the guns fired at long range, rather than close (canister) range. Which does leave a rules quibble - musket-armed troops , for example, being charged are allowed to fire even if the chargers start out of musket range - but there is no equivalent statement about artillery being able to fire at close range using canister. I wondered about a 'house rule',  perhaps a die roll test to see if the gunners can hold their nerve and wait to fire case-shot?   Anyway, I treated the cannon fire as long range, the guns had 2D6 and scored 1 hit. That was enough to trigger a morale check on the cavalry, who failed the test and lost a base - but two bases still remained to charge home.  

Meanwhile the Jagers (skirmishers)  had the capability to fire and move (or move and fire), firing first at Piedmont 2nd Infantry ( missed) and then moving forward, swinging round to threaten the flank of their target.  At the same time, Piedmont's 1st Infantry was hurrying across the Austrian front, and attracted fire from both the Austrian guns and their 1st Infantry, who needed to turn 45 degrees  - this reduced their fire effect somewhat.  The Piedmontese escaped unscathed - both guns and muskets missed. 

Which brings us to the crucial clash as the Austrian Cavalry charge hit the Piedmont guns.. The cavalry rolled 4D6 per base - so 8 dice in all.  The gunners had only 1D6 in reply, and things went all too predictably - the cavalry rolled no less than 6 hits, and the gunners none.  Six hits of course wiped out the Piedmont artillery - strike two to the Austrian horsemen!   

In all that excitment, I omitted to take a 'before' picture for the cavalry vs artillery melee: all I can show is the 'after', with a gap where the guns used to be.. 


 On their turn,  more frantic re-organisation from the Piedmontese - their 1st Infantry in column was now looking at the still-rampaging enemy cavalry and feeling quite nervous!  They hurriedly formed line, ready to fire. 2nd Infantry's single remaining base formed into column and retreated as fast as they could, taking shelter behind their comrades.  The Grenadiers were summoned to help too, marching to meet the Austrian Jagers and prevent an envelopment. All thoughts of taking the village were forgotten..  In the Firing phase, 1st Infantry loosed off a volley at the enemy cavalry and did well - 4 hits! ( Cavalry are very  vulnerable to fire )  That took another base from the cavalry - they passed the required morale check, but had only one base left. Perhaps their run of luck was ending at last.

Turn 4 End: Piedmont shoring up their flank

 On Turn 5, the Austrian commander wisely pulled his cavalry back, moving the Jagers onto the hill - thus for now,  Austria held one and contested the other battlefield objective. Their 1st Infantry held position, and their 2nd Infantry were emboldened to advance from the village, up the road to threaten the Piemont left.  No less than 3 Austrian units ( artillery, 1st Infantry and Jagers) poured fire onto Piedmont 1st infantry, but only the gunners were accurate, and scored just one hit. Piedmont in their turn formed the Grenadiers into line, turning to face the Austrians coming down the road; the remnants of 2nd infantry supporting them, while 1st infantry held position, giving fire at the Austrian 2nd Infantry, who are within range and a 45 degree firing arc.  Their volley scored 1 hit, but the Austrians had accumulated 3 hits previously, hence lost a base - and then failed their morale check, and lost a second and final base.  Austrian 1st infantry fell apart, some respite for the Italians.  the Austrians still seemed to have the upper hand, but had taken greater losses ( 7 bases to 4 ) and had only one full-strength infantry unit against two Piedmontese.

End of Turn 5 : the hill is contested 
 

The Austrians might still prevail, if they could  hold the objectives, so on Turn 6 their 2nd Infantry halted on the road, the Jagers held position on the hill, and the remaining cavalry base manoeuvered to threaten the flank of the Piedmont 1st infantry.  Their guns and Jagers kept up a steady fre on that same infantry unit, which suffered two more hits. This was worrying for the Piedmontese, but did not stop them wheeling to fire on the enemy cavalry - with good effect, scoring no less than three hits, enough to remove the cavalry's fourth and final  base.  A short but spectacular career for those Austrian horsemen!

By Turn 7,  it was clear to the Austrians that they could no longer win, but hoped they might hold out for a draw. Their 2nd Infantry retired towards the village, intent on holding that objective. The Jagers still held position on the hill, and the gunners kept firing. But the dice weren't with them - firing on Piedmont 1st Infantry, both Jagers and guns missed.  Piedmont's commander was now determined to recover the hill, with 1st Infantry turning their muskets on the enemy Jagers (scoring 1 hit) while the Grenadiers formed column and marched towards the South of the hill - the Jagers now threatened by two full infantry units and at risk of being outflanked.

Turn 7 : Austrian Jagers  (right) under threat

 Turn 8 saw the end of the battle.  The Austrians simply held their positions, and their gunners dealt a blow to 1st Piedmont infantry, scoring a hit which removed a base, with the infantry then failing their morale check and losing a second base. But in their turn, the Piedmont infantry were able to form column and  charge at the Jagers - the latter's fire scored one hit, but to no effect, and the Italians charged home. In the resulting hand-to-hand combat the skirmishing Jagers were no match for an infantry attack column, suffering 2 hits to 1 and losing the combat. Being forced to retire 12cm, the Jagers were dislodged from the hill, with no real chance of retaking it.  

With losses at 8 bases for the Austrians vs. 6 bases for Piedmont, both sides had taken pretty heavy casualties. Each side held one objective; Austria the village, Piedmont the hill. Piedmont could hold the hill with two infantry units while keeping out of artillery range, but did not have the strength to take the village, which was  occupied by infantry and supported by guns. Austria could hold the village, but had nothing available to take the hill.  At which point, I called an end to the fighting, and declared a draw. 

Turn 8 and the end : an honourable draw

 
The butcher's bill: Austrians at front

 I thoroughly enjoyed this game, and really liked the rules - in true Neil Thomas style, simple but subtle, I think!  The action moved quickly, rules were assimilated easily, and felt 'right' for the period. In particular the effects of firepower are becoming more powerful, and cavalry is very vulnerable to musketry, so don't try a frontal charge - but if you can take the enemy in the flank...! Only one rules query came up ( the one about guns using canister when charged ), and I feel a simple 'tweak' should sort that out. One 'classic' tactical scenario did not come up, as no infantry column managed to get within charge range of an enemy infantry line; it would have been nice to work through that situation and see how it worked out - bloodily, I suspect!  I have perhaps given  too much detail  here for some,  given the small size of the game, but I did want to explain some of the basic mechanisms - I think they work pretty well.  Given the quite fast and furious nature of the game, I think these rules should be pretty good for much larger battles, too - better get  painting  some more units! 

I hope this has been interesting and fun for anyone thinking of trying these rules and/or  this period - well worth a go, I'd say!  I am much encouraged and will try a more ambitious setup next time. 

My next hobby event is due this very evening,  as I step up to enter the medieval mincing machine that is Jon Frietag's  WotR  Battle of  Mortimer's Cross!  I look forward to that, and to his report after the game. Next time here, perhaps some more thoughts on the Risorgimento, orders of battle and possible future games.  Until then keep well, everyone.