Thursday 29 July 2021

Hussars! Hussars!

Last time we set up the Austrian cavalry raid on Prussian-held Piesport in my 'Soldier King' 7YW campaign; so let's see how it turned out.  I used Bob Cordery's 'Portable Napoleonic Wargame' with my own home-grown 7YW modifications, and some tinkering with the close combat rules based on modifications by Mike Lewis. 

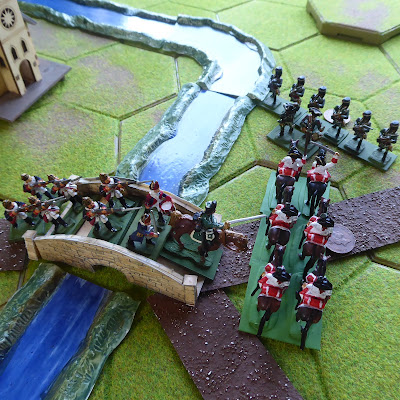
where we left off - first combat
 

We left the game at Turn 4, as the leading squadron of Grenze Hussars charged over the bridge  and crashed into the Prussian Fusilier battalion.  The dice were rolled, and the Fusiliers ( helped by the presence of their commander, Oberst von Fruhling ) came out on top. The Hussars  took a 'retreat' result and were thus repulsed by the steady Fusiliers, and back over the bridge they went. To add to their discomfort, the Prussians' activation phase came next, and the Fusiliers gave them a musket volley for good measure,  and took 1 SP: not the best start for the dashing Hussars. Meanwhile, the Prussian supply convoy with its escorting von Kleist Frei Korps battalion  plodded warily along the road towards safety.. and realised that 3rd Squadron Grenzers was in front of them. 

trouble for the convoy?
 

Next turn, Von Fruhling  won the initiative roll for first activation , and his trusty Prussian foot used musketry to good effect again - both Hussar units forced to retreat further by steady fire from Fusilier and von Kleist battalions.  The Austrians rolled hopefully for their next unit's arrival - and scored a '1' -  their comrades must have stopped to water the horses..


A different approach from the Grenzers

Having failed with a dashing charge on solid Prussian Fusilers, with no reinforcements nearby,  and  no way of getting around the enemy flank,   the 1st squadron Grenze changed their approach. They dismounted, and prepared to use their skirmishing fire to pin down and annoy their opponents ( handily, when I bought the figures from Eric Knowles colleciton, the Austrian Grenze Hussars had both mounted and dismounted contingents - at last, they can be used properly! ). And so commenced a firefight across the river,  Prussian volleys versus a 'popping fire' from the Grenzers,  the Fusiliers getting the best of it, repeatedly hitting and forcing  retreats on the Grenzers, whose own shooting was distinctly lacklustre. 

Convoy escort outflanked!

On Turn 6, the next Austrian unit failed to arrive yet again, but 3rd Squadron Grenze Hussars (though raw recruits)  used their speed and the cover of the woods to surprise  von Kleist foot with a flank charge - and the dice were with them, von Kleist losing 1 SP.  The men of the Frei Korps tried to stand and fight in their turn, but were  disadvantaged by losing the first round of melee,  and were forced to retreat, deserting  the precious wagons!  The Hussars gleefully fell back and captured the wagons, shrugging off a long-range volley from the dispirited von Kleists.

Austrian Cuirassiers charge..
 

Further good news for Austria, as the 3rd Hussar squadron began escorting the captured wagons away. Finally on Turn 8 their next unit (of newly-raised Cuirassiers) arrived on the table, closely followed next turn by the last cavalry unit,  2nd Squadron Hussars.  The Cuirassiers were keen to make up for their later arrival,  immediately charging the unfortunate von Kleist battalion in the flank as they made for the bridge. The dice rolled - a draw - von Kleist held steady.  The Cuiraissiers charge had brought them next to the bridge, and von Fruhling saw his chance - 'My Brave Fusiliers - charge!' The Fusiliers swarmed over the bridge, took the Austrian Horsemen ( already embroiled in combat with Von Kleist ) in the flank, and took 1 SP off them.  This put the heart back in von Kleist, who fought back ( and rolled a 6 to the cavalry's 2 ), and took another 1SP from the Cuirassiers.  Being a raw unit, the Cuirassiers onlt started with 2 SPs - so they were destroyed, on their first turn of combat!   A bitter blow for the Austrians, and at the end of Turn 9 their losses were 3SP to Prussia's 1 SP. However,  those captured wagons kept plodding away, under escort..


...but meet their Fusilier-shaped doom

Over the next few turns, the stout  Prussian infantry kept up their fire against 1st and 2nd Grenze Hussar squadrons, but could not prevent the supply wagons being shepherded away: and I had decided that if the wagons were captured and escorted off the table, each one would cost 1SP loss to the Prussians.  


Supply wagons hurried away

This was their downfall, hastened by the dismounted 1st Grenzers finally managing to shoot straight and take 1SP from the Fusiliers - this left the losses  at end of Turn 12 as Austrians 3SP, Prussians 4SP , and Prussian exhaustion point was reached. Defeat loomed  for von Fruhling. Sadly he ordered his men to fall back, the von Kleist battalion almost reaching the bridge - only to be charged in their flank by the fresh 2nd squadron of Hussars!  The Frei Korps were forced to retreat, whereupon the Hussars followed up, and inflicted a further  1 SP loss. To add insult, 3rd Hussar squadron, returned from escorting wagons, piled in and charged von Kleist in the rear! But the dice were with the Prussians (who had been joined by their commander), and the combat was drawn. With great relief, the Prussians won the initiative roll on Turn 14, and the battered von Kleists made it across the bridge to safety, while their Fusilier comrades gave covering fire, taking 1 SP from 3rd Hussar squadron. 

The last charge at the bridge
 

And there it ended, the Austrians deciding to retire with their prizes, not fancying further Prussian musket vollies.  Losses were Austrians 4SP, Prussians 5SP,  thanks to the capture of the supply wagons.   But the Austrians had lost a vital part of their force,  the newly-raised Cuirassiers being destroyed, and thus removed from the campaign game. The Prussian infantry had acquitted themselves well, apart  from  the loss of their vital supplies. They may be hungry, but they are still in the game!  

Given the small forces and the lack of  'balance' in them, this turned out rather an intriguing game; I think largely due to the fall of the dice, which kept half the Austrian cavalry force off the table for no less than eight turns.  Perhaps it was harsh to penalise the Prussians so heavily  for the capture of the wagons - with their exhaustion point at 4SP, it only took a loss of 2 SPs  in addition to the wagons to defeat them, which was perhaps too easy.  But were  they were too timid? Perhaps the Fusiliers should have taken the offensive rather than sheltering behind the bridge?  I was pleasantly surprised by how challenging the game was for both sides, and how it wasn't, as I had feared, all over and done with in a few turns.  With a little thought, and the interesting way the dice seem to help things along, even a small and limited  game can be a bit of a nail-biter! 

I hope this has been interesting and fun to read, as it was to play. I feel the result favours the Prussians in the overall campaign, and that a climactic 'big battle' may be approaching. We shall see ; meanwhile keep well, and safe, everyone.

Thursday 22 July 2021

Here come the Cavalry!

At last, back to my 'Soldier King' Seven Years War campaign, and the cavalry raid on Piesport that resulted from the recent map moves.  Four units of Austrian Cavalry are about to  descend upon the junction and river crossing town, which is held by two rather lonely units of Prussian foot. 

The Hussars are coming..

How to make an interesting game out of a very 'asymmetric' (and quite small)  pair of opposing forces?  I decided to use Bob Cordery's 'Portable Napoleonic Wargame' , with my home-grown 7YW adaptations, and so  those forces became : 

Prussians  : 

            Oberst von Fruhling :   3 SP 

            One battalion Fusilers,  rated Average , 4SP 

            One battalion von Kleist foot,  rated Average, 4SP 

            Two supply wagons 

             Total : 11 SP,  Exhaustion point 4 SP

Austrians: 

             Oberst  Knurrer :  3SP 

            Two squadrons Grenze Hussars, rated Average  each 3SP

            One squadron Cuirassiers , rated Poor ,  2SP

            One squadron Grenze Hussars, rated Poor , 2SP. 

            Total :  13 SP,  Exhaustion Point 5 SP. 

( I decided that for such small forces the commanders would be quite 'junior' and therefore only worth half the normal 6SP. )

Each side has its challenges : the Prussians could just hunker down in the town and be untouchable, so they have to be given a reason to be out and about. The Austrians could just sweep in, line abreast, and ride 'em down, so they have to be strung out on the road, at least, and not certain of timely arrival. 

So I decided that the Prussians would happen to be escorting their regular supply wagon convoy into town that day.  The Von Kleist foot would accompany the wagons, which would enter from the Northern road;  meanwhile the Fusiliers would guard the town and bridge. There would be some uncertainty over the arrival time of the convoy - a die roll would decide when it arrived on-table, with a 5 or 6 needed on turn 1,  4/5/6 on turn 2, and 3/4/5/6 on turn 3 or later. The wagons would aim to reach the bridge and cross into the town and safety - presuming that the bridge  was still in friendly  hands when they arrived!

Meanwhile the Austrians would enter from  the South-Eastern road, but would also not necessarily be punctual : again on turn 1,  a roll of 5 or 6 would be required for a unit to enter, then 4/5/6 on turn 2, and 3/4/5/6 on turn 3 or later - and only one unit could arrive each turn.  I decided in advance the order that the squadrons would arrive. In the hurry along the roads, with some units of lower quality or less experience, they may have  become somewhat separated. In this way I hoped to inject some random chance into both side's situation.     Finally, regarding  the wagons : if captured by the Austrians and escorted off the table at the Austrian entry point, each wagon would cause the loss of  1 SP  to the Prussians. 

And so it began - or rather, it didn't. On Turn 1 the Prussian Fusiliers kept a watch from their sentry posts, looking forward to the arrival of the convoy with welcome supplies and news, but also alert to the rumours of the dreaded enemy Hussars in the vicinity.  But both sides rolled a '1' for unit entry, so nothing happened!  Oh well, Turn 2 : Prussians rolled '1' again, no supply train. But the Austrians scored a splendid '5', heralding the clatter of hooves and the arrival of 1st Grenze Hussar Squadron on the South-East road. Prussian sentries couldn't miss that..

Arrivals - that convoy is rather late
 

Turn 3 came, the Austrians rolled high again, and their 3rd Grenzer squadron ( an untried, new-raised unit ) appeared, while the first squadron made all speed for the bridge. Prussians finally got their convoy onto the table , with  Von Kleist foot leading it, while von Fruhling in the town chivvied his Fusiliers into firing line, covering the bridge.  And without further ado, on Turn 4, 1st Grenze Hussars put spur to flank, and charged over the bridge! 

Grenzers charge!
 

So, first combat - how will it go? Will the Hussars sweep all before them and capture the bridge, or will the Fusiliers hold their nerve and inflict a bloody repulse?  We shall see.  'Tune in next time,  folks...'

This would be too long a posting if it covered the whole game, so we'll be back next time with the conclusion.  Until then keep well, and safe, everyone.


Friday 9 July 2021

More Italian reading, with some help

Briefly, back to the 'D-Day Dodgers, in sunny Italy': I am trying to soak up some of the atmosphere, through reading, of the Italian campaign of 1943-45.  Recently the  Naval and Military Press had one of its periodic and very tempting sales - and I was indeed  tempted.  I acquired the four books you see below for about £20, which I count as a bargain for a total of 800 pages and perhaps nearly as many 'rare photographs from wartime archives'.   

All from the 'Images of War' series by Pen and Sword, we have three by Jon Diamond (  'a kidney specialist in the USA with a deep interest in the Second World War' ) and one - 'Monte Cassino' -  by Jeffrey Plowman ( 'a research biochemist by profession, and he has had a keen interest in military history for over thirty-five years' ).  as many will know, the USP of this series is the numerous contemporary photographs, and in that respect I think they are really interesting, the pictures give a  great panorama of the troops, the  equipment and vehicles they used, and the terrain they fought in. Admittedly this is very largely from the Allied point of view, but plenty of German kit appears, albeit often when wrecked or captured.  It's good to see the polyglot range of gear that was in use, the multi-national nature of the Allied forces,  and especially to see the landscapes that they operated in. 

Is the text only secondary? Well, maybe slightly, but so far ( I am almost at the end of the first book - Salerno to the Gustav Line ) it gives a reasonably clear and brisk narrative of the campaigns, without excessive detail, and I'm grateful for that at this stage.  A typical chapter starts with about 10 pages of text outlining the progress of the armies, followed by perhaps 30 pages of photographs, the latter having quite large captions which tend to reinforce the main text.

I've always struggled with campaign narratives, due to all the place names - there are never enough maps with enough detail in such books to be able to 'follow the action'.  The maps in this first volume aren't bad at all, with usually one at the start of a chapter ( so we have a couple for the Gulf of Salerno area, and one covering the whole width of the peninsular and the advances October 1943 to January 1944 ) but  there are always names in the text that are not on the maps. So, I have invested in visual aids.   

The W.H. Smith stationery and bookshop chain is a bit overlooked these days, but maybe unjustly - I went to my local ( not large ) branch in Sudbury, and found a pretty good selection of maps of other  countries - plus impressively, a full set of Ordnance Survey Landranger maps of the UK.   

Amongst all those, I found 1:400,000 ( 1cm to 4km ) scale Michelin series maps ( 'carta stradale e turistica' )  of South and Central Italy - just the thing. Maybe they had plenty in stock because  not many people are planning driving tours this summer.  Just the right sort of scale, most of the places named in the book are indeed shown on the maps.

So, equipped with these, I can read the books and (mostly) keep up with the locations on the maps. This I find much better - I think without a decent map, the narrative tends to just become a bit of a blur when you don't have an idea of the places mentioned. I really don't know  why I didn't think of this before - Michael Howard's history of the Franco-Prussian War is still a painful memory.   I'm not quite at the stage of making little flags on pins to stick in the map and indicate the different formations - but can it be far away? 

I rather look forward to some summer weekend afternoons sat in the garden with books and maps - if we actually get a decent summer here, which at the moment seems a bit doubtful.        

Salerno - where the story starts

This is a bit of an interim posting, sadly not a lot of hobby activity has been possible recently owing to various real life stuff,  but I hope to get back to the 7YW Campaign quite soon, that cavalry raid scenario needs to be played out. Hopefully I can report on that soon; in the meantime, keep well, and safe, everyone.