I've had a bit of a re-think.. In my last post, I set out the likely forces involved in the upcoming battle in my 'Soldier King' campaign, with the Prussians attacking their Austrian foes in defensive positions at the town of Zouache. I had established that I have sufficient troops to portray the opposing armies in Bob Cordery's Brigade Level 'Portable Wargame'. All well and good, BUT what I have been worrying about is the small size of battlefield I can use, relative to both those army sizes, and also the topographical layout of the area to be disputed.
I think I should show the campaign map, to illustrate my concerns. It looks like this:
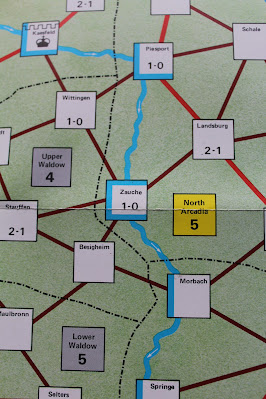 |
| Zouache: a river runs round it |
The Austrians are of course positioned at Zouche. The Prussians have their infantry and guns advancing down the road from Wittingen in the North, while their cavalry has swung around to the West and is approaching from Stauffen. As you can see, the town is in the bend of a river - so there must be a bridge into the town on each approach road, which the Prussians are going to have to secure. It's the combination of river, two bridges, and town that I fear will make things difficult to fit into a 9 by 9 grid. I had a go at a layout:
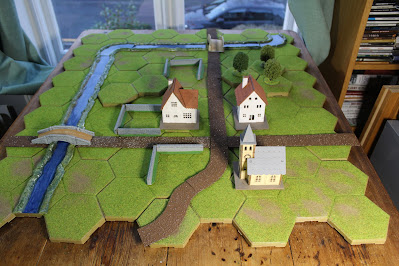 |
| Terrain: first draft |
Hmm... I can fit the two bridges and the river in, with a bit of distance between so the defenders are stretched a little by the flanking cavalry column. But there's no space for the approach: if the Austrians contest the bridges, battle will be joined immediately and all the fighting take place at the edge of the table, and being pretty static too. I wondered if the Prussian cavalry might be assumed to have rushed the Western bridge, allowing a bit of manouevering once across, but that seems a bit unfair on the defenders - who are after all supposed to be 'entrenched'. If I put the river and bridges closer to the centre of the table, then maybe there's not much room for movement once the bridges have been crossed - they will be too close together.
I think the problem is maybe that I am trying to cram too many troops and too much action into a small space, and it's just going to bog down. Thinking time..
One option might be to 'mini-campaign' it. I did this quite successfully before, at Rahden earlier in this campaign. Draw a map of the general area, encompassing multiple tables worth of terrain, and use map movement to determine where and when contacts between opposing forces occur, transferring to a table when battle is joined. It worked quite well for Rahden, and also reminded me of Charles Grant's system used in 'Wargame Tactics', where the initial moves of larger tabletop battles were made on maps, allowing an element of pre-game manoeuvre and surprise. However, I think in this case there's less of a case for map movements, as the position is fairly well decided already : the Austrians are pretty much dug-in at the town, and the Prussians are attacking from two directions, already obvious. Austrian cavalry could be sent out to harrass the approaching Prussians, but that's about the only map-movement option, really. Hmmm...
So my next idea is to address the issue of numbers of troops and available space : I can't increase the space available, but maybe I can change the scale - 'zoom out', so to speak? Maybe what I need is for the table to represent a larger area, so the troops are able to fit into less space, not move so fast across the table, and not shoot so far, as they do in the Brigade level game of The Portable Wargame. And of course, I need look no further than... the next chapter of Bob's book 'The Portable Napoleonic Wargame'! Here we have the Division level game, and I think it might just do the trick. It allows two infantry units (notionally regiments, in a brigade ) to occupy the same grid area, and they move and shoot over shorter distances. The forces available would translate into two or three infantry brigades and one or two cavalry brigades for each side (plus artillery units), which would seems fairly manageable and hopefully make the table a bit less crowded.
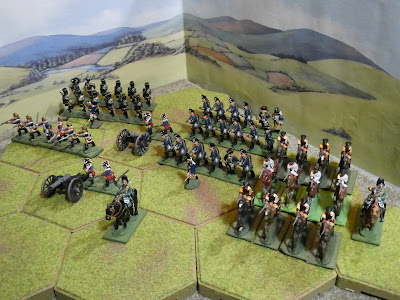
So, let's see how the forces might now look - first the Austrians:
 |
Commander - General Dachs : 6 SP
Botta d'Adorno Brigade ( 3 SP )
- Three regiments Botta d'Adorno Line Infantry, rated Average, each 4 SP
Grenzer Brigade ( 3 SP )
- Two regiments 'Grenzer' foot , rated Poor, each 3SP
Erzherhog Ferdinand Cuirassier regiment,. rated Poor, 3SP
Grenze Hussar brigade ( 3 SP )
- Two regiments Grenze Hussars, rated Average, each 3 SP
'Schwarzen' Hussar Regiment, rated Inferior, 2 SP
Artillery battalion , rated Average, 2 SP
Giving a total of 46 SP , and Exhaustion Point reached at a loss of 16 SP.
And the Prussians:
Commander - Generalleutnant von Gehirne : 6 SP
44th Fusilier Regiment, rated Elite, 5 SP
Jaeger Brigade ( 3 SP )
- Three regiments Jaegers ( fighting as Line infantry ) , rated Average, each 4 SP
Von Kleist Brigade ( 3 SP )
- Two regiments von Kleist Frei Korps, rated Average, each 4 SP
Heavy Cavalry Brigade ( 3 SP )
- Three Regiments Cuirrassiers, rated Elite, each 5 SP
One Battalion Field Guns and crews, rated Average, 2 SP
One Battalion Howitzers and crews, rated Average, 2 SP
Making a total of 59 SP , and Exhaustion Point reached at a loss of 20 SP..
It's interesting that the Strength Points values of the armies have increased by about a quarter, partly at least due to the allocation of points to the Brigade commanders. Movement and firing distances are slightly shorter than in the 'Brigade' game, and two regiments can occupy one hex - so the my limited table space should feel a bit more spacious for the forces involved.
Now I just need to figure out the terrain - which still needs some hard thinking, I reckon, and battle may commence. But it's past my bedtime, so that will have to wait for the next post. With apologies for the slow progress on this, due to our old friends 'time and space, dear boy..' ( just work and domestic duties, really - and some January/ Pandemic ennui, I think ). I am very aware that this has been very slow - can't help comparing with the fantastic amount of work put in by Nundanket on his planned Hohenfriedberg game - now that's how to prepare for a battle!
I will try to be a bit quicker with the next post, which may even see the forces engaged. Meanwhile keep well, and safe, everyone.
Thanks for the nod David. I’m not sure my case is a good example- my activity level is even lower. It seems we’ve both had our share of analysis paralysis!
ReplyDeleteThank you, I was really impressed by the thoroughness of your research! Hopefully it's quite useful to do this kind of 'thinking aloud'. Hope the game goes well!
DeleteI look forward to seeing how you resolve the terrain issue. The look of the table was great however, most effective.
ReplyDeleteThanks Alan, I hope it won't need too much more head-scratching to work out a suitable terrain layout.
DeleteGlad you like the general look, I am keeping it fairly 'old school', funny how that just happened without a particular design!
You could take the row of hexes on the right of the photo and add that to the left, and take the bottom row and add that to he top. This would give more room.
ReplyDeleteAlternatively, move the BUA back to the rear row of hexes and assume what's on table is outskirts of a bigger BUA.
These will give more room.
In the game, the Prussians would have to attack over a river giving serious minuses to the combat role, in addition to any minus for entrenchment. The BUA wouldn't feature in the combat.
Neil
Thanks Neil, all good points! I had realised that in Soldier King there is a significant penalty for attacking across a river, plus the defenders are entrenched.. I think the Prussians may have been too confident! Terrain suggestions are useful, thanks, agree the BUA can be moved back a bit, and the main fight can be over the river crossings. We'll see...
ReplyDeleteSimilar to my thoughts: scrolling the table 'down' one, and two hexes to the right. Gives you 3 hexes approach from the west, and 2.5 hexes from the north.
ReplyDeleteThere may be another alternative worth considering. That is to run the river down hex edges. It can be done. Where the river runs 'against the grain' (i.e. east-west) it may be laid down on alternate 'hex-halves'.
It's a method I've used, and it saves having to 'waste' valuable grid cells on rivers. I've not used it in games involving combined land and water-borne elements, but I reckon it would work.
Forcing and defending defiles such as bridges is a whole different challenge from the usual war games battle!
Cheers,
Ion
Thanks very much, Ion! I think those are all good ideas, and I will try to apply them. I think maybe the essence of this battle is indeed the river crossings and whether they can be forced or held, we shall see..!
Delete