Friday, 24 February 2023

Darkest Day: one year on


Maidan demonstration, Kyiv 2014
 

Exactly one year ago today Russian forces invaded Ukraine. Of course I sprang into 'action', and wrote a blog post, entitled  The Darkest Day. There didn't seem much else to be done, and to be honest, at the time the outcome seemed inevitable, that outcome being the rapid conquest and subjugation of Ukraine, and its elimination as an independent nation. Quite surprisingly, that blog post became my 'most read' ever ( with the exception of  one other post that had been previously  'nobbled' by a bot attack ).  I had expressed myself pretty strongly, and I wondered if I would attract hostile reactions, even attacks, on the blog - I'm glad to say that didn't happen, and there were many supportive comments.   I've just been re-reading the post, and I stand by everything I said. 

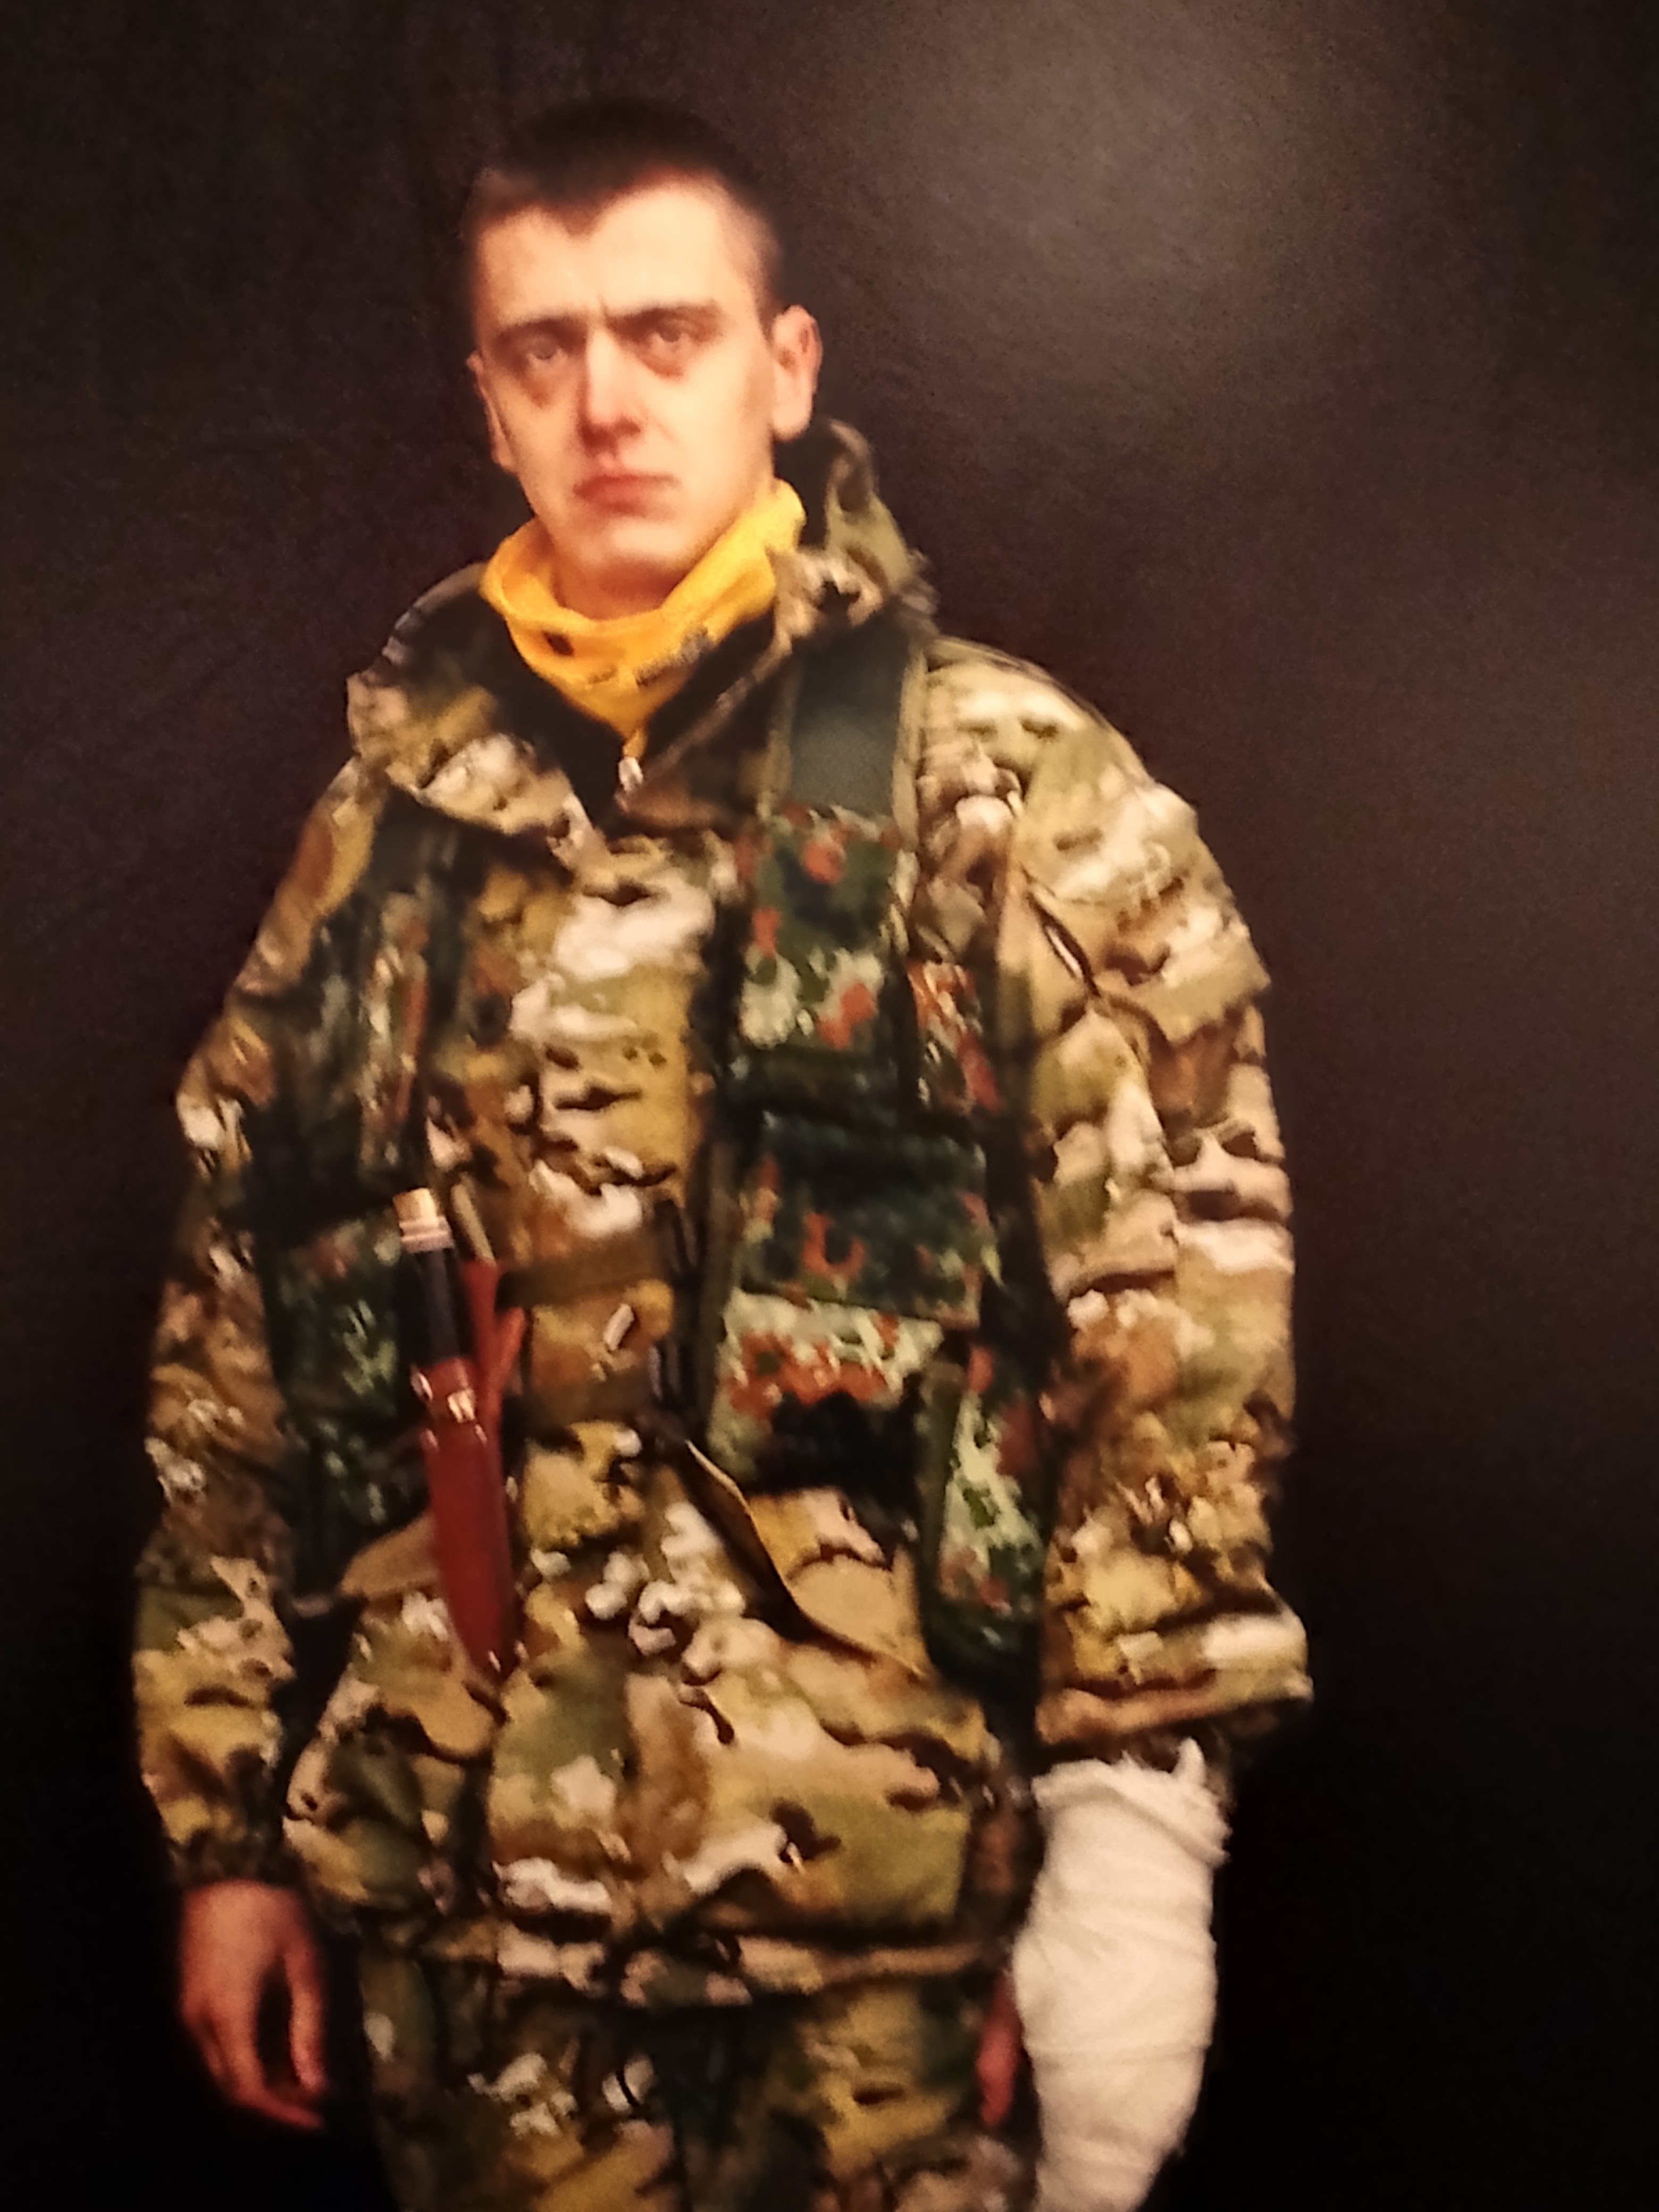
Pro-democracy protestor Yevhen Shulga, 2014
 

Of course there was a very unexpected outcome: the Russian invasion failed. Ukraine's defence forces fought bravely and successfully, and  gave Putin a massive shock; Western nations have rallied in Ukraine's support and provided arms and equipment to Ukraine.   Despite many thousands of casualties both military and civilian, despite thousands of war crimes inflicted by the Russia's deliberate targeting of the civilians they claim to be 'liberating',  Ukraine fights on, has had victories, and has regained territory. The cost has been terrible, but I entirely understand Ukraine's willingness to pay that cost and keep fighting, and  I think we in the West need to support our governments in supporting Ukraine. Freedom is at stake; Putin now says he is fighting a war against the West, so perhaps we have little choice.

Battle damage to Ukrainian homes, 2022
 

As before, I am not going to get into nerdy discussions of the fighting and whether they should have done X, Y or Z - there are too many armchair generals already, I'm sure. But there is  of course much  worthwhile analysis available - I would highlight the Royal United Services Institute, which for example has a summary today entitled The War In Ukraine One Year On . I've also been recently recommended a 'Substack' blog ,  Comment is Freed, a joint effort by  political commentatior Sam Freedman  and his father, the military historian  Lawrence Freedman, whose recent piece The Storm Before The Calm  makes interesting reading.   Regarding the effect on those of us not directly involved in the fighting, political journalist Andrew Marr recently wrote a chilling ( but realistic, I'm afraid ) piece which should give us all plenty to consider :  The war in Ukraine will go on for years – and so will its consequences for Britain.  Also Steve Rosenberg, the BBC's man in Moscow has been consistently interesting ( and sobering for those who might think the Russian population will not support Putin ), his latest piece about How Putin's fate is tied to Russia's war raises some scary possibilities  ( civil war in a nuclear-armed power? ). 

burial of victims of Russian occupation, Bucha 2022


Yesterday I paid a visit to London's Imperial War Museum, which had advertised an exhibition of pictures by photo-journalist Anastasia Taylor-Lind. covering the period since the 2014 Ukraine revolution and Russian takeover of  Crimea,  to the current war. I used my phone to capture some of those pictures, which I include in this blog post.  They are very impressive, but I have to say the exhibition was underwhelming - there was just one small room, and perhaps no more than 20 pictures. I thought the subject deserved a much bigger effort than that - and I note that the main exhibition space in the museum is currently filled by an exhibit about computer games.  I'm not sure if this is a deliberate reflection of the priorities of the IWM management.  However, I was glad to see the exhibition and spend a little time thinking about the situation. I guess this post is also part of that train of thought. 


Yevhen Shulga, now Ukrainian soldier, 2022

I'll get back to hobby stuff next time; meanwhile I think it's worth a pause to reflect. Keep well, everyone. 


Thursday, 16 February 2023

Portable Pike & Shot: Controlling the River

 Last time, I set up the forces and table for a trial game of The Portable Pike and Shot Wargame rules variant by Alan Saunders. I have now played the game, and can report how it went - quite well, actually! 

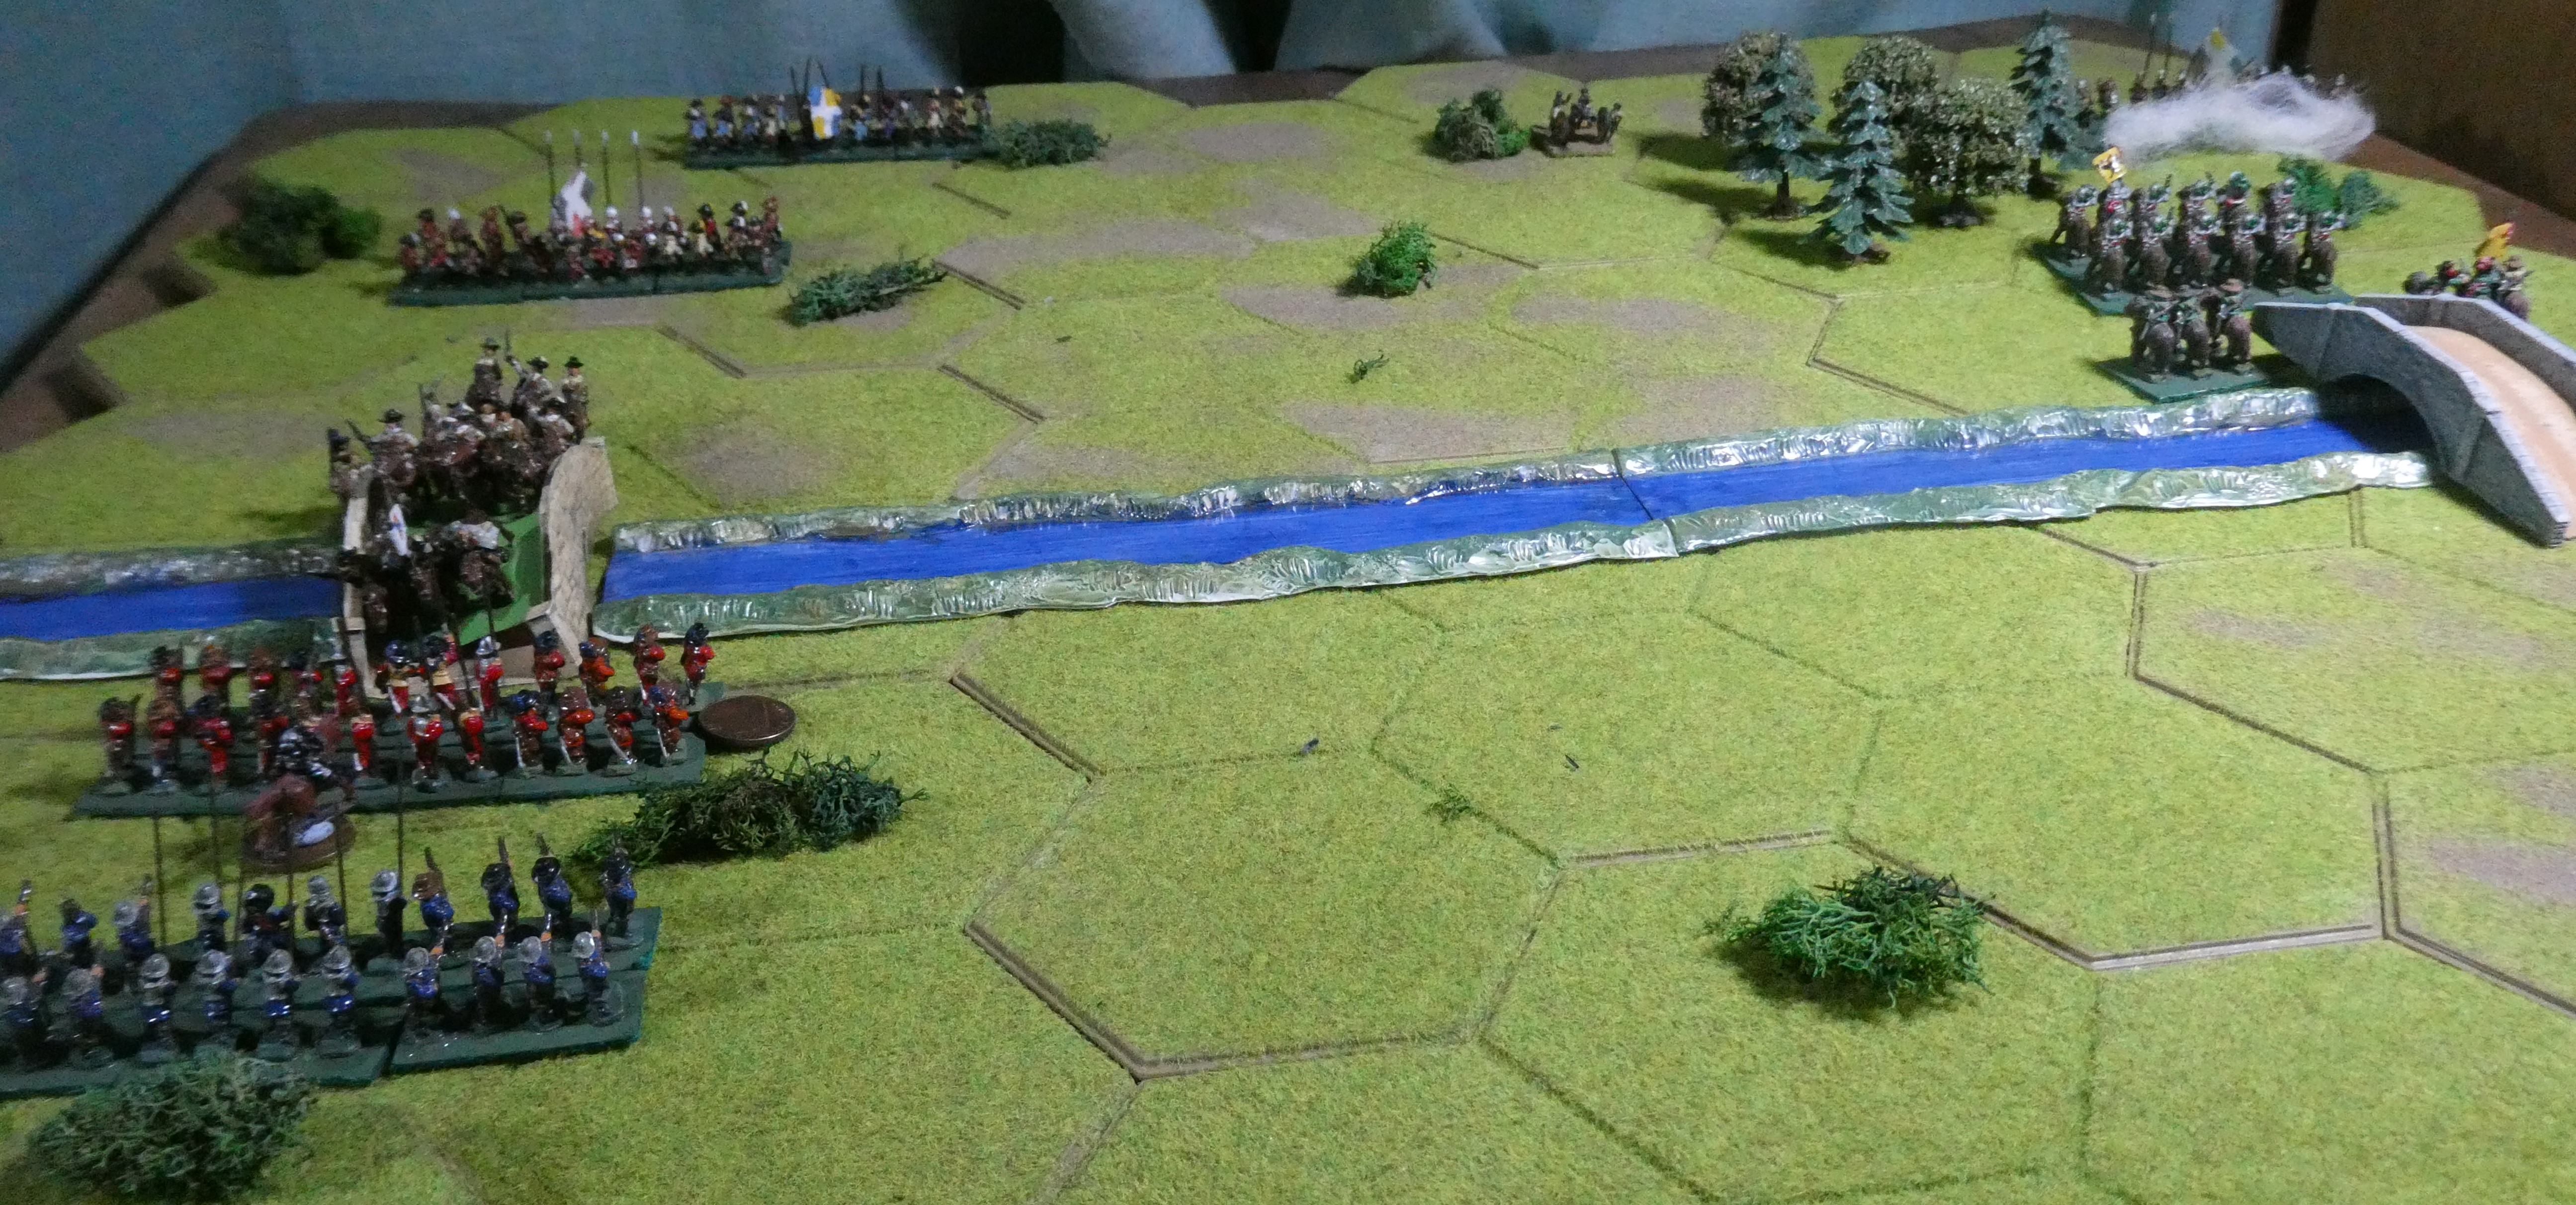
Herr General Blau's Imperialists approached from the South ( nearest camera ), and the French under General Le Rouge from the North, both intending  to seize control of two bridges across the river.  Both sides started off-table, and I decided to make their deployments quite random - I divided the table into 3 sections left/centre/right for each army, and rolled a 'D6' dice for each unit - roll 1 or 2 to enter on the left, 3 or 4 centre, 5 or 6 right - but no more than 3 units could arrive in each section.  The dice decreed that the Imperialists deployed all three of their infantry regiments on their left, with their cavalry and dragoons on the right and artillery in the centre,  while the French had two infantry regiments and their cavalry on their right, dragoons in the centre and the remaining foot regiment and artillery on their left.  So, both sides had sent strong forces to take the Western bridge, with fewer units going for the Eastern bridge, but with slight variations in the makeup of those sub-groups.  Hmm..how did the dice know that there was no bridge in the centre?

The rules decree an initiative die roll each turn, with the winning player going first and usually getting to activate more units. So initiative is quite important, and it must be said that the dice gods were on General Blau's side - the Imperialists won the initiatve on the first four turns, and in seven of the ten turns in all! Quite an advantage. By turn 2, both sides cavalry had crossed the river at their respective bridges ( French at West bridge, Imperialists at East bridge ), and 'contact' was made as the French horse charged into oncoming Imperial foot, specifically the Roter Mantel (thanks, Google translation) regiment. Close combat under these rules has a slightly amended system to Bob Cordery's original Portable Wargame - each side rolls a dice (with modifiers, e.g. for cavalry charging, or foot with pikes)  'to hit', and the highest modified score  gets to inflict damage first if hits have been achieved.  Both sides could suffer hits, of course. This seemed to work fairly well, avoiding multiple rounds of 'no effect' combat. In the first fight, the Imperial redcoats took a hit and suffered a loss of 1SP - first blood to the French.   At East bridge, the French Regiment Vert opened fire at the Imperial cuirassiers - with no effect.   

Turn 2 : Horse vs Foot at both bridges
 

On Turn 3, the Imperial foot at West Bridge tried to push back the French cavalry, but everything went wrong for them - the cavalry kept rolling sixes!  Roter Mantel regiment was forced to retreat, and the cavalry pursued (it's mandatory for horse to follow-up if close combat opposition retreats), crashing into regiment  Blauer Mantel, beating them and forcing them to lose 1SP rather than retreat and be pursued again! So much for the Imperial counter-attack.  Finally the 'Blaus' steadied things on their own activation, with a volley of musketry forcing the rampant cavalry to retreat back to the bridge.   That didn't stop the horsemen, though - in the French turn, they charged again! But the dice were not with them this time, and they 'bounced off'. They had thoroughly unnerved the Imperial infantry, and  bought time for French infantry to come up to West Bridge.  At East Bridge, the  French regiment Vert, facing enemy cavalry and dragoons, wisely took to the cover of wood, while their own dragoons moved up in support.

The clash at West Bridge continued the following turn, and the French cavalry's luck held under fire from Imperial muskets and newly-arrived cannon ( artillery are not very effective unless firing at close range - 2 hexes or less ), then charging yet again and taking anoother SP from Blauer Mantel regiment. In the centre, Imperial cavalry gave a nasty shock to the French dragoons ( which count as foot in combat, but of course have no pikes )  - 1 SP loss. At the end of Turn 4,  losses were French 1SP, Imperials 4SP, mainly due to those rampaging French cavalry!  Going well for the French, but the Imperialists had East Bridge, and three regiments of foot must eventually see off one cavalry?

Grinding on at West Bridge: Cavalry clash in the centre
 

Turn 5 - finally General Le Rouge won the initiative, and used it well. He pulled his cavalry unit back from the bridge and personally led it to the centre, promptly crashing into the Imperial cavalry, pushing them back and following-up. At West bridge,  regiment Rouge charged in, but were stopped by Imperial Blauer Mantel, losing 1 SP.  On the Imperial turn that fight continued, both sides losing 1 SP rather than retreat, both determined not to fall back from the bridge - desperate stuff. The Imperial Horse continued to be pushed back by their French opponents, and were now back to East Bridge.

And so things continued for another two turns, with a grinding fight between infantry regiments at West Bridge - French regiment Rouge reduced to 1SP and falling back, replaced by their regiment Bleu comrades, and neither side giving ground, Meanwhile the opposing cavalry duked it out in the centre. Losses mounted fast - by end of Turn 7,  losses were 7 SPs each ( both sides having  'Break Point'  at 11 SP ).

Infantry fight at West Bridge..
   

..and Cavalry fight in the centre
 

Turn 8 brought a twist - the initiative die roll was tied,  and in these rules that means a 'Random Event'. A couple of die rolls determined that this would affect the French, and the result was the other player picks one of the affected player's units and performs an action with it, including engaging in combat. It will still only shoot at or charge enemy units, but the decision to do so is in the hands of the player making the move.  So, one French unit would 'go rogue' for a turn;  I chose to make foot Regiment Bleu retreat a full move from West Bridge. Presumably the desperate fight had temporarily broken its morale.. Of course this 'opened up' West Bridge, and the Imperials promply won the re-roll for initiative and poured their infantry over the bridge, attacking the weakened  regiment Rouge - and destroying it!  The only consolation for the French was that in the continuing cavalry fight, the Imperial horse were reduced to only one remaining  SP, and their hold on East Bridge looked very shakey.  

Turn 8: 'Random Event' gives Imperials the bridge 
 

Next turn the Imperial infantry ( regiments Roter Mantel and Gruner Mantel ) kept pushing their lone French opponent (regiment Bleu) even further from West Bridge - bad news for General Le Rouge. However, in the East he threw everything at the Imperial cavalry -  his Regiment Vert charging out of the woods to support his cavalry - and finally broke them! Thus East Bridge taken by the French, to balance events to the West. At end of Turn 9 losses were  French 9 SP and Imperials 10SP -  only 2SP and 1SP from break points, who would crack first? 

Turn 10 was the end - and General Le Rouge's dice won the initiative, allowing him and his cavalry  to gallop over East Bridge, then swing West to threaten the Imperials at the other bridge from behind. Over in the West, Regiment Bleu steadied their muskets and delivered a volley at  Gruner Mantel regiment - and took 1 SP from them. Not much effect on a relatively fresh unit, but crucially it meant the Imperialists reached their 'Break Point' of 11 SP losses.  As such, on their turn they must take a 'Break Test' - a D6 roll, with modifiers relating to possession of objectives ( even, with both sides holding one bridge ) and proportion of units lost. The modifiers looked good at 'Plus 2' with a modified 4 or more required - but Herr General Blau  rolled a one!  His weary men's morale had clearly collapsed as the French Cavalry ran amok behind them - his army was deemed Broken, and victory went to the French!  Losses at the end - French 9SP, Imperial 11SP. 

Turn 10 - French Cavalry rampant (lower right) 
 

I really enjoyed this game, and I think the rules went pretty well.  I particularly liked the way the distinction between shooting and close combat is handled - with units adacent to each other able to simply shoot, but shooting having somewhat less effect, and close combat is the way to force a decisive result and to take ground. The scenario obviously tended to funnel the action into two 'bottlenecks' at the bridges, but that added to the tension as both sides contested those bridges determinedly, unwilling to retreat. Equally I thought the 'Random Event' added a nice bit of friction, and with only one such event coming up, it didn't overly randomise the game. The 'Break Point' rule seemed good too, as reaching Break Point does not mean automatic defeat - with good die-rolling, an army past its Break Point can keep fighting.  Not so for Herr General Blau, however! 

I hope you've enjoyed my account of the game, I certainly enjoyed playing the it, and will certainly  come back to these rules. Many thanks to Alan Saunders for them,  and to  Bob Cordery for publishing them in The Portable Pike & Shot Wargame. 

Next time - well, I have a few ideas, and not yet sure which one to pursue. Meanwhile I've also  enjoyed no less than two remote games in  the American War of Independence period ( Loose Files and American Scramble )  run by the excellent Nundanket - many thanks to him and the other players.  Until next time, keep well everyone. 

Saturday, 28 January 2023

Trying out the Portable Pike and Shot

Having given my Pike and Shot armies a couple of goes recently with different rule sets and enjoyed those games, I thought I'd like to have another game in the same period. I've been reading Bob Cordery's (and friends)  book The Portable Pike and Shot Wargame, which has several sets of rules, including two variants for ECW/30YW forces. Having looked through them, I was interested by Alan Saunders' ECW variant, which seems to have some good ideas which Alan explains in his Design Notes. 

Alan's rules are strictly 'ECW', but I think they'll stretch to being used with my Thirty Years War armies representing French and Imperialists - I tend to think that by the 1640s, a lot of the features of earlier 30YW armies such as 3/4 armoured Cuirassiers, mounted Arquebusiers and larger Tercios would have fallen out of use, even if some units still carried those names. Admittedly my armies of vintage figures maybe look a bit more 1620s/1630s, but I am choosing to overlook that! 

I'm going for a simple setup, from an old favourite source: Neil Thomas One Hour Wargames. I selected Scenario 3: 'Control the River'. Neil Thomas summarises as follows The Red and Blue armies represent portions of much larger forces. Their commanding generals have ordered them to seize two strategic river corssings, as a base for future operations.   As typical for OHW, there are six units per side, which is  within my reach. It's a simple, symmetrical layout, with a river dividing the field, crossed by two bridges, control of which is the objective for both sides.  

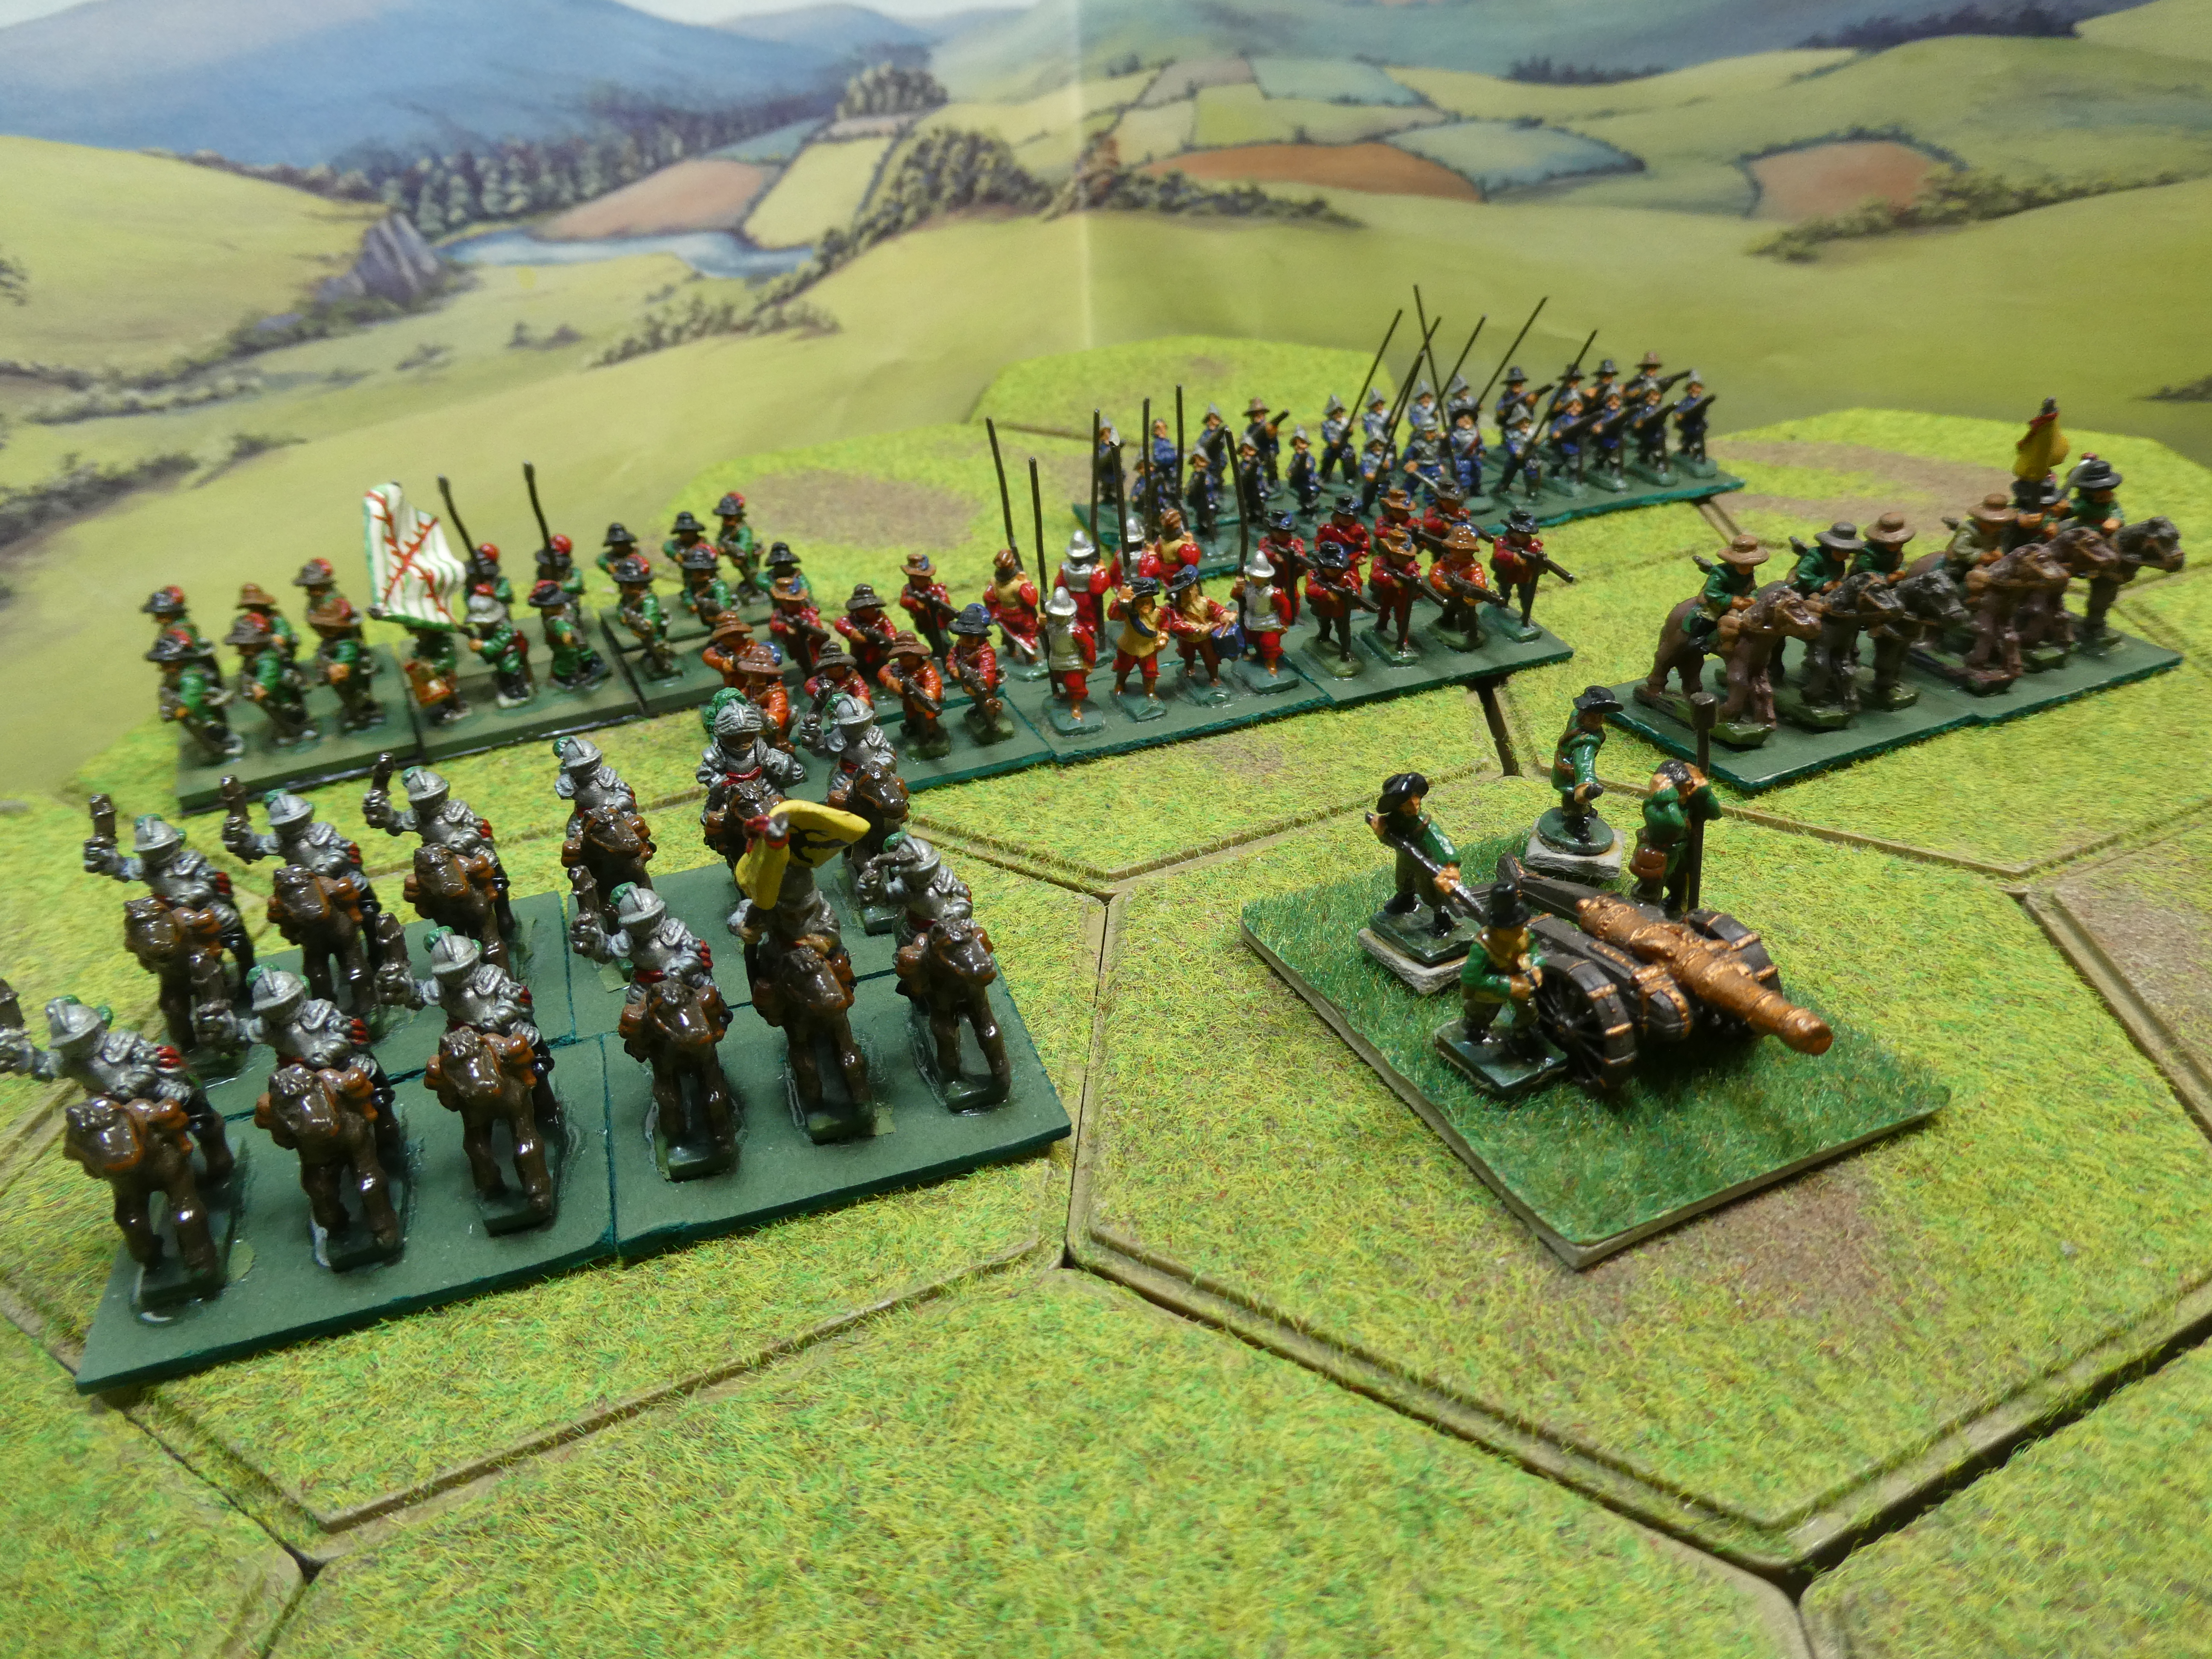
In the spirit of keeping things simple, I've also gone for symmetry in the opposing forces - which will represent the French and the Imperialists.  Here is the Imperial contingent: 


 It consists of :

        Two  Pike and Shot Infantry Regiments ( 'Grun' and 'Blau' ),  rated 'Trained',                                             each 4 Strength Points (SP) 

        One  Pike and Shot Infantry Regiment ( 'Rot'  ), rated 'Elite', 5 SP

        One unit of  Cuirassiers  ( Horse ), rated 'Trained' , 3 SP

        One unit of Dragoons, rated 'Trained',  3SP

        One unit of Artillery, rated 'Trained', 2SP  

A total of 21 SP. Alan's rules the army has a Break Point, equal to half its total SPs rounded up. So the Break Point for this army is 11 SP. When casualties reach the Break Point, the army must test each turn to continue fighting. For those interested in such things, the figures are 15mm scale and mostly from Mike's Models, Frei Korps 15 and Minifigs - as far as I remember, given they are some decades old! 

Obviously the French force is similar, though I made a slight variation in the morale ratings - all three French infantry regiments will be 'Trained', but their cavalry unit will be 'Elite'.  I have a shortage of Dragoon figures, so I have drafted in some of MacFarlane's Scots cavalry to represent Dragoons. Here is the French force


     which consists of :

        Three Pike and Shot Infantry Regiments ( 'Rouge', 'Vert' and 'Bleu' ),  rated 'Trained',                                             each 4 Strength Points (SP) 

        One unit of  Horse ( 'Turenne' ) rated 'Elite', 4 SP

        One unit of Dragoons ( 'MacFarlane' ), rated 'Trained',  3SP

        One unit of Artillery, rated 'Trained', 2SP 

Giving a total of  21 SP and Break Point at 11 SP.  Figures mostly a bit more recent, from Essex Miniatures, except the Scots and the Artillery which  Ross told me were 'old strip Minifigs' ( I think their first 15mm range ) from the late 1970s - real veterans!  

This is a simple  'encounter battle'  - at the start, neither side has troops on the table. The French represent 'Red' who will enter from the Northern ( top ) table edge on Turn 1 , while the 'Blue' Imperialists enter from the Southern table edge at the same time. It should be a nice straightforward scenario, and I hope an easy introduction to the rules.  Next time, we'll  see how it goes. Meanwhile keep well, everyone.

Saturday, 14 January 2023

Fnurban #23 Rainy Day Miscellany

The other day I had the good fortune to be in London for the afternoon, before an evening of boardgaming with friends: the only drawback being that it was a rather wet afternoon in the Great Wen. Since the gaming was due to take place in the  Borough area, what better place to visit beforehand than the nearby Imperial War Museum? 

With those 15-inch guns, this is surely the best-defended property in the city, as long as any assailant remains about 15 miles away.  I had about 90 minutes in the museum - not really enough to  tour the whole thing properly, so contented myself with looking at a few old favourites. I may not have been there since the pandemic, but I had previously seen the fairly recent WW1 gallery, which is well worth a tour.  The temporary exhibition space sounds promising in that the current show is called 'War Games' - but that is all  about computer/video games, not my sort of thing at all.  I looked in at the Lord Ashcroft Gallery and its display about 'Extraordinary Heroes' :  This display houses the world’s largest collection of Victoria Crosses, alongside a significant collection of George Crosses. Discover over 250 stories of people who faced adversity and performed acts of bravery. All were awarded either a Victoria Cross (VC) or George Cross (GC) - the highest recognitions of bravery that can be given by Britain and, for many years, the Commonwealth. On display, for each recipient, are the medals belonging them, usually with a photograph ( even for the Crimeam War awards ) and   description of their act of bravery - a high proportion  of which resulted in posthoumus awards, which was  a sobering realisation. Sadly there is a distinct  'plus ca change' aspect too, when neighbouring exhibits relate to the long-dead heroes of the Third Afghan War ( 1878-1880 ) and those recently deceased in Helmand Province.   

Prominent among the 'old favourites' is Spitfire Mk 1A,  serial R6915, which saw action in 1940 with 609 Squadron RAF and is now suspended above the main hall.


By coincidence, only a few days before I had listened to Al Murray and James Holland discussing this very machine on their 'We Have Ways..' podcast, with special guest James May They had observed that though the Spitifre is undoubtedly a visually beautiful aircraft, when you get closer to it there is a distinctly rough-edged quality to the construction, with all the rivets and panel joins -  and I had to agree with them.  Beautiful maybe, but very much still a workmanlike tool for a particular job. 

Given that admission is free, one should find a way of giving some money, even if only for a cuppa in the cafe; on this occasion the museum shop ambushed me, with a display of books in a fine new 'Imperial War Museum Wartime Classics' edition, and a 'three for two' offer.


 Oh dear, more for the books backlog pile - which is considerable and probably unmanagable.  In my defence, I have been looking for a copy of Alexander Baron's  From the City, From the Plough for a while now, and the other two also look promising - all are fictional accounts of the British Army's 1944-45 campagn in NW Europe following D-Day, written by men with first-hand experience of their settings.       

There followed a fairly short walk to a pub in  Borough Market, to meet my friends Dave ( aka  St Cyr on Wheels ), Paul and Rupert  for a boardgame evening. We had agreed to keep things simple, so Dave tried out SQPRisiko  on us -  this is basically a version of the old favourite Risk  produced in Italy, with a Roman Empire setting, some new features such as naval fleets and battles, and amphibious attacks.

I haven't played Risk in decades, but I used to love it as a child;  all that time spent during school (and college!)  holidays came flooding back, and a thoroughly good time was had (one of the players, all well over 50, and a very keen boardgamer, had never played Risk - amazing!).  The addition of fleets worked well, allowing seaborne invasions of enemy territory  - so don't leave any coastal areas weakly-defended! There are also a number of territories with neutral garrisons, which are quite strong and can be expensive to conquer - if you attack one and don't quite manage to  wipe it out, you may leave it an easy target for the next player.  I think the Risk combat system is genius, and it's fascinating to see how different playing styles work out - in our game, two players went for slow and steady build-up of armies giving strong defences and gradual expansion, while the other two relied more on rapid attacks and didn't worry too much about in-depth defence - unfortunately the latter two tended to fight each other, allowing the 'slow and steady' players to build up strength. Victory points are scored for holding the most territory or controlling sea areas each turn, which gives an idea of who is winning or losing.   Almost inevitably there was no 'finish' to the game, but when we called time Paul was winning , having built 'slow and steady' in Northern Europe, and wisely invested in some fleets in the  Channel and Biscay. Overall, I'd say the game is a nice twist on a vintage classic, I enjoyed it very much! 

Many thanks to Dave 'St Cyr' for the below picture of our game in its early stages, before Red and Blue started building big armies while Yellow and Black tore lumps out of each other..

Early stages - I am blue, building up in Iberia


That's all for now, next time back to the toy soldiers I think. I've been looking at The Portable Pike and Shot Wargame, and also Rapid Fire Reloaded - which to try next? Meanwhile, keep well, everyone.


Friday, 6 January 2023

Fnurban #22 : Does Anyone Want These ?

Hello all, I've been having a bit of a new year tidy-up and came across the following - sprues of hard plastic 28mm WW2 figures.  Freebies from hobby magazines in the past year or two - probably Wargames Illustrated. They are as follows: 

(1) Warlord Games 'Bolt Action'  Late War British and Canadian Infantry(2020), There is a code number : 4030300011. 


(2) Warlord Games 'Bolt Action' Afrika Korps (2018) Code number 4030100016.


(3) Wargames Atlantic Panzer Lehr  ( 2021 )  Code WAAWA002

There looks to be the potential to make 6 figures for each sprue - though I wouldn't swear to it, as there are just so many pieces!  I don't need them, as my small WW2 collection is good old-school 20mm, and I don't have the patience for assembling these before even getting an undercoat on them!  But of course, they may be right up someone else's street - at the very least there are lots of potential 'spares' here - and it would be a shame to just throw them away. 

SO - if you are in the UK and can find a use for any of these, please get in touch via the comments, just give me your email address ( I won't publish the comment ) and I'll be in touch to get your postal address. There's no charge, it'll only need a second class stamp so I'll cover that, just to see these go to a good home. First come, first served..  BUT as I say, UK only please, sorry it will be too expensive to   post them abroad.  Also bear in mind that I was told by a friend today ( 6th January ) that they had just received my Xmas card, which I think posted on about 9th December... so we won't assume quick delivery in the current climate. 

If you are also a blogger, I hope you can show the world what a splendid job you make of  painting and assembly, and maybe even how they subsequently perform on the battlefield.. 

I'll wait for the comment(s)  to flood in ( Mrs Trellis, are you out there ? ). Meanwhile keep well, everyone.   

*** UPDATE: I'm glad to say Mark 'Man of Tin'  has taken up my offer of these,  says he hopes to transform them into VBCW / Imaginations troops in due course this year as a small ahistorical Skirmish Force , and that  he will eventually post on his blog describing what he does with them. I have posted them off, hopefully they will arrive OK and be of some use to Mark!  ***


Tuesday, 3 January 2023

D-Day Dodgers : Operation Ponte Natale

Happy New Year to one and all.  Now let's go back to just before Xmas - 1943, that is, 'somewhere in Italy'.  British forces launch an operation to secure a vital ( yet entirely fictitious ) river crossing at Ponte Natale; German forces mount a hasty defence. 

The explanation for this: I fancied to do a quick and simple game before Xmas, and I thought it was time the 'D-Day Dodgers'  WW2 Italian campaign forces had an outing. I thought Bob Cordery and friends 'Fast Play 3X3' version of The Portable Wargame might  offer something very simple, so I consulted his recent book The Portable Wargame Compendium.  I was in luck: see page 47 for 'Fast Play 3X3 Portable WW2 Operational-Level Wargame Rules' by Mark Cordone - for fighting the major battles of World War Two.  Essentially a combination of the '3 X 3' system  and the WW2 rules in Bob's  Developing the Portable Wargame book.  That should do nicely. 

The Compendium also has a chapter containing a selection of '3X3'  terrain set-up suggestions - I chose number 20, which features a river with a bridge,  and hills overlooking them, which seemed suitably Italian and a good defensive position for the Axis forces. I kept it very simple, as you can see:

The Bridge at Ponte Natale

Armies in this variant are of 6 units plus an HQ each side, available  unit types being Airborne, Armoured, Artillery and  Infantry all with 2 Strength Points (SP)  each ,  plus some special units:  Assault Guns/Tank Destroyers, Self-Propelled Guns and Heavy Armour which have just 1 SP each. ( I am assuming that the basic (2SP) units represent Brigades, or perhaps Divisions? )  There must be at least three Infantry units in each  army. 

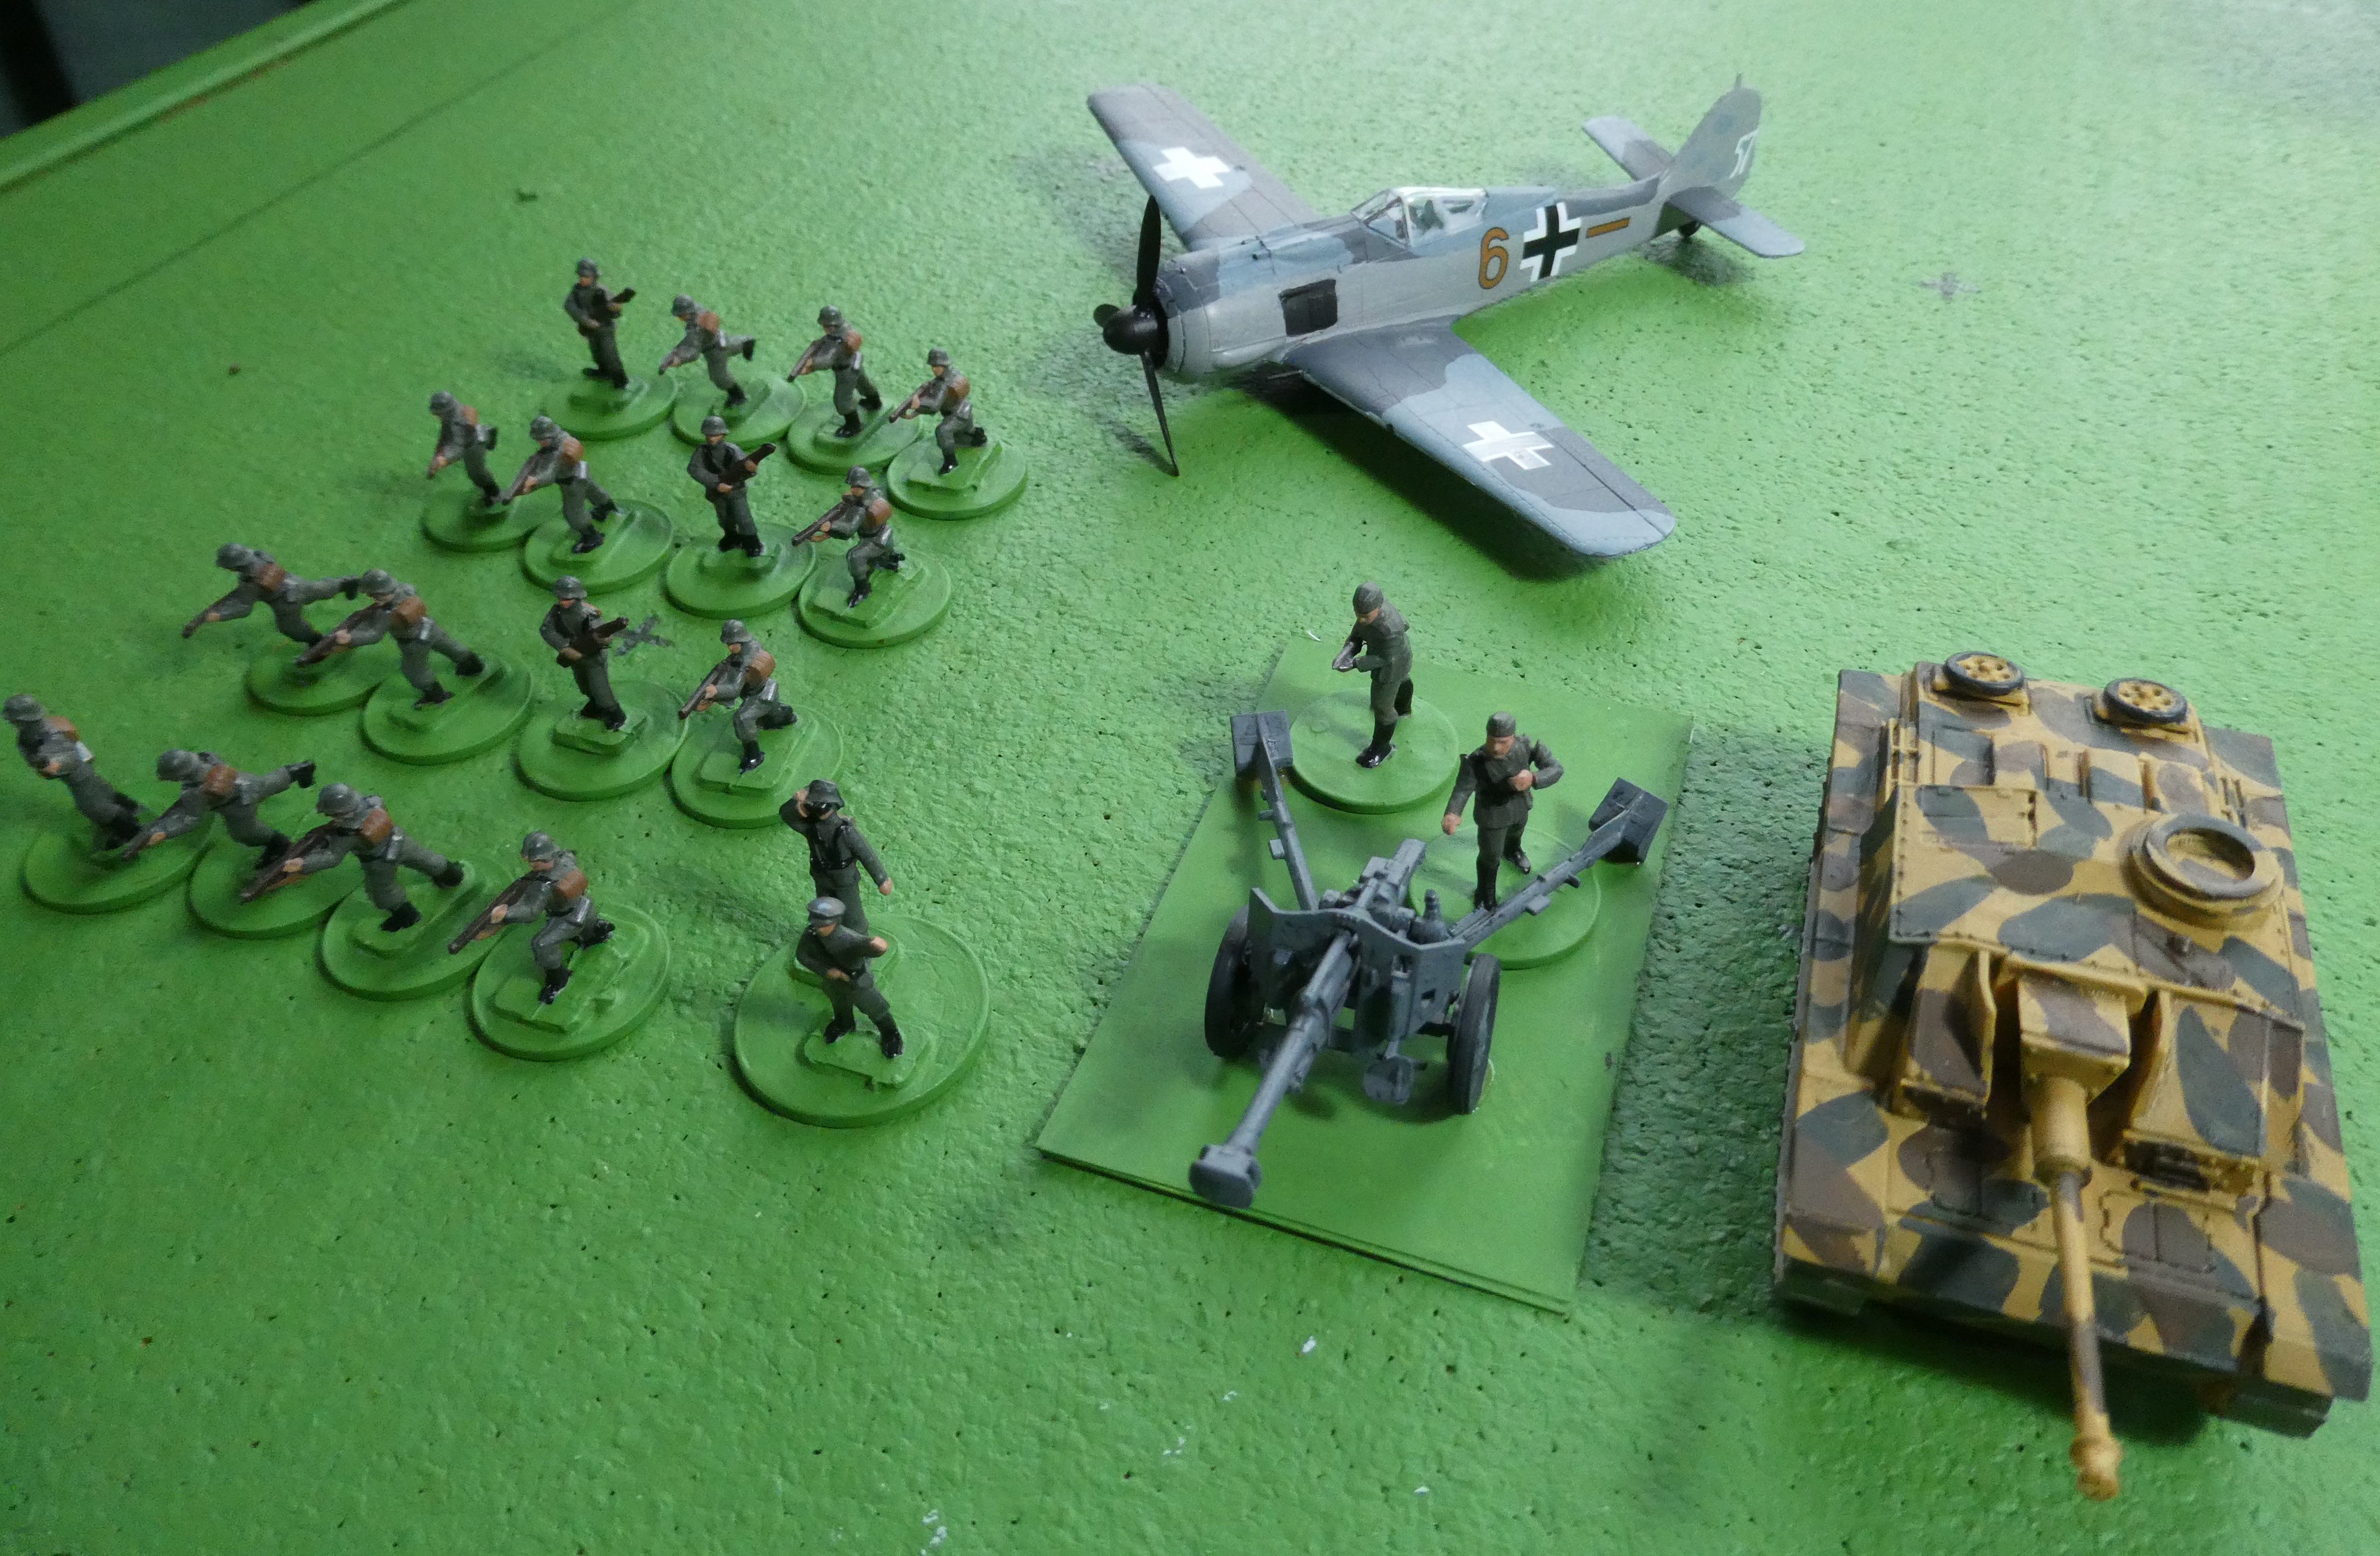
With that in mind, I selected an attacking British Force : 

General Badger and 'Badger Corps'

Three Infantry units, 1 Armour, 1 Artillery, 1 Self-Propelled Gun  : total 11 SP

and a defending German Force :    

Her General Von Kleist and Kampfgruppe Kleist
 

Four Infantry Units,  1 Artillery, 1 Assault Gun : total 11 SP.

Each side also has its HQ, of course, and the ability to conduct airstrikes, for which the model aircraft make a rather extravagant 'marker' (all that is required by the rules, simply to mark the grid area under air attack) . I decided that all units would be 'Average' quaility, just for simplicity (  if 'Airborne' had been in use by either side, it would have been only fair to make them 'Elite' ).

Allowing 6 SP for each side's HQ, the total strength was 17 SP each, therefore 'Exhaustion Point' would be reached at a loss of 6 SP. 

Deployment is Defender first, in his baseline or middle row grid areas ( or Reserve ),then Attacker in his baseline or Reserve areas only ( both sides' Artillery units are placed in 'Reserve' area  ). I duly deployed both sides: 

Iniital Deployments

Notice a single brave German infantry deployed in front of the bridge, the other three remaining behind the river. Perhaps unfortunately for the defenders, I forgot to allow any of them to be 'dug in' at the start - perhaps the defensive position was only a very hasty one, having just rushed to the area in response to the British advance! And so to battle. 

The  sequence of each turn starts with initiative die rolls (1D6) - highest roll  moves first, and the die score gives the number of units that can move. Then 'Airstrikes' : again 1D6 each, highest score gets an airstrike - if a tie, both get strikes. If one side is deemed to have air superiority, they get two dice and use the highest score - I gave this advantage to the British, as befits Italy in 1943. A nice touch was that the 'Initiative' die rolls could give a result which indicated bad weather - so no airstrikes. Then both sides Artillery get to fire simultaneously, followed by the player who won the initiative moving his units, then combat, then the other player moving, and combat again.   That's the end of the turn, and we go again for the next turn.  

Victory is achieved by one side if they can occupy one of the opposing side's baseline grid areas at the end of the opponent's combat phase - so obviously the British needed to cross the river to win. If neither side achieves victory that way, battle continues until Exhaustion Point(s) are reached.  There can also be a designated terrain objective that must be taken to achieve victory - though  in effect that would be the same, the British would need to cross the river and reach the German baseline. By default I assumed  the Germans would win if the British did not reach their baseline - it seemed unlikely that the Germans would try to counter-attack to reach the British baseline!


Airstrike! First blood to the R.A.F..

I won't give a blow-by-blow account, partly because despite the simplicity of the rules, I still managed to miss vital points on several occasions, so I may have played them completely wrong at many points! Suffice it to say it lasted eight turns, and was pretty 'ding-dong' back and forth stuff. Airstrikes and Artillery had a big role right from the start, on Turn 1 a British airstrike hit the German  infantry defending  the bridge, taking 1 SP and 'pinning' it,  only for the German artillery to mete out the same treatment to the British infantry advancing to attack the bridge, and forcing the supporting Self-propelled guns to retire!

The British made a general advance to  keep pressure on the defenders across the board, even though the bridge was obviouly going to be the focal point ( I decided that the river could only be crossed there).  The Germans hastily 'dug in' their infantry where possible, and brought up their Assault Guns to back-up the bridge defenders. British airstrikes wiped out the forward defending  infantry unit as early as Turn 2, while British artillery concentrated on counter-battery fire on the German artillery - without  much success, it has to be said.  German artillery focussed on trying to break up the British attacking formations, with quite destructive effects. This was lucky for the Germans, as  they knew they would have fewer opportunities for airstikes.

British SP guns go 'up in smoke'
 

The British central  thrust at the bridge struggled from the start, with their Self-Propelled Gun unit destroyed  by defending Assault Guns  quite early on, but their infantry fire kept the pressure on by destoying a second German infantry unit - at the end of Turn 3 losses were British 3SP, Germans 4SP.

Turn 6: the Luftwaffe makes an appearance
 

Inevitably the British armour had to move to the centre to spearhead the attack on the bridge - probably should have done so from the start!  British armour and infantry repeatedly tried to advance to assault the bridge, but defensive fire from the German infantry and Assault Guns kept knocking them back. Finally the British armour and Infantry attacked across the bridge on Turn 7, taking 1 SP and 'pinning' the defending infantry, but themselves having their infantry forced back - attack stalled! 

Turn 8: the final British 'push'


In the next turn, the British won the initiative and pushed forward again for another assault - defensive fire damaged the British armour, but in the ensuing close combat the British finally prevailed, the defending  German infantry and Assault Guns both being destroyed. The British infantry was forced to retreat, however, leaving their Armour, with only 1SP left, sat unsupported on the German baseline... thus the Germans on their turn had to kill the British armour to save the game. They brought their last Infantry unit down from the hill, attacking the British tanks from the flank - and just couldn't kill them. The infantry lost 1SP and ended up pinned down, the British armour held position on the defenders' baseline, and the day was won. 

German Infantry's desperate counter-attack ( 2p coin for 'pinned', 1p for 1SP lost )
 

Final losses totals : British 5 SP,  Germans 9 SP  - only 1 German infantry unit and their Artillery remained in position, both having only 1SP each remaining.  So, a pretty thorough bashing received by the Germans, but they made it pretty tough for the attacking Brits.  As I've said, I think I managed to play the rules wrong in several ways - a salutory lesson in just how easy it is to overlook or misinterpret even the simplest rules! In paricular I got the characteristics of the 'special units' (SP Guns and Assault Guns)  wrong, and even worse I only allowed firing to occur about half as much as it should! I think if played correctly, it would have been a much more 'quick and dirty' battle, but all the same I had a throughly enjoyable time, and the balance of the game  swayed back and forth throughout before that decisive last assault over the river.  A nice simple little game for a pre-Xmas afternoon, before the eating, drinking and gifting took over - and it gave the D-Day Dodgers some table time, of which there needs to be much more, I like these 'old-school' forces.  I plan to review them and organise them  a bit more formally - probably making formations suitable for the 'Rapid Fire Reloaded' rules. does that count as a New Year's Resolution? 

I hope everyone had a good festive season, and are not too downcast by the return to normality and (for those in the Northern Hemisphere ) dreer January.  The answer is of course, to cheer ourselves up with hobby activities... Meanwhile, keep well, everyone. 


Friday, 30 December 2022

Fnurban #21: a little quiz

 I hope everyone had a pleasant Xmas, if you celebrate it.  Now, one evening over the holiday period we watched a DVD ( yes I know, a bit old-school, no streaming services here ) - 'Knives Out' ( 2019 ) by Rian Johnson, starring Daniel Craig, Christopher Plummer, Jamie Lee Curtis and many, many more. During the course of the film, something kept nagging at my mind, and at the end I did a little internet searching.. 

The result was that I congratulated myself on one of the few 'film nerd' moments I got right - I love the cinema, but these days I don't know who any of the actors or directors  are any more.  Powell and Pressburger and Kieslowski were my obsessions, and they are long gone  - though Almodovar is still producing his immaculately-mounted twaddle ( I mean that as a compliment!), so there is hope for me yet. 

Anyhoo, having spotted this little detail, I think it might make a festive quiz question for you all - and it has a 'military history' angle : the quesiton being,  what is the link between 'Knives Out' ...


      ...and Ken Burns' classic documentary series 'The American Civil War' ? 


No prizes for this, it's just a bit of festive fun.  I hope it's not too easy, or already widely discussed in the blogosphere - I may have been a bit slow on the uptake! 

Answers in the comments please -  I will use the moderation to hold back the correct answers for a day or two.  Wrong-uns will be published immediately - humourous answers welcome.  And of course, there may be links other than the one I am thinking of - it will be interesting to see if anything comes up! 

Watch this space for answers:  meanwhile keep well, everyone, and have a Happy New Year!  

*** UPDATE ***   The answer was of course, that Daniel Craig based his character Benoit Blanc's accent on that of the historian Shelby Foote, who was prominent among the experts appearing in Ken Burns' ACW series.  

Craig himself says : Shelby Foote was my inspiration. He’s a historian. If you ever saw the Ken Burns documentary, the Civil War  documentary...  It just said a southern accent but then we talked about it, we were talking about oh, we want it to be sonorous and honeyed, we started throwing back and forth references. We didn’t want it to be twangy and annoying so Shelby Foote came to mind.

Congratulations to Jon Freitag,  Epictetus and Chris aka Nundanket for giving the correct answer - much kudos to them!  Jon was quickest on the buzzer - luckily I didn't offer a prize, or I would now be shelling out for postage to the USA 😀

As Jon says,  Foote’s distinctive drawl is almost immediately recognizable.  He had a very stately, proper, and southern gentlemanly delivery and tone in his voice.  He was a great storyteller and writer too.   Here he is, in a tiny snippet from the series :


If you've not seen the Burns ACW series, I'd recommend it highly.  'Knives Out' ain't bad, either.

Thanks all, hope it was fun!