Showing posts with label Rules. Show all posts

Saturday, 23 August 2025

'Dominion of Risorgimento' : Palestro 1859

In between counting and photographing vintage Minifigs,  I fancied a quick and easy bit of gaming with my 6mm Risorgimento 1859 armies.  I have to thank Bob Cordery for his most timely pointing out that the latest  'Dominion of..'  rulesets to be release included  Dominion of Otto von Bismarck,  which cover the period from the Crimean to Franco-Prussian wars. at around £5 from Wargames Vault, they looked worth a try.   

As you may be aware, these are very simple rules, designed for solo play and using only about 6 units per side, so games can be played in pretty quick time - and from my experience with the Pike and Shot version, they have some interesting and subtle mechanisms. In this case, Infantry are defined as 'Line' (mainly relying on firepower)  or 'Column'  (mainly fighting in assault columns), and this seems a fair reflection of the period. Artillery can be kept in the 'reserve' area and used for bombardment in support of attacks by other units, which can be very effective.

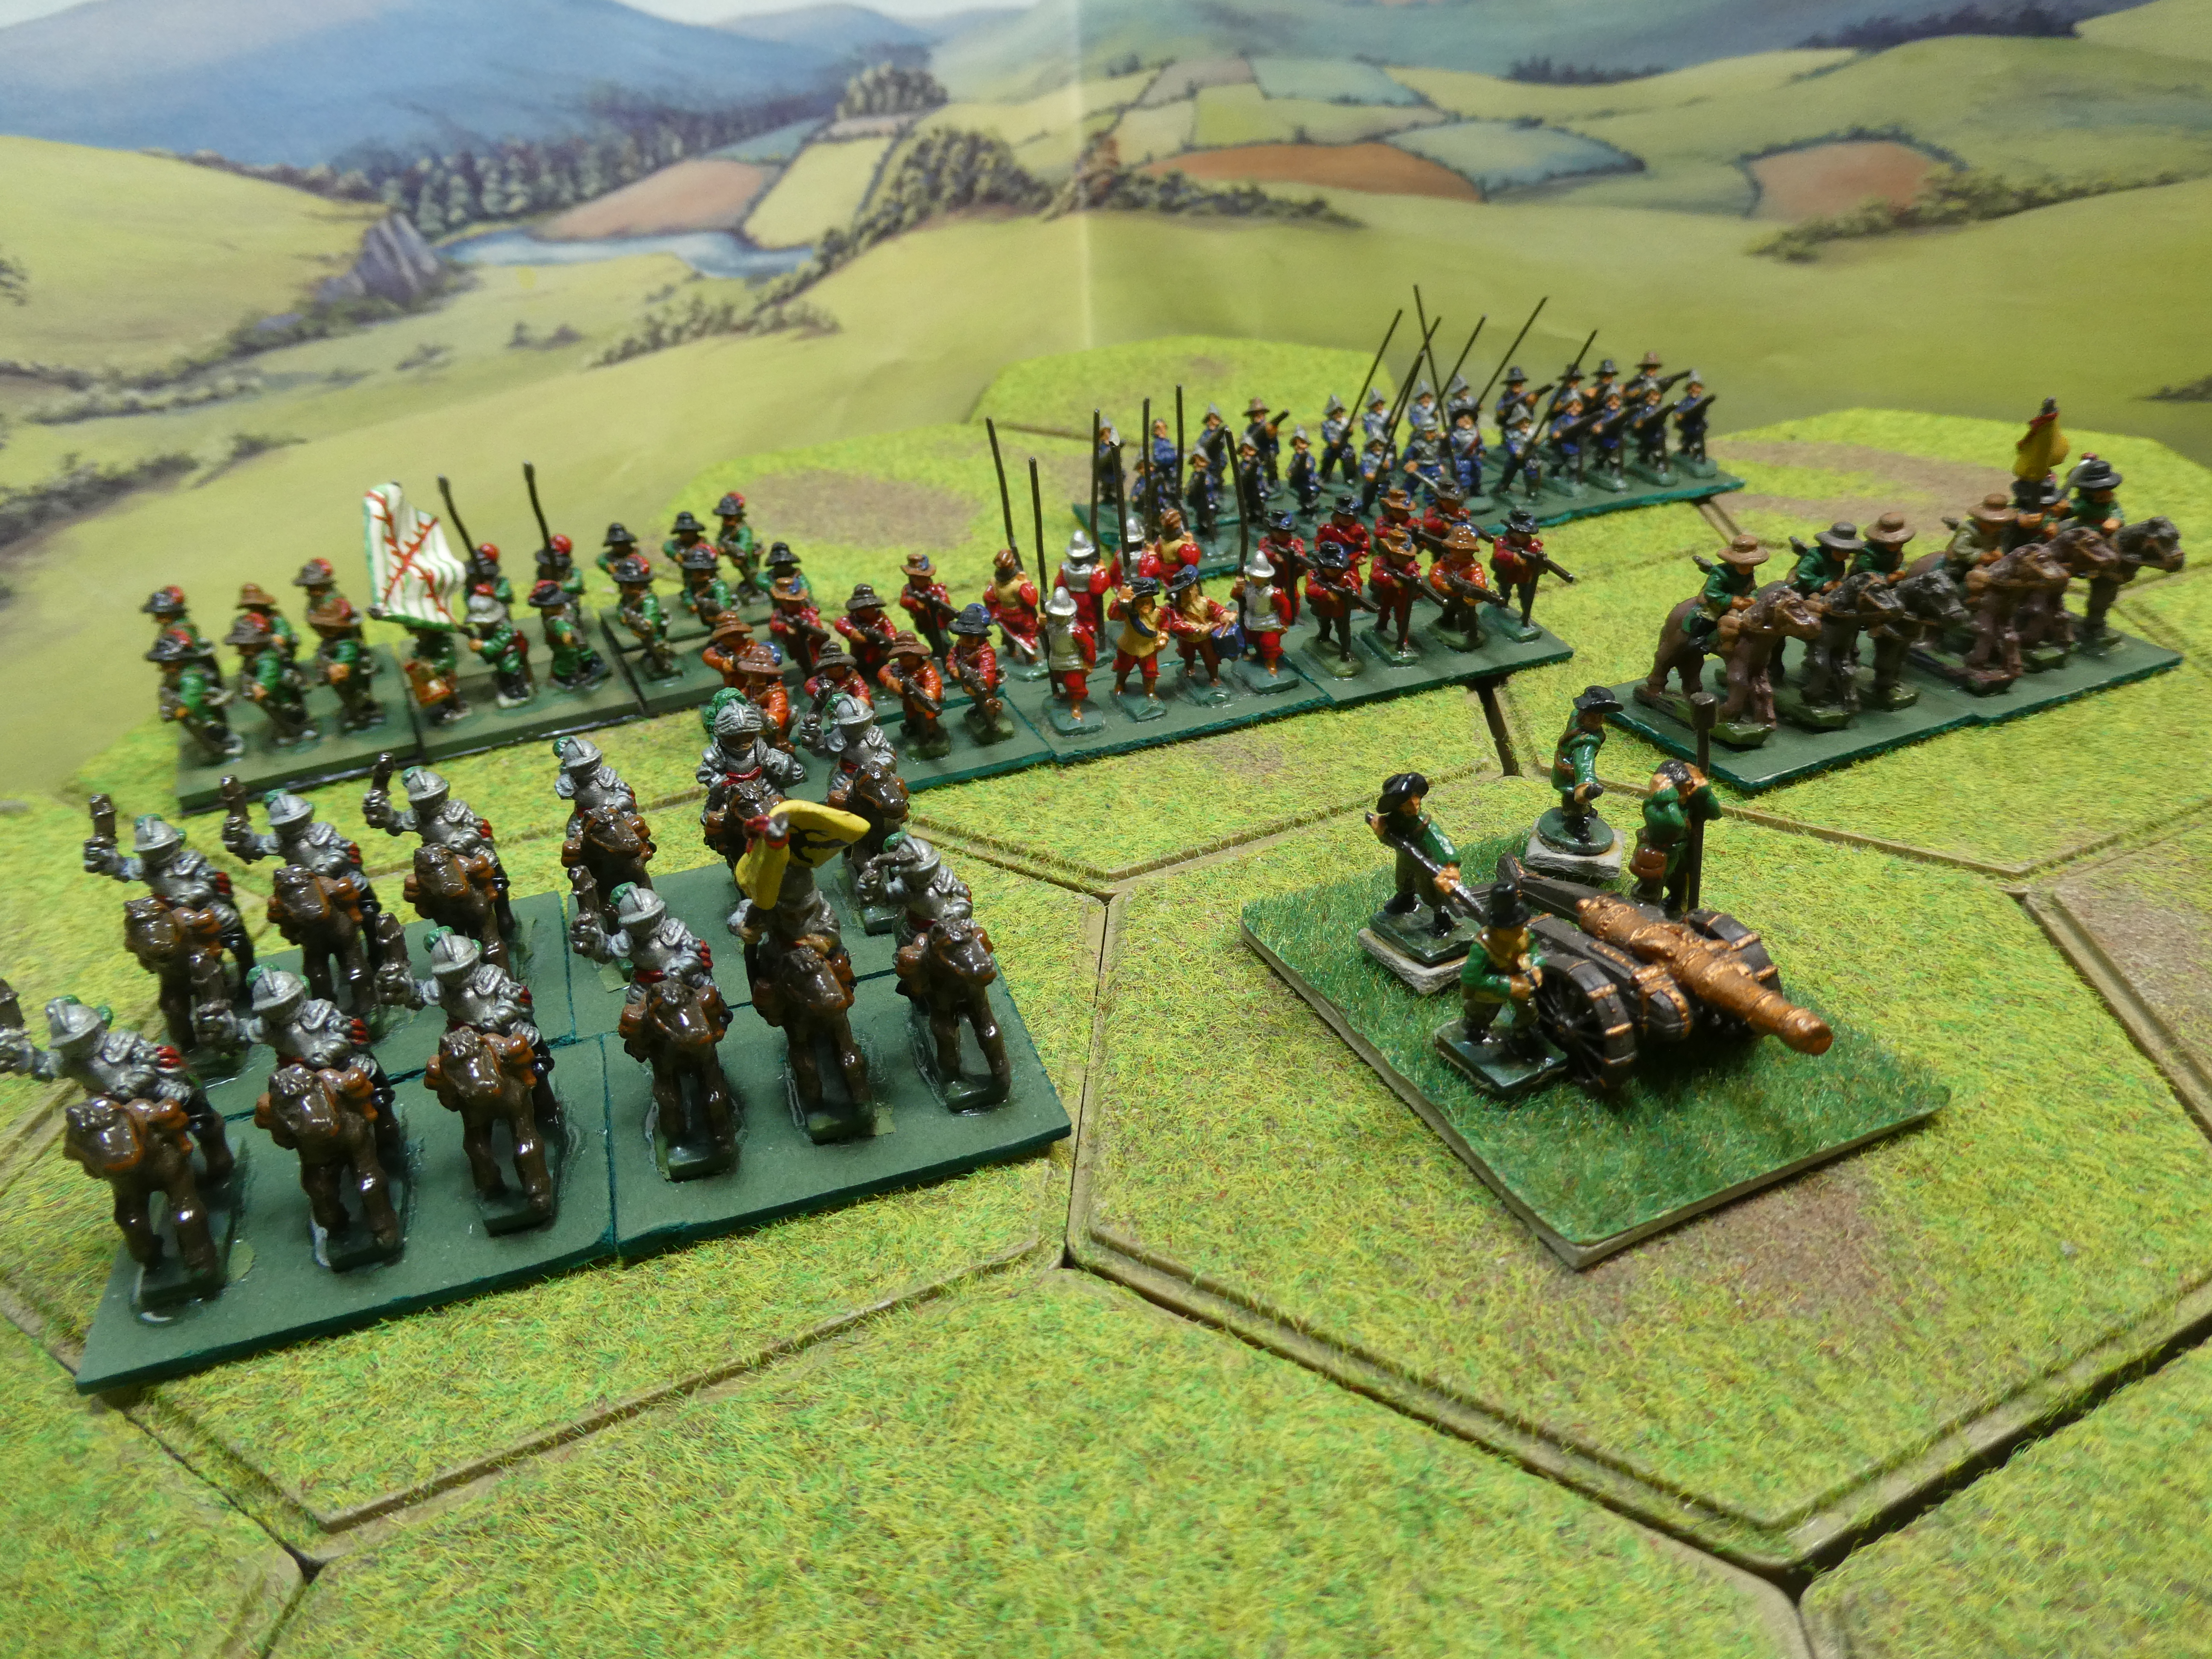
The rules include scenarios and army lists for 24 historical battles, one of which is Palestro 1859, which suits my current  'Piedmont vs Austria'  setup (really must get some French next!),  and with  the forces  comprising five or six units each side, very easy to  find armies for.  So I gave it a go, and here is the intial deployment - Peidmontese nearest the camera. 


Historically, the Piedmontese had counter-attacked the invading Austrians and re-taken the village of Palestro on the River Sesia, and the Austrians then attempted to push the Piedmontese out of their defensive positions. In the suggested scenario,  Piedmont has three 'Line' Infantry units in defensive  positions  ( denoted by the walls )  as their front line, with the right-hand unit also being Elite status - these were the French 3rd Zouave regiment on the day, but I used Piedmontese Grenadiers (must get some French next!).  That unit was concealed (hence trees) and could not be bombarded by artillery until they had revealed themselves by engaging in combat.  In reserve (back line) they had two 'Column' infantry units, which were deemed 'unreliable' to simulate the uncertainty of reinforcements arriving. 'Unreliable' units have to roll a die before their first combat - they will either rout and be eliminated, or become 'regular' and fight as normal. You might have noticed that I deployed 'Column' units in a sort of T-shape formation representing the attack column with skirmishers out front, and 'Line' units in simple blocks. 

The Austrian force had three 'Column' infantry units on the front line and ready to attack, plus two more 'Column' units and one Artillery unit in Reserve - the latter being able to fire in support of attacks by the front-line units. So, they had the advantage of one extra infantry unit and supporting srtillery, but were facing 'dug in' defenders, one unit of whom had Elite status. And so, to battle..

The basic turn mechanism is for the attacker to go first and specify one sector of the table (Left, Centre or Right ) to mount an attack, with combat taking place between the opposing front-line units in that sector  ( note that since this is a solo game, it's easier to keep the same sectors as 'Left' or 'Right' for both sides - in this case, as per the photos ). Once that attack is resolved, the Defender takes their turn to attack in their specified sector. The choice of sector is decided by the active player rolling a die - they may be able to choose their attack sector, or have the choice forced upon them, depending how the die roll goes. So there's an element of uncertainty in that decision, the Commanders are not in complete control of their forces and fighting may break out in unintended places - which seems quite a reasonable, 'fog of war' effect.

Turn One opened with an Austrian attack in the Left Scctor (having rolled a high enough score to choose), where on of their 'Column' Infantry faced an entrenched  Piedmontese 'Line'. The Austrians could also have their Artillery fire on the enemy unit first - it did so, but missed.  In the subsequent combat, 'Line' units fire first (all combat rolls are one D6), but have less chance of scoring a hit, then surviving 'Column' units can charge home, with a better chance - rather subtle.  In this case the Piedmontese shooting was too good, scoring a hit and eliminating the attacking Austrians.  An eliminated unit must be replaced from Reserve - so one of the two reserved Austrian  'Column'  units stepped up.  In the Piedmontese turn, the Die decided on a 'Centre' attack;  there were no Piedmontese artillery, so no bombardment. In the combat the  tables were turned, with the Peidmontese scoring a 'miss'  and the Austrians rolling high - the Piedmontese unit was Eliminated, and had to be replaced by one of the two 'Unreliable Infantry 'Column' units from Reserve.   Each side lost one unit in Turn One, but perhaps Austria did better, knocking out a dug-in unit which was only replaced by 'Unreliable' reserves. 

Turn One: Piedmont centre weakened?
 

Turn Two started well for Austria; again getting choice of attack sector, they chose the Centre. Their artillery missed again, but the 'Unreliable' defending Piedmon unit rolled low on its reaction test, and promptly routed! It was replaced by the second, and last, also 'Unreliable' unit from reserve. Piedmontese pride was restored on their turn; the die roll forced them to attack on the Left, but their 'Line' unit there rolled high and defeated the opposing Austrian 'Column' unit. It was replaced by another 'Column', leaving only the Artillery in Austrian reserve. Losses still even at two units each, but that Piedmont centre looked quite worrying, and reserves were denuded..

Turn 2 : Front lines holding, but Reserves almost gone
On Turn Three,  fighting broke out on the Left (decided by the die roll), and the Austrian  Artillery finally got the range, scoring a hit which removed the 'Dug-In' advantage from the defending Piedmont unit.  Piedmont's 'Line' unit then missed, but so did the attacking Austrian Column, so no decision there. The Dice Gods favoured the Austrians, however, as Piedmont's roll  indicated the same Left sector again, the defending Line unit's shooting was again ineffective, and the attacking Column charged home and overran them! With no units left in Reserve, Piedmont could not replace the loss, leaving their Left sector undefended.  Things looked bad for the Italians.. 

Turn 3 : Piedmont Left gone - is it all up for them?

 Would Turn Four spell the end for the Piedmontese?  The Austrian die roll denoted fighting breaking out on the Right, where all had been quiet until then - and here lurked the Elite Piedmont Grenadiers. As noted above, these were concealed and could not be bombarded by artillery, so the Austrian Column had to fight unsupported - and were promptly shot down by the Grenadiers' musketry. This was a double blow, as it forced the Austrian artillery to come out of reserve to fill the front line gap, leaving it unable to bombard in support of other sectors AND facing an Elite enemy!  On Piedmont's turn the worst promtly  happened for Austria - the die roll decided on the Right sector again, and the artillery were sent packing by the Piedmont Grenadiers!  That Elite unit had really proved its worth. 

Now the opposing sides are each allowed one attempt to 'Rally' and bring back one routed unit, and at this point ( luckily I remembered the rule!) both sides took advantage of that  - and both sides rolled high and succeeded. The Austrians were able to rally their Artillery (hmm, perhaps an Infantry would have been better?)  and put it back in place on the Right, and Piedmont rallied one Line Infantry, and filled the gap on the Left.  With three units each left, the Piedmontese had held things together, at least, and their Grenadiers looked well placed for potential further success. 

Turn 4 : successful Rallies fill the gaps
 

Turn Five opened with  the Austrian die roll indicating combat in the Centre, where Column faced Column, so combat rolls would be simultaneous - but first the 'Unreliable' Piedmont unit must test, and failure could spell disaster.  The die was rolled - success, the Piedmont unit held its ground! Better yet for them, in the ensuing combat the Austrians were defeated, leaving their Centre wide open, no reserves available. The Dice Gods were merciless then - the Piedmont roll indicated 'Centre' again, and this allowed the unopposed  Piedmontese centre unit to attack the flank of the Austrians on the left..

Turn 5 - Piedmontese flank attack

 In a flanking attack, the attacker gains an advantage on its die roll and the defender cannot fight back - and the Piedmontese attackers rolled high. The last Austrian Infantry unit was sent routing, and with only their Artillery unit left to oppose three enemy units, Austria was soundly defeated! 

How it ended - only Artillery remain for Austria! 
 

So that was that; I rather enjoyed the game. For such a simple syatem, there are some interesting and subtle features which felt 'right', and for fans of quick games, it probably would have taken only about half an hour, had I not been taking plentiful notes and photographs.  Apart from just 'a quick game', the obvious use for this would be for a 'mini-campaign' where map moves could generate  multiple battles which could each be resolved very simply and quickly.  I also think that it would be interesting to 'tweak' and add to the rules; I think it might be worth making 'bigger' games,  perhaps increasing the number of sectors on the board and/or maybe the number of units per sector, and perhaps bringing in more terrain effects and thus enabling more 'meaningful' terrain to be placed? My only hesitation about the basic system is that  the commander's choices can feel quite limited  ( the downside of the die roll for sector choice), and there isn't really a concept of 'manouevre' - would it be good to be able to move units between sectors, to bolster weak points or reinforce successes?  I'm sure others have been thinking along some or all of these lines.

For a quick and simple game, that has set quite a few thoughts running, as well as simply  being enjoyable.  I hope my description has been of interest to you, too! 

Now I need to get back to sorting through the 'Minifigs haul' - more pictures to come soon, Probably before that happens, though, I am  lucky enought to be promised a bit of 'Face to Face' gaming this coming week, with Black Powder's  Pike and Shotte variant and Edgehill 1642 as the scenario, which promises to be interesting and fun, and will be fully reported in a future post, if possible.   Until then, keep well everyone and (if in the UK)  enjoy your holiday weekend!


Friday, 9 May 2025

Quick-Fix Gaming: Dominion of Pike and Shot

 It's been far too long since I actually set up a game on my own table - there's just been a bit too much 'real life' stuff going on. However, recently some  other bloggers (in particular,  Bob Cordery)   highlighted a very simple series of rules known as 'Dominion of...'  by Steve Parker, which allow very quick games on a 'three by four'  grid table. You don't even need figures to try the rules, you can simply play the battle out using pencil and paper.  I like simple rules and these seemed to have something about them, so I spent the huge sum of (almost)  £5  on the PDF of  Dominion of Pike and Shot  from Wargames Vault.  Typically an 'army' in the rules is up to 6 units, and there is a selection of army lists in the basic rulebook,  so it was very easy to get out my veteran 15mm Thirty Years' War figures and  create forces for list no. 63, 30YW  French and no. 56  'German Catholic'  (let's call them Imperialists),  and give the rules a try.

initial setup, veiwed  from behind the French army
 

The army lists give similar but not identical forces for the French and Imperialists: each has two  units of Cuirassiers, defined as 'Melee Mounted'  and one unit of 'Carbineers' ( I assume 'Harquebusiers' ) which are 'Missile Mounted',   and then three units of Infantry.  The variation comes in the Infantry - the French foot are defined as Pike (plus Musket) - 'Melee Foot' - and the Imperialist foot are Musket ( plus Pike ) - 'Missile Foot'.   These classifications are the equivalent of  'Pike Heavy' and 'Shot Heavy' infantry formations in other rules, so the French are 'Pike Heavy' and Imperialists 'Shot Heavy' in these lists. From my prior knowldge I admit that  I would probably have suggested the other way round!  But I wonder if the idea of these lists is to emphasise the attacking Elan of the French by making their Infantry very much melee-oriented, while Imperialist foot are a bit more ponderous and defensive-minded.  Units can be deifned as 'Armoured' or 'Elite' but I kept it simple to start with, keeping all units 'vanilla', so to speak.     

The picture above shows the two forces deployed at the start,  shown from behind the French army. In the middle, the main forces face each other with each having a unit forming each of Left Wing, Centre and Right Wing. I went for a conventional setup of Infantry Centre, Cavalry on the wings, with the French deploying both their Cuirassiers while  the Imperialists placed Cuirassiers on their right, Carbineers to their left.   The remaining three units on each side are placed in 'Reserve' - those are the lines of units nearest to (French) and furthest from (Imperial) the camera.  A die roll decides which side is 'Attacker' and which 'Defender' - the Imperialists won that honour, and as a result the French had to deploy first, an the Imperialists 'moved' first each turn.  

Front Lines at start (French nearest camera) 

True to the period, there is a Bombardment phase before the first turn, even though  no artillery units are actually included - a nice simple way of reflecting the reality, where artillery often did not play much part beyond an initial cannonade. Each side chooses a target sector to bombard - Left, Right or Centre - and rolls a dice, and a 'hit' forces an targeted Infantry unit to retire, but a  Cavalry target if 'hit' is goaded into a charge. Risky, but presumably you aim to provoke them to charge recklessly against a better unit of yours.   This phase turned out to be quite eventful - the Imperialists bombarded the Cuirassiers on the French left, and 'hit', provoking a charge at the Imperial Cuirassiers opposite them. That meant combat between the two, at which point both promptly rolled high scores, and both units were destroyed!   Quite a shock for both sides, even before the first 'proper' move!  the French bombardment, meanwhile, had no effect. 

bombardment provokes Cavalry clash!

If a unit is defeated it is removed from the game - sudden death,  indeed - and must be replaced by a unit from the reserve, if one is available.  So as a result the Imperialists brought up their second Cuirassier unit, and the French their 'Carbineers'.   

Now on to Turn 1 - each side gets to attack in one sector, with Attackers ( Imperialists) going first. Both sides elected to attack with their respective Carbineers against opposing Cuirassiers  - the logic being that Missile troops get to attack first, so the Carbineers hope to shoot well enough to drive away their opponents before being charged.  It didn't quite work out, as the both Carbineers units shooting was ineffective, and the Imperial Cuirassiers promptly charged and destroyed the Carbineers on the French left (French Infantry regiment  'Bleu' moved up from Reserve to replace them),   Each side gets one attempt to 'rally' a destroyed unit, and at this point the French tried to rally their Cuirassier unit - and failed. So losses after turn 1 were: French 2 units, Imperials 1. 

End of Turn 1 (Imperialists to the right)
Then Turn 2 was quite bloody : Imperial Carbineers on their left wing managed to shoot down the opposing French Cuirassiers ( both French Cuirassiers now gone ) but honours evened when on the French left, the newly-arrived 'Veste Bleu' regiment chased away the Imperial Cuirassiers.   The French brought up their last reserve unit - 'Veste Vert' infantry,  while the Imperialists replaced their dispersed Cuirassiers with their own Green coated infantry.   Losses now  French 3 units, Imperialists 2, and the French cavalry have all been scattered. 
Turn 2 : French Cavalry seem to have 'gorn'
Turn 3 - on the Imperial right, their 'Gruner mantel'  foot attacked the French 'Veste Bleu' regiment. The Imperialist unit being 'Missile Foot', it fired first, but missed. The French being 'Melee Foot' then got to strike back - and also failed.  In turn, in the French centre the  'Veste Rouge' regiment attacked the Imperial 'Blauer Mantel' unit. Again the 'missile' troops (Imperialists) rolled first, but to no effect, and the French promptly charged home and routed the Imperial unit.  They were replaced by the 'Roter Mantel' regiment from reserves;  the Imperialists also took the chance to try rallying one of their lost Cuirassier units, and succeeded. That left the losses at end of Turn 3  French 3,  Imperialists 2. 

Turn 4 : On the Imperial left their Carbineers attacked the French 'Veste Vert' foot, to no effect, while on the French left, the struggle between their  'Veste Bleu' regiment and the  Imperial 'Gruner Mantel' ended in defeat for the Imperial regiment.  The newly-rallied Cuirassiers stepped up from reserve. Losses at end of Turn 4 were  three units each - neck-and-neck stuff - and we have an interesting situation,  with three French Infantry units facing only one Imperial foot and two horse units. 


End of Turn 4 : an interesting balance

The next turn was the first one without any losses - the Imperial Carbineers and French 'Veste Verts' tangled inconclusively, as did the French 'Veste Bleu' and Imperial Curassiers on the other flank. Losses remained at  three each.

After that comparitive lull, things livened up on Turn 6. On the Imperial left, the long struggle between their Carbineers and French 'Veste Verts' foot continued without a result, while on the French left their 'Veste Bleus' tried conclusions with the Imperial Cuirassiers - and the French regiment was promptly routed!  That brought losses to French 4, Imperial 3 and crucially left the Cuirassiers unopposed,  and able to turn inwards to take the French centre in flank. 

Turn 6 : French flank in danger..
Turn 7 therefore inevitably opened with the Imperialist Cuirassiers charging into the flank of the French centre - attacking from the flank gives a +1 on the die roll, and the defending unit cannot reply if they also have opponents to their front. The dice duly favoured the Imperialists, and the 'Veste Rouge' regiment was destroyed. 

Turn 7 : Imperial Cuirassiers strike
 

and with only one unit remaining, the French on their turn facing imminent defeat,  tried a last desperate attack with their 'Veste Vert'  regiment on the Imperial Carbineers - only to be scattered by a salvo from the horsemen ( I think we can conclude that the French infantry were none too enthusiastic in their attack, and needed little encouragement to skedaddle).  Thus Turn 7 ended wth all 6 French units routed, to Imperial losses of 3 units. 

The final blow -  last French regiment routed! 

 Well, that was rather fun.  Obviously very simple,  but quite tense and with a few surprises and subtleties in the mechanisms. I think it took about 90 minutes to play through, but that included taking detailed turn-by-turn notes, checking rules carefully and taking some photos, since it was a first try.  I think it would have probably taken less than half an hour if simply played.  Some interesting questions arise over details of the rules, which give advantage or disadvantage to units in combat in certain combinations. For example  'Missile Mounted' get +1 against 'Melee Foot' ( note that without that modifier the Melee unit would have a +1 advantage, but also that the Missile unit always fires first).  This is all quite subtle stuff, which  I will be interested to ponder over and try to decode all the ramifications of what on the face of it is a very simple combat mechanism. 

Overall, I enjoyed this - it certainly gave a very simple and quick means of 'scratching the itch' for a game, and I can see that it could be very useful for playing through mini-campaigns in short order. I note that there is a companion volume available with many scenarios recreating real battles of the period;  it may be interesting to see how White Mountain, Lutzen or Naesby translate to this small gridded-game format. Having recently bought a book about Fribourg, 1644, I wonder if I could work out a scenario for that? We shall see.  

Next, I need to 'crack on' with painting scenery for my Risorgimento 19th Century Italy project, and I feel a Portable Seven Years War  game is long overdue - and I also hope to get to the Partizan show at Newark in about a week's time, so plenty to be going on with and to generate future posts here. Until then, keep well, everyone.    


Saturday, 11 March 2023

Diversionary Tactics

 David Crook recently posted on his excellent A Wargaming Odyssey blog,  about his list of current projects, to which my response was I suspect that often just after such a list is written, something completely different pops up and overtakes all the things one has carefully listed!  And so it proves.  I have been trying to concentrate my somewhat inadequate hobby efforts on Eighteenth Century,  WW2 in Italy, and Thirty Years' War periods - plenty of reading, organising, painting and gaming to be getting on with on each of them, and not enough actually being done.  But then the other morning I strolled into an Oxfam charity bookshop, made a habitual scan of the Military History shelf, and spotted this: 


Blimey, that's a little specialised for a charity shop! Phil Barker and Ian Heath's Armies and Enemies of Imperial Rome, 4th Edition ( 1981 ).  In pretty  good condition, and fairly priced, I thought  - I couldn't leave it there, could I?  Indeed not - money changed hands and I took the book home.  It joins a small collection of books acquired fairly recently, on an 'Ancients' theme, because I've been having certain thoughts..

Charity shops started it, really, because I found a couple of vintage volumes by Peter Connolly : The Greek Armies ( 1977) and Greece and Rome at War ( 1981/2012 ). 


The former covers the period from the Trojan War  to Alexander The Great, and is actually a children's educational book, but none the worse for that - the writing style is clear and simple, but not in the least patronising.  Both volumes have plentiful and rather lovely illustrations. I've always had a hankering to investigate the Ancient Greek world - and the second book adds an account of Rome, up to 450AD. So, I think I've got a good set of introductory texts to work with. 


If this is going to lead to any gaming, then rules will be needed, and I have some options there too. Sometime in 1990 or soon after, I spent the princely sum of £2  at Leisure Games in Finchley for a copy of the latest thing in Ancient Wargaming - the first edition of  De Bellis Antiquitatis,  known to us all as DBA. For whatever reason, I never actually played it, but I kept the booklet - 'it might be useful one day'. More recently, what with certain ideas being mulled over and various special offers coming up, I have also picked up  Graham Evans/Trebian's Spartans and Successors, which are billed as Simple Tabletop Wargames Rules for the Classical Ancient Period in the Golden Age of Greece and Macedon. 


And finally, Neil Thomas' well-regarded Ancient and Medieval Wargaming.   Plenty of options and ideas between those three volumes, I reckon. 

Hmmm... if this is going anywhere, some armies will be needed. Although today's find is obviously all about Rome, I admit that the Greek/Persian/Macedonian wars have interested me most so far ( though of course using DBA could allow multiple armies covering various periods to be mobilised quite easily and relatively cheaply ), the triumverate of Greeks/Macedonians, Persians and Indians seems to have all sorts of possibilities and variations. 

But  this is the dilemma - what scale to choose?  Again, if going down the DBA route,  pretty much any scale could be used, for example a 25/28mm DBA force would not involve a large number of figures, and should therefore be fairly quick and cheap to recruit, while smaller scales would give a 'mass' look to the units ( which must be good if deploying Roman Legions or Greek Phalanxes ) while also being relatively inexpensive. Plastic 20mm figures are perhaps  another 'budget' option.  I could do any of  25/28mm,  1:72/20mm, 15mm, 10mm and 6mm - maybe even 2mm, though I have some reservations about those.  I admit I was sorely tempted to try buying  a few nice old-style Lamming  Greeks and Persians, but my timing is not good it seems, as their website says that they are going to stop taking orders for a couple of months due to illness. Sorry to hear that, I wish them a swift recovery and return.

So, I will have to mull over the possibilities of different scales and makes, and we'll see what if anything, comes out of that.  I'd welcome any thoughts from readers who have been down this track themselves.  At the very least, I have some pleasant and interesting  reading options to browse. Here is a bit of inspiration, courtesy of Peter Connolly : 

Also in the next few days the paintbrushes and glue really have to come out - the lead/plastic piles of 7YW, 30YW or WW2 need to be adressed!  Meanwhile, keep well, everyone.  


Saturday, 28 January 2023

Trying out the Portable Pike and Shot

Having given my Pike and Shot armies a couple of goes recently with different rule sets and enjoyed those games, I thought I'd like to have another game in the same period. I've been reading Bob Cordery's (and friends)  book The Portable Pike and Shot Wargame, which has several sets of rules, including two variants for ECW/30YW forces. Having looked through them, I was interested by Alan Saunders' ECW variant, which seems to have some good ideas which Alan explains in his Design Notes. 

Alan's rules are strictly 'ECW', but I think they'll stretch to being used with my Thirty Years War armies representing French and Imperialists - I tend to think that by the 1640s, a lot of the features of earlier 30YW armies such as 3/4 armoured Cuirassiers, mounted Arquebusiers and larger Tercios would have fallen out of use, even if some units still carried those names. Admittedly my armies of vintage figures maybe look a bit more 1620s/1630s, but I am choosing to overlook that! 

I'm going for a simple setup, from an old favourite source: Neil Thomas One Hour Wargames. I selected Scenario 3: 'Control the River'. Neil Thomas summarises as follows The Red and Blue armies represent portions of much larger forces. Their commanding generals have ordered them to seize two strategic river corssings, as a base for future operations.   As typical for OHW, there are six units per side, which is  within my reach. It's a simple, symmetrical layout, with a river dividing the field, crossed by two bridges, control of which is the objective for both sides.  

In the spirit of keeping things simple, I've also gone for symmetry in the opposing forces - which will represent the French and the Imperialists.  Here is the Imperial contingent: 


 It consists of :

        Two  Pike and Shot Infantry Regiments ( 'Grun' and 'Blau' ),  rated 'Trained',                                             each 4 Strength Points (SP) 

        One  Pike and Shot Infantry Regiment ( 'Rot'  ), rated 'Elite', 5 SP

        One unit of  Cuirassiers  ( Horse ), rated 'Trained' , 3 SP

        One unit of Dragoons, rated 'Trained',  3SP

        One unit of Artillery, rated 'Trained', 2SP  

A total of 21 SP. Alan's rules the army has a Break Point, equal to half its total SPs rounded up. So the Break Point for this army is 11 SP. When casualties reach the Break Point, the army must test each turn to continue fighting. For those interested in such things, the figures are 15mm scale and mostly from Mike's Models, Frei Korps 15 and Minifigs - as far as I remember, given they are some decades old! 

Obviously the French force is similar, though I made a slight variation in the morale ratings - all three French infantry regiments will be 'Trained', but their cavalry unit will be 'Elite'.  I have a shortage of Dragoon figures, so I have drafted in some of MacFarlane's Scots cavalry to represent Dragoons. Here is the French force


     which consists of :

        Three Pike and Shot Infantry Regiments ( 'Rouge', 'Vert' and 'Bleu' ),  rated 'Trained',                                             each 4 Strength Points (SP) 

        One unit of  Horse ( 'Turenne' ) rated 'Elite', 4 SP

        One unit of Dragoons ( 'MacFarlane' ), rated 'Trained',  3SP

        One unit of Artillery, rated 'Trained', 2SP 

Giving a total of  21 SP and Break Point at 11 SP.  Figures mostly a bit more recent, from Essex Miniatures, except the Scots and the Artillery which  Ross told me were 'old strip Minifigs' ( I think their first 15mm range ) from the late 1970s - real veterans!  

This is a simple  'encounter battle'  - at the start, neither side has troops on the table. The French represent 'Red' who will enter from the Northern ( top ) table edge on Turn 1 , while the 'Blue' Imperialists enter from the Southern table edge at the same time. It should be a nice straightforward scenario, and I hope an easy introduction to the rules.  Next time, we'll  see how it goes. Meanwhile keep well, everyone.

Sunday, 18 December 2022

Kirchendorf by Twilight: battle report

Almost a month ago I set up a game to try out Nick Dorrell's Twilight of the Divine Right rules for the Pike and Shot period, with their scenario for the Battle of Cheriton -  albeit somewhat Germanicised to a Thirty Years War conflict at the fictional 'Kirchendorf'.  Real life rather got in the way in the meantime, but this week I have finally come back to the table, and fought out the battle. The opposing Imperial and French  forces have been described in my earlier post,  now we can see their deployment on turn 1.

Starting positions: Imperialist in foreground
 

It's quite a 'busy' battlefield, but probably the most important feature is the South Spur, running roughly across the middle of the field. This is the highest point and blocks line of sight, so the main bodies of both armies cannot see each other at the start. Note the single French foot regiment ( de Lisle )  on the South Spur, holding the road, and also the body of detached Imperial musketeers placed far forward to hold the woods at top right - they will be hoping their comrades make smart progress to support them.  The Imperial main body is in the foreground, with Mauer (Waller)'s infantry and guns in the centre, and Balvier (Balfour)'s cavalry divided between left and right wings - a unit of Dragoons on the right, who may be able to assist in the woodland.  The French main body is in the distance, with sub commander Le Quatre (Forth)'s wing of two cavalry regiments to the left ( he also commands the advanced infantry on the South Spur )  and the rest under Sautville (Hopton) to  the centre and right - on the end of the line an unit of Elite musketeers (with 'Assault Tactics' characteristic of firing salvee and then charging to contact)  prepares to clear the woodland.  Most regiments started in 'march column', though the Imperial guns were deployed for firing, to bombard de Lisle's regiment on the spur.  Bombardment forces the victim to take an 'Action Test' before ANY move, in effect making it possible for them to be 'pinned down' by the cannonade.  The Imperialists had a slightly larger force and were also a little closer to the highest ground, so perhaps had an advantage, but they would have to turf out  de Lisle's unit from a good defensive position, and the French had dashing 'Swedish' style cavalry,  which may be at an advantage against the more plodding 'Dutch' style Imperial horsemen. So, all to play for..

Turn 2: Imperial guns take aim

The rules assign various characteristics to each unit, such as quality (raw/trained/elite), proportion of musket to pike, cavalry drill type  and  unit size etc - instead of drawing up a roster sheet (which I find I never quite remember to keep an eye on), I  placed small paper labels with each unit giving that information. Admittedly a bit untidy, but useful  for a trial of unfamilar rules. I suspect simple markers could be used, and these could be minimised ( for example no need to mark the cavalry types, as all the Imperialists are 'Dutch style' and all the French are 'Swedish style' ). 

Turn 4: Imperial horse crests the hill
 

By Turn 4, the Imperialist cavalry had more or less reached the high ground of the South Spur . though some units on their left had lagged behind due to their sluggishness in changing from column to line before climing the hill - most moves more complicated than straight ahead require an 'Action Test' roll of one D6, and the dice were not with Balvier's units ( commanders can be used to give an extra attempt if close enough, but even Balvier's encouragement failed this time).   In the centre, the slower Imperial foot approached the hill, where de Lisle's regiment awaited.


Turn 5 and battle joined
 

Turn 5 saw battle really commence, as the opposing cavalry came to grips on both flanks. Given their different fighting  styles, the French attempted to charge while the Imperialists halted and levelled their pistols, trusting to their firepower and uphill advantage. Charging to contact requires an Action Test, and the left-hand French unit failed that test, while their comrades charged home, weathering the volley of pistol shot and contacting their opponents, but not being able to push them back. On the other flank things were more messy, with the leading French regiment charging uphill into contact, but their  second regiment being caught in the flank by Imperial Dragoons, who hastily fired from the saddle. Now these rules have no 'shooting' or 'melee' mechanisms - rather, when fired on or in contact with the enemy, units must take a Morale Test to see how they fare. That French cavalry unit, both under fire and threatened from the flank, rolled low and failed the test. As a 'Large' cavalry regiment they could stand three morale fails before breaking - so, two 'lives' left.  The Dragoons' intervention, plus the rather cramped space between wood and hill, made it difficult for the French cavalry to deploy for a full-blooded attack. In the centre, the Imperial foot closed on de Lisle's regiment on the hill, who gave the leading regiment a volley, which they shrugged off. Over in the wood, the Imperial musketeers had lined the edge of the trees to fire from cover - the French musketeers advanced and gave an opening salvo, but to no effect. 


Imperial Dragoons (upper right) cause chaos
 

Turn 6 brought first blood, rather unexpectedly. On the far left, the French cavalry unit which had failed to charge was in turn charged by the opposing Imperial regiment, clearly encouraged by the Frenchmen's hestitancy. The dice gods then intervened - if the modified roll of two D6 in a Morale Test is 3 or less, the unit is routed, and the hapless French regiment scored '2' and were duly routed. That left only one French cavalry unit against three Imperial on that flank, not good news. On the other flank also the French did poorly, with their unit which had charged up the hill into melee failing their Morale Test in melee and being forced to retreat, while their comrades failed Action Tests ( including  a 're-roll' by their commander ) and were unable to charge the Dragoons, and the regiment under fire failed yet another action test and could not even retreat out of the way! Thanks to those Dragoons and the  dice gods, confusion reigned in the French ranks.  In the centre,  Imperial foot succeeded in charging de Lisle's regiment - the Imperialists had more Pikes in their 'MX' ( Mixed) category regiments than the French 'MH' ( Musket Heavy ) foot, so they needed to get into contact, while the French would have preferred to stand off and trade musket  volleys.  De Lisle took a morale fail and fell back a little, while the leading Imperial unit passed their morale test, albeit requiring their Wing commander to attach himself and give a  re-roll after an initial fail. French infantry from the main body were advancing in support of their hard-pressed comrades, but were still some way back. In the woods, the French musketeers may have been 'elite' but they couldn't roll an Action Test success, and thus could not nerve themselves to charge into melee after giving their salvos.   

Turn 7 : Dragoons swept away by French charges
 

In Turn 7, the French left-wing cavalry pulled itself together, finally rolling good enough dice for a 'Swedish style'  charge  against the plucky  Imperial dragoons. The dragoons had little chance, caught by a solid wall of 'regular' cavalry ( with  the attackers' rear support giving a further bonus ) - with a 'minus 4' on 2D6, they rolled '5' and were instantly routed. The French tested to pursue, and couldn't restrain themselves, dashing forward past the end of the Imperial line, and were joined by their rear support unit too. That left two regiments of enemy  cavalry behind the Imperial flank. and caused some consternation. The French success was tempered somewhat by another of their  cavalry units on that flank failing to charge yet again, allowing their  Imperialist opponents to plod forward and ply them with pistol balls. On the other flank the sole remaining French cavalry held on grimly in melee, as did de Lisle's foot regiment, albeit taking casulaties, while further French foot came up in support and traded volleys with Imperial foot on the hill. Finally in the wood, their much-vaunted Elite musketeers still didn't fancy getting the lace on their tunics caught up in in the branches of the trees, and failed again to charge into contact! 

If the previous turn gave the French some cause for optimism, this was to be cruelly dashed on Turn 8. First over on the left, while Le Quatre's  cavalry unit hung on, de Lisle's foot failed a final Morale Test in melee and were routed. That meant that Le Quatre's wing  had lost two out of three units, and must undergo a 'Wing Morale' test - they passed, but would have to test again every turn, and failure would put the whole army at risk. Worse still was to come on the right, where a French cavalry unit under pistol fire from Imperial cavalry failed its Morale test - the French commander Sautville ( aka Hopton )  attached himself to them and re-rolled - only for the result to cause the rout of the cavalry regiment, and Sautville's own death in the rout! Disaster for the French, losing their army commander! 

The leaderless French tried to press on in Turn 9, despite Imperial pressure all along the line - Le Quatre's  sole remaining cavalry unit failed its morale test and was forced to retreat, and an infantry regiment in the centre,  another cavalry regiment and finally the musketeers attacking the wood  also failed tests under fire - for the musketeers, it was their last 'life', and they routed. On top of all that, what was left of Le Quatre's wing now failed its morale test and was routed, removing its remaining cavalry unit. That in turn triggered a morale test for the whole army - thankfully for them, the dice came up '6' and the army held on. Realistically their best option looked to be to begin to retire, and  with three 'Swedish' cavalry regiments still active on the left flank, there was at least a good chance of covering the retreat of infantry and guns. But even that turned out to be too optimisitic, as the dice gods intervened - two of the three cavalry regiments failed their Action Tests and refused to charge. Sometimes the dice reflect the mood of the army.. At this point, I ended the game - the French army was facing a morale test each succeeding turn, requiring 5 or 6 on 1D6 to stay in the game. With three cavalry and two infantry regiments left facing six cavalry and five infantry regiments, the situation looked pretty hopeless. 

How it ended - Turn 9

So, a second  attempt at Cheriton/Kirchendorf was no more successful for the French/Royalists than the first, and also chimed with the historical outcome.  And what about the Twilight of the Divine Right rules?  I had heard varying reviews, frankly - see Nundanket's and MS Foy's blogs. I have to say, I quite liked them - but with some reservations, and I think MS Foy's analysis in his blogpost linked above puts many of those reservations pretty well.   However on the whole I did like the idea of the  'combat mechanism', whereby  no-one rolls dice for melee or shooting effects, but any unit that is in combat has to take a Morale Test, be they under fire or in close combat. Given the short range of musketry and pistol fire at this period, it seems appropriate to minimise the difference between fring and melee - though there are still defined ranges for firing, hence units can move into musket range and just fire, whereas making physical contact means a melee ( hmm, does that actually undermine  the concept of  rolling-up fire and melee into 'combat'? Pauses to suck a thoughtful tooth.. ).   The 'Action Test' mechanism was interesting, again I liked the idea, as it introduced a fair amount of uncertainty into proceedings - a unit ordered to make an extra move, charge into contact,  or make any complicated manoeuvre ( even a wheel or about face ), might fail their Action Test and remain rooted to the spot, while presumably the officers and  NCOs berated their confused or cowardly charges. Wing and army commanders could  give a limited number of units an 'extra move' - in effect allowing Action Tests to be re-rolled - so failures could sometimes be recovered from. This gave quite a few occasions when things did not go to plan in the heat of battle, which was good from a 'friction' point of view. However, I think the likelyhood of a failed  Action Test seemed too high in some circumstances - a particular example being the French army's 'Swedish style' cavalry failing repeatedly to charge against their 'Dutch Style' opponents. This was because the 'Dutch style' ability to use Defensive Fire modified  the Action Test roll, such that the 'Swedish' horse needed a 4,5 or 6 on 1D6 to charge - a 50% chance of failing the test. Now ( unless I've read the rules wrongly)  I can't really see that Prince Rupert's ECW Royalist cavalry would fail to charge the  Parliamentarian plodders of 1642/43 up to 50% of the time, just becuase of the Roundheads' ability to let off a ragged volley of pistol fire... Admittedly the 'Dutch style' cavalry would suffer a negative modifier in their morale test if they were contacted by the 'Swedish' horse, but that didn't seem to compensate, somehow. Also, I should add that the dice were really not with the French in this game - a real 'anything that can go wrong, will go wrong' situation seemed to occur whenever I rolled dice for the French player!  Anyway, I think a 'house rule' tweak is in order, to allow  'Swedish style'  cavalry to ignore defensive fire when testing to charge.     

My comment regarding reading the rules correctly is also relevant, as I'm afraid I did find these rules rather hard to understand from simply reading them!  This is perhaps  partly due to that novel combat mechanism, but in general I just found that I wasn't easily picking up the 'flow' of the game from simply reading the rules ( whereas the In Deo Veritas rules for the same period were very good in this respect).  What did help quite a lot, luckily, was a series of YouTube videos made by the Twilight  author, whereby he plays out a whole game, with many different troop types, to show how the rules work. Watching those, suddenly the scales fell from my eyes regarding the flow of the game - but of course, when playing one's own game, it's not easy to fire up your computer and then sift through a series of videos every time something in the rulebook is hard to understand. If I persist with the rules, I will need to re-read and re-watch, I think, and take some notes.  Another point ( though no fault of the rules )  was that my small table meant I had to use quite a  small 'Base Width'  of just 40mm, which meant that a regiment of two bases covered  an area of  80mm by  20mm. In 15mm,  that gave me 8 figures for a regiment, in a single line, which didn't look much like a 'Pike block'  to me.  At the recommended 60mm Base Width, I might just have fitted 24 figures in two ranks,  which would be better - but  I wonder if  6mm figures might give a better 'period'  look to the units, which are after all supposed to represent up to 1000 men for an Infantry unit.  

Having played both In DeoVeritas and Twilight of the Divine Right,  which is my preferred set? Well... I'm not sure! Both had many strengths, and both had issues that made me pause. I need to think about this, quite hard - I do think that some of my  issues with both sets would probably be solved by some 'house rules' tweaks - for example by introducing some variation in cavalry types to In Deo Veritas, and by adding some more modifiers to the  'Action Test' rolls in Twilight.   I hope my battle reports have given an idea of how the rules played out, and may have piqued some readers' interest in one or both sets.  I had fun playing both games, of course!   Other rule sets are, of course, available - and I have managed to accumulate quite a few.. There may be further trial games in the near future, though I will have to use another scenario : I think  Cheriton/Kirchendorf has been done to death now! 

We are now in that 'time speeds up' period before Xmas, where one suddenly realises just how much gift-buying and food-shopping etc still needs to be done in the next week. So I can't promise another game will be played before the big day,  though I may be able to squeeze in one more post later this week ( 'twas the night before...').  Meanwhile, I hope you've been interested in my efforts with Twilight of the Divine Right   and enjoyed reading the battle report, as I enjoyed playing the game and writing the report.  I'll sign off here - keep safe and well, everyone.

Wednesday, 16 November 2022

Return to Kirchendorf, by Twilight

Having used the introductory Cheriton scenario to put on a trial game using In Deo Veritas rules, it was very convenient to find that the same battle is also one of the introductory scenarios in the Twilight of the Divine Right rulebook. A great chance to compare and contrast the two systems!  (Fleurus, 1622 is also an introductory game in both sets - perhaps because they both involve fairly small forces and should be quite simple battles? Twilight was published in 2018 and IDV only in 2020, so perhaps the latter couldn't resist being 'inspired' by the former? ) . So, let's look at the battle  again, this time through  the Twilight lens. 

First thing to note is the much wider area of battlefield that is used - where IDV started with the armies close together and action imminent in a relatively small space, Twilight places them much further apart and with a commensurately wider field of action and much more terrain.  Here is the map they use  ( I photographed the page from the rulebook, if this breaks any copyright then I will be happy to remove if asked ):  

That's an awful lot of hills..

The previous game really only covered the Cheriton Wood and Middle Spur area in the centre, as you can see this is much wider.  The main armies start on baselines and behind ridges, so main bodies can't actually see each other at the start.  Parliament has an advance party of detached musketeers in Cheriton Wood ( top right ) , and the Royalists have a foot regiment on the highest ground, marked 'Lisle' in the centre of the map - so there should be some action pretty quickly as the respective main battles run into  those two parties. 

Ok, so how about trying to set up that table? One nice thing about the rules is that they use 'Base Widths' for measurement, and the size of the battlefield is given in Base Widths (BW)  too. That made it quite simple to scale the suggested 20BW by 20BW battlefield to my roughly 3 feet by 3 feet table - I have ended up with a 'Base Width' of 40mm as a result.    What was not so simple was finding all those hills and roads - it took almost every piece of 15mm  terrain I had!  Luckily I made a habit some years ago of picking up a few more hills from Total System Scenic ( TSS ) every time I went to the SELWG show at Crytal Palace - several of these were taken out of their stapled bags for the first time for this setup. 

I had just about enough terrain!

Note that the higher 'South Spur' is made by the time-honoured method  of placing CD cases under the cloth for the first contour,  then TSS hill pieces on top for the second contour.  Not so elegant, but effective.

Now for the opposing forces: as in the previous game, I have used my vintage 15mm Thirty Years War 'Imperialists'  to stand in for Parliament, and French as substitute Royalists. Given the 30YW setting, this will of course again be the imagined battle of Kirchendorf.  Forces as follows: 

The Imperialist / Parliamentary army..

First the Imperialists ( Parliament ), commanded by Waller ( shall we call him a Germanic-style  'Mauer' ? ), organised as follows: 

Infantry ( Waller / 'Mauer' ) 

     1 unit Detached Musketeers, Trained, 'M' ( Muskets only )

     3 units Trained, 'MX'  ( about 3:2 muskets to  pikes )

     1 unit Trained, 'MX'   ( London Trained Band ) 

     1 Field Gun,  Trained

Cavalry ( Balfour,  google translate suggests 'Balvier' ) 

    2  units Trained, Dutch style

    4 units Trained,  Dutch Style 

    1 unit Trained, Dragoons 


..and their French/Royalist opponents

Now the French ( Royalists ),  commanded jointly by Hopton and Forth, organised as follows:

Left Wing ( Hopton  - shall we call him Sautville [ hop' + 'town' ] in French? It has a ring to it..  ):

        Detached Musketeers : 1 unit Elite, Small, 'Assault Tactics', Musket only 

         2 units Infantry,  Trained, Small, 'MX'  

         1 Field Gun, Trained 

         2 units Cavalry, Trained, Large, Swedish style 

         2 units Cavalry, Trained, Swedish style 

Right Wing ( Forth - I'll go with Le Quatre, which is cheating, I know! ) :

        1 unit Infantry, Trained, Small, 'MH'  ( about 2:1 muskets to pikes ) 

        2 units Cavalry, Trained, Swedish Style

I had some fun with English to German and English to French translation web pages for the commanders' names, but of course plenty of English, Scots, and Irish ( and no doubt,  Welsh ) officers fought in the Thirty Years War, in many forces on all sides, so I could have just kept  the English names, I guess!    

A few words of explanation - units are 'Regiments' or equivalent, and each unit ( except guns and baggage ) has two bases.  A standard Infantry 'regiment' is made up  of about 1,000 troops,  but they can also be designated as 'Small' (about 800)  or 'Large' (about 1200). Infantry are also categorised by the ratio of Musket to Pike  - see 'M', 'MX', 'MH' in the descriptions above, and then there are some other special attributes such as the 'Assault Tactics' which denotes foot who fire a salvo and immediately charge into combat. 

Cavalry regiments are about 500 for a standard unit,  400 for Small and 600 for Large. As you can see they are also categorised in different ways, and we have Swedish ( charge at the trot firing pistols as they close ),  and Dutch ( fire pistols first, then charge if the target is disrupted ) style horse,  and some  Dragoons.    

Artillery are either Field Guns ( 3 to 12 pounders )  or Light Guns ( under 3 pounder ) - we have only Field Guns. Both armies have a 'Baggage' unit - 'used to show the direction for pursuit', say the rules. 

Finally, all units have a 'quality' rating which is 'Raw', 'Trained' or 'Elite' - self-explanatory, I hope. I think you can see that there is quite a bit more detail to keep up with in the makeup of units than there was in In Deo Veritas - I think I'm glad to see things like 'Swedish' and 'Dutch' style cavalry being included, though they ( and the musket:pike  ratios for foot ) will need to be remembered and recorded on some sort of roster,  or by using labels or markers.  

Over all, the Imperialists have 5 Foot and 7 Horse units, versus the French 4 Foot and 6 Horse, and each side has one Field Gun battery - so a slight strength advantage to the Imperialists. The French have those 'Elite' musketeers, and perhaps a bit more 'dash' with their Swedish-style cavalry.  The  scenario Victory Condtions  are simple for this scenario - the Royalists ( French ) simply have to remain undefeated under the rules. As with IDV, the armies are organised in 'Wings', and if half of an army's Wings are lost then the army as whole tests for morale - failing that test results in defeat. 

Now at last, the table with forces deployed - not necessarily the final dispositions, just a trial to see what they looked like,  with Imperialist / Parliament nearest the camera.

As you can see, the armies fit into the space well enough - I was able to deploy the Imperialists near the camera in two lines, which is sensible for the period. The French are a little more spread out, with infantry in a single line - I may revisit that for the actual game. 

So there we are. I've had a read-through of the rules - I need to allocate some single mounted figures to be the commanders, but given that,  I think we are just about ready to go.  Alas 'real' life may now intervene, so there may be a bit of a pause before the game gets played, but I'll try to get it done as soon as I can.   

I hope this is interesting for readers,  I'm looking forward to playing the game and seeing how the rules play out, and reporting back on how it goes.  Until then, keep well, everyone.  

Thursday, 3 November 2022

After Kirchendorf : thoughts on 'In Deo Veritas'

As promised, in this post I will give my impressions of the In Deo Veritas Pike and Shot period rules for  'big battles' following my recent game based on their Battle of Cheriton scenario. Overall I'm quite positive about it, though there were one or two issues worth raising.  I'll also show a few more pictures of  the game in progress.


First the  plus points : 

Simplicity - there were no really  complex mechanisms,  only 'D6' dice are needed. Tests for unit disorder, wing fatigue and  army 'general will' involve one D6 and a few modifiers. For combat, units usually roll 1 to 3 dice, it's always  4,5 or 6 to hit or save, and variable factors for advantage or disadvantage will add to, or subtract from, the number  of dice rolled. All quite easy, and to me has quite a nice 'old school' feel - '4,5 or 6' takes me right back to Charles Grant and 'Battle'!   Charts with modifying factors are quite short, easy to assimilate. It would also be simple to add your own modifiers if you wanted to 'tweak' the rules. 

They read quite well: the rules are set out in a logical order, with not too much detail up-front.  'Army Composition' comes first and starts with Commanders, then the Wing concept, then different troop types are described in plain English  (  'the most common unit of the period was the formed infantry unit of between 900 and 1200 men. Frequently called a 'Brigade', each unit represents a grouping of regiments' ) - technical stuff about how many hits they take or shots they fire can wait till later. I found that made it easy to assimilate information in gradual stages.  The explanation of different parts of the rules generally follows the turn sequence - Orders, Movement, Combat, Retreats, Pursuit, Cohesion (wings), General Will ( army level ) - all pretty sensible, and the writing is pretty clear and easy to understand. 

Scale: use of the 'Brigade' as the basic unit  ( 900-1200 foot, 400-600 horse ) is sensible for battlefield units in larger battles.  There's not a specific 'figure scale' - the Brigade is defined by its base size, so you can decide whether to use 6mm ( or even 2mm ) figures and pack loads in, or 10mm/12mm/15mm with less figures in the Brigade.  

Orders and Move sequence are quite neat - you  move  a 'Wing' ( from either side ) at a time, using a  card draw - the order that wings move in can  be crucial and is effectvely random, giving some uncertainty of outcome. You could rationalise this as different Wing Commanders responding more or less promptly to orders, which feels right.   Orders are given each turn, but at the level of a whole  Wing - so you are only issuing maybe four orders per turn -   and are v. simple,  just Attack/Hold/Withdraw.  

Vive la France..
 I very much liked the use of Levels of Disorder - Sound/Disordered/Disrupted/Routed/Destroyed - as the main mechanism for the effect of combat, rather than tracking casualties. I suspect that  reflects the period correctly - the deep blocks of pike and shot units depended on keeping cohesion, probably more than on simple numbers of losses.  It was obvious to use counters ( e.g. coins ) with the number of counters indicating disorder level - casualty markers could be even more appropriate. Simple!

Sensible combat outcomes - units hit by fire, or losing a melee, suffer increases in disorder level, may be forced to Recoil or Rout,  and can be destroyed completely if losing by a wide margin or suffering enough hits. The 'Recoil' result  makes it sensible to keep a sufficient distance between front and supporting lines,  allowing front-line units to recoil without disordering the second line, and that feels right, too. The simple  interpenetration rule allowed a second line unit to step forward and replace a first line unit that was halted by artillery fire - straightforward.

Wing 'Fatigue' seems sensible - once a Wing suffers  routed or destroyed brigades, it can be fatigued (i.e. demoralised) triggering automatic 'Hold' or 'Withdraw' orders.  Similarly 'General Will'  for the whole army. It looks like with 1/4 to 1/3 of the army's  brigades routed there is a 50/50 chance of defeat -  .go over 1/3 routed and it gets more likely. Finally the after-battle 'Pursuit' mechanism is fun, simple but effective and a useful device in campaigns.

Turn 2, imminent action
 I did have a few issues, though:  

The melee combat mechanism felt a bit long-winded : although the 'hit' and 'save' rolls are simple, the problem is that you have to roll for Unit 'A' to hit, then Unit 'B' to save those hits, then Unit 'B' to hit, then unit 'A' to save those hits, and then finally compare the number of unsaved hits for each side to get the result.  When the armies got to grips, with melees all along the line, I ended up with 7 or 8 sets of melee combats to do as above, so that could be up to something like 30 die rolls! For a solo player, that started to feel like hard work - though I suppose with two players it would be less work for each.  Hmm.. do we really need the 'saves' part?  Could we just combine the charts of variable factors for 'hits' and 'saves' into one, and have one die roll per unit instead of two? In melee that would still give 'opposed' die rolls so both players involved, but less drudgery..

Shooting ranges : admittedly I probably shouldn't have halved all the movement rates and shooting ranges to fit my small table.  The 'normal' move distance for an Infantry Brigade is 12 inches, and their muskets have a range of 3 inches. Once I halved those, trying to measure  1.5 inches for musket range (and one inch for cavalry pistol/arquebus fire) became a bit ridiculous. Even at the unmodified 3 inch musket range, it felt a bit awkward, and of course if Unit A starts its move less than 12 inches from Unit B, then A could charge into contact in one move, wihout ending a move within musket range. There's a mechanism to deal with that - Unit A stops at musket range and both units exchange fire, before A closes in for melee, if not stopped by B's fire.  That does give an authentic-feeling sequence of events, with units advancing, giving fire and then charging home, but it also adds two more sets of 'hit and save' die rolls per combat!  

Now I've always had the impression that effective musket range was really quite short - even in Napoleonic times, probably not much more than 100 yards, and I suspect that 40 yards might be more realistic ( and by the way, how terrifying must that have been, and how did anyone have the courage to do that? ), and as a result I can't help feeling that we might be better off simply rolling musketry up with melee into something called simply 'combat',  which occurs when units get sufficiently close to each other. This seems even more appropriate when playing 'big battles', where the basic unit is a Brigade. The player represents  a General, and  he doesn't know or care whether the Yellow Brigade defeated their opponents with a musket volley only, or by charging home - they probably did both, anyway. So maybe we don't need to replicate the combat at  such a level of detail?  I think my halving of the distances and ranges perhaps just served to emphasise this point. 

Turn 5, fighting all along the line
Cavalry are, in general, all the same ( fully armoured cavalry get an extra 'save' die, but that's about it ), and I wondered why the 'Trotters vs Gallopers' or  'Dutch vs Swedish style'  concept that appears in other rule sets was not used - I feel that is a big part of the 'feel' of the period. I suppose perhaps the rules are taking up my point about not going into too much detail? But it felt like something was missing somehow. It might be addressed by simply adding a variable - one exta 'hit' die for 'Gallopers' charging at 'Trotters',  perhaps? 

I was confused by the 'Impetuous Pursuit' rule, used when a unit losing a melee retreats, and the winners may pursue - as so often the ECW Royalist cavalry would, for example. If the losing unit ends its rout move within 18 inches and line of sight of the winning unit(s) then the winning unit(s) must test to see how it.. responds to the opportunity to attack the enemy at his most vulnerable  says the rulebook - but in the earlier paragraph on Retreats,  Routing Units use the March Column move rates.. They must attempt to move the full distance..  For a cavalry Brigade, the March Colmn move is 27 inches -so if Prince Rupert's regiment gets the better of some of Parliament's   'old decayed servingmen and tapsters' and put the latter to rout, the Roundheads will be 27 inches away at the end of the rout move, and the Royalists won't even get to roll a die to pursue, whether they want to or not. Hmm.. have I missed something?  As a result, the only Impetuous Pursuit that happened in my game was by an Imperial  cavalry unit against a French Infantry brigade - none of the many routed cavalry units were pursued by their vanquishers. That seems to be wrong, doesn't it? 

For the life of me, I can't find a mention of Dragoons dismounting or mounting-up. There's a rule for changing formation between 'normal' formation and March Column ( it takes a full move), and there's a rule for deploying/limbering  artillery ( e.g. field guns - a full move without moving to deploy, may then fire ). But Dragoons dismounting - no mention. Hmmm... have I just missed it? 

I didn't make much use of commanders ( army generals and wing commanders ), I kept things very simple by not attaching them to units, simply kept Wing commanders  close to their units, so as to keep all brigades 'In Command' - if 'Out of Command', units cannot move toward the enemy. The command radius is 6 inches, so the units of a wing have to be quite close together. But in the Cheriton scenario in the rulebook, both sides have three units each of  'commanded musketeers' - Company sized units, deployed in the woods to the East of the battlefield. Those units are very likely 'out of command' right from the start, given the specified deployment. So they should not be able to advance against each other, unless their Wing commander personally comes over and leads them - which would leave the rest of his wing 'out of command'. I suspect a special rule was intended, to the effect that these detachments don't have to be 'in command' to operate normally. But I don't see any such rule. 

by Turn 6, French line has swivelled to along the road
That's about it, I hope this has been of some interest.  I may have outstayed my welcome! I should add that the above are only my personal opinions, you are entirely free to disagree with them ( please feel free to use the comments area  below )  and  if I am factually wrong on any of them, I am happy to be corrected. Overall, it was positive experience using these rules, I enjoyed the game and most of it felt 'right' for the period. The organisation of armies  into Wings which are ordered and moved as a whole, and the use of Disorder rather than casualties seemed particularly good - my favourite parts, I think.  The influence of Frank Chadwick's much-loved 'Volley and Bayonet' rules is strong, I suspect, and that's no bad thing. 

I had also hoped to have a look at a rival set of rules - Twilight of the Divine Right from the Pike and Shot Society / Wyre Forest Wargamers.  But I've banged on for far too long about In Deo Veritas, and as a result I haven't even fully read Twighlight..  so that will have to wait for another time. It will be interesting to compare them, as both sets of rules are for a similar 'big battle' scale of game, and obviously in the same period. 

I'd better get on and read those rules, and next time I should set out the details of a battle to be played with them, so we can see how they play.  Meanwhile I hope this was interesting and/or useful; keep well, everyone.


 .