Showing posts with label Pike and Shot. Show all posts

Sunday, 31 August 2025

'Proper Wargaming' : Edgehill with Pike & Shotte

Earlier this week I was fortunate to have a really great day's 'proper wargaming' - thanks to old gaming friends Reg and Tony. We met at Reg's place at Haverhill, which is a nice easy trip for me. Reg had set up his table with his  15mm ECW collection for a re-fight of  Edgehill (1642), the first big battle of the English Civil War. We  used Warlord Games  Pike and Shotte rules, which I had not played before, though I have been introduced to the Warlord  Black Powder system on which P&S is based, in a couple of previous games with the same guys - and I have thoroughly enjoyed playing them.  

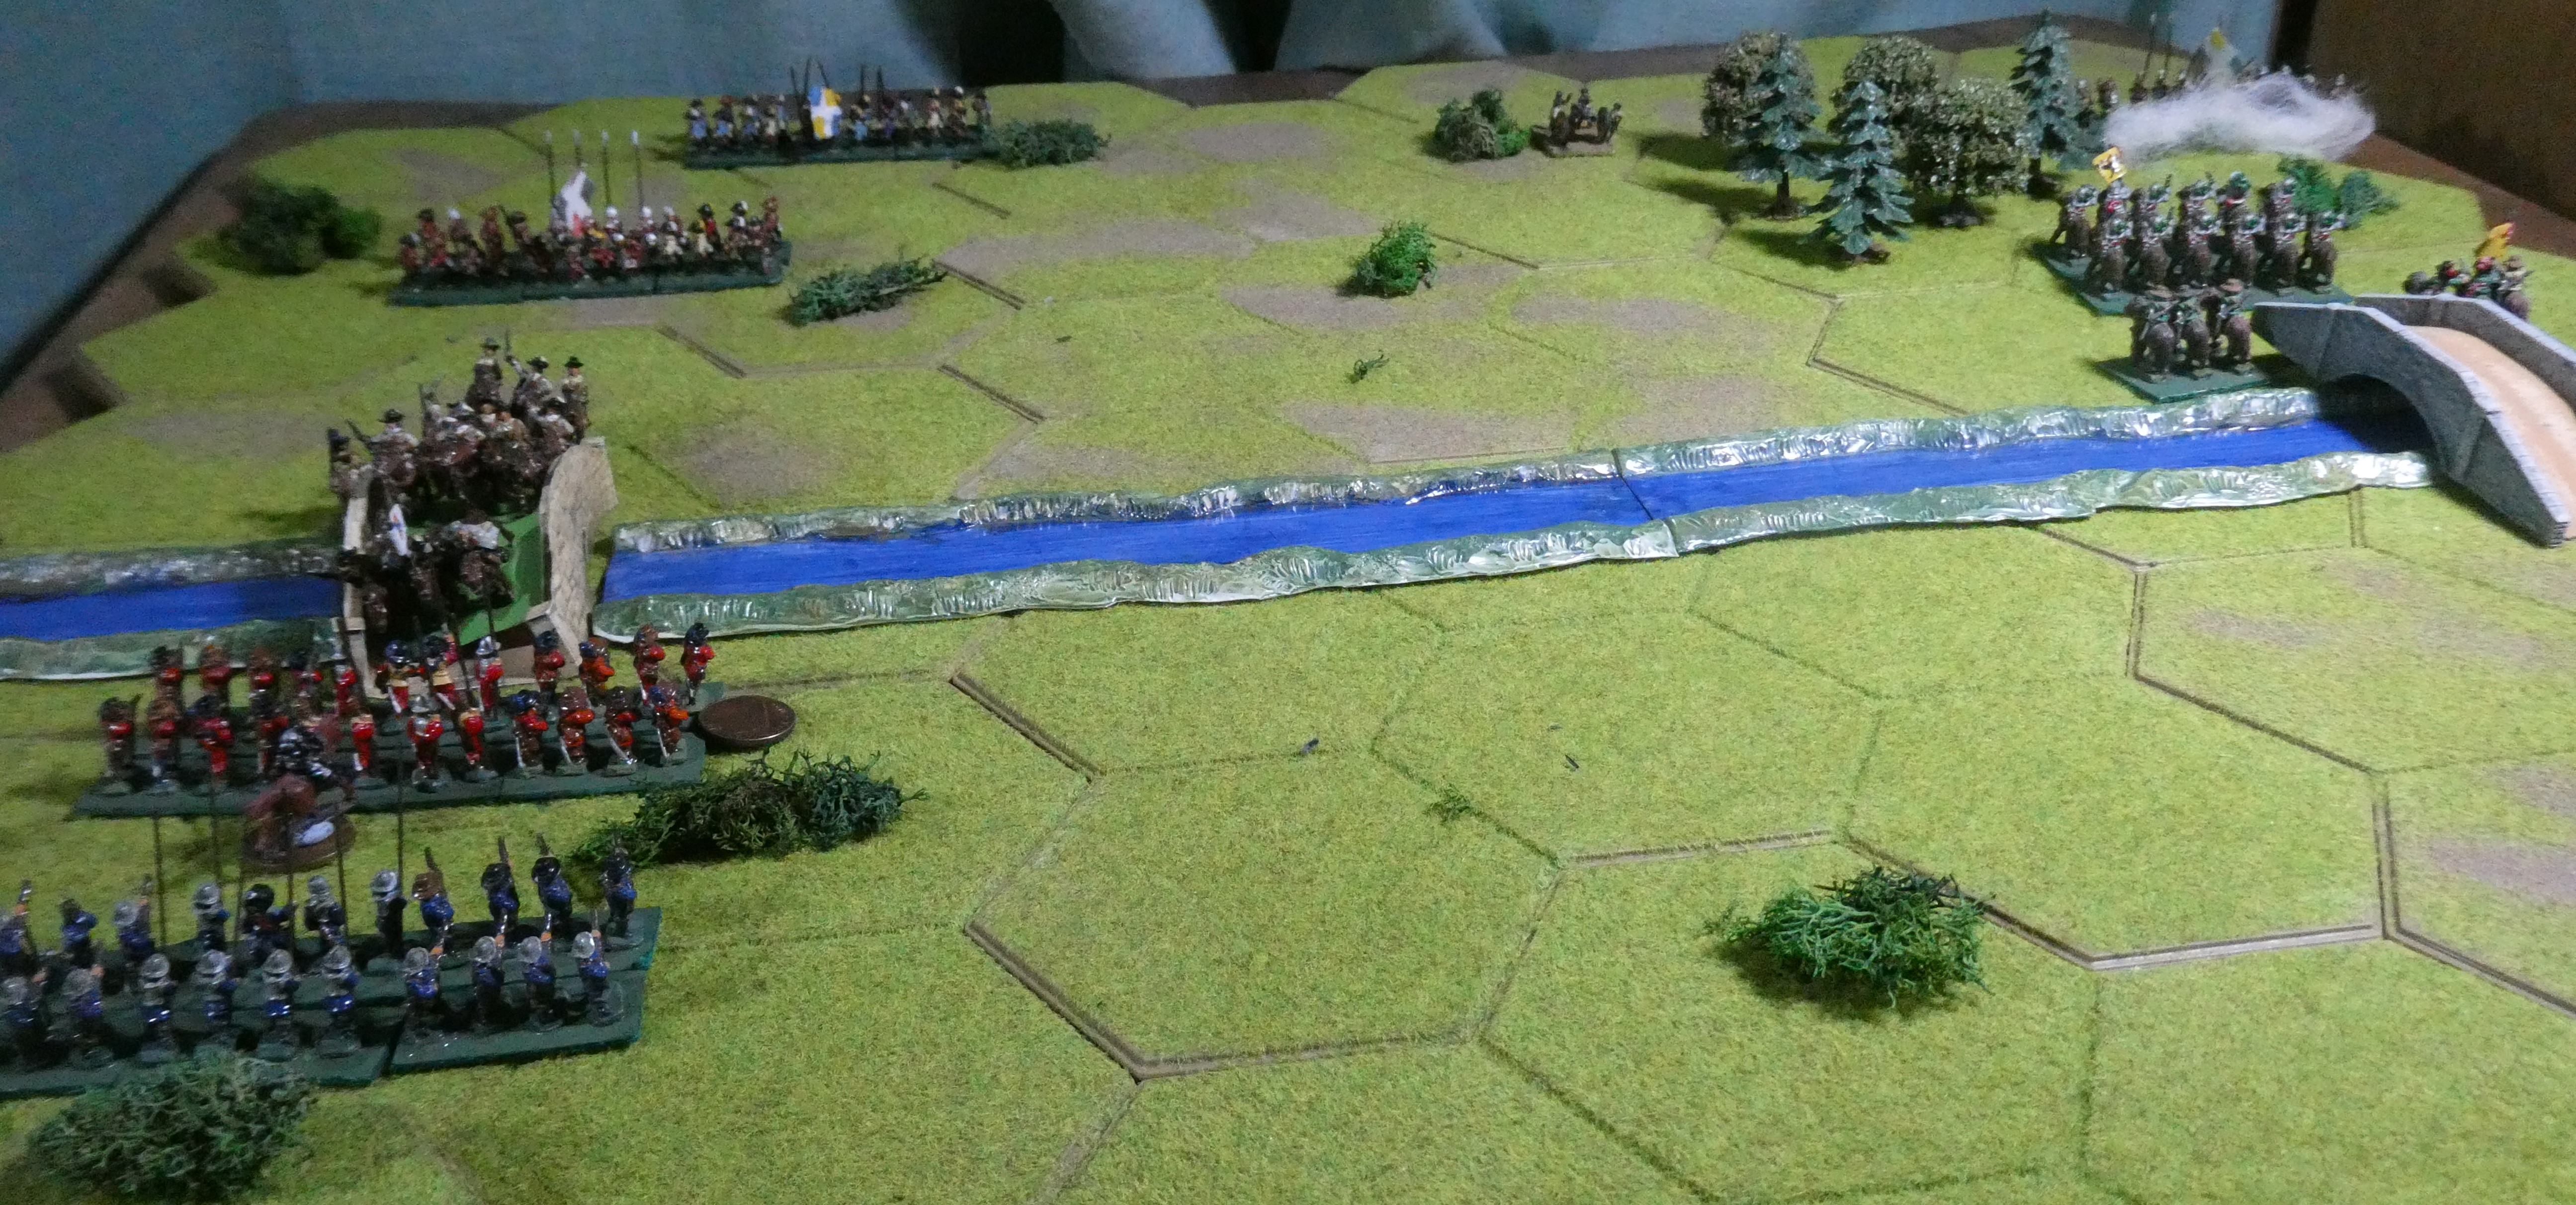
I took some pictures during the day, in a slightly haphazard way - as one does when busy playing the game and learning the rules! I'm afraid  some of them are a bit dark, but I'll include a selection  here to give a flavour of the game. Here is the table at the start of the day: 

Initial setup - Parliament to the Left

I should say that nearly all the scenery ( roads, stream, fields, trees etc ) was purely for decoration and did not affect play, except for the hedges at bottom left, lined with Roundhead dragoons. Tony played King Charles,  and Reg and I shared the Parliamentary command, with me on the right (nearest the camera, left of photo)  - each side had two cavalry wings and the central infantry and guns divided into two sub-commands ( called 'Battalia' in the rules, I think - I'd just call them Left and Right Wing of Infantry), so it was easy to split the Parliamentary army.   Reg had put in a few special rules - the main one being aimed at realistic behaviour from the Royalist cavalry.  Prince Rupert over on the Royalist Right ( top right of picture) had 'Galloper' cavalry up against Parliament's less dynamic  horsemen, who used 'Caracole' tactic (they could not counter-charge, which seemed quite a disadvantage) - so Reg made a rule that if the Royalists routed their opponents, they would automatically then have to attack the Parliament baggage train, which was placed nearby. They would fall to looting and be out of the battle, unless actually attacked by further Parliamentary units. That seemed quite an appropriate rule, and I'm sure we all assumed it would happen - more on that, later! 

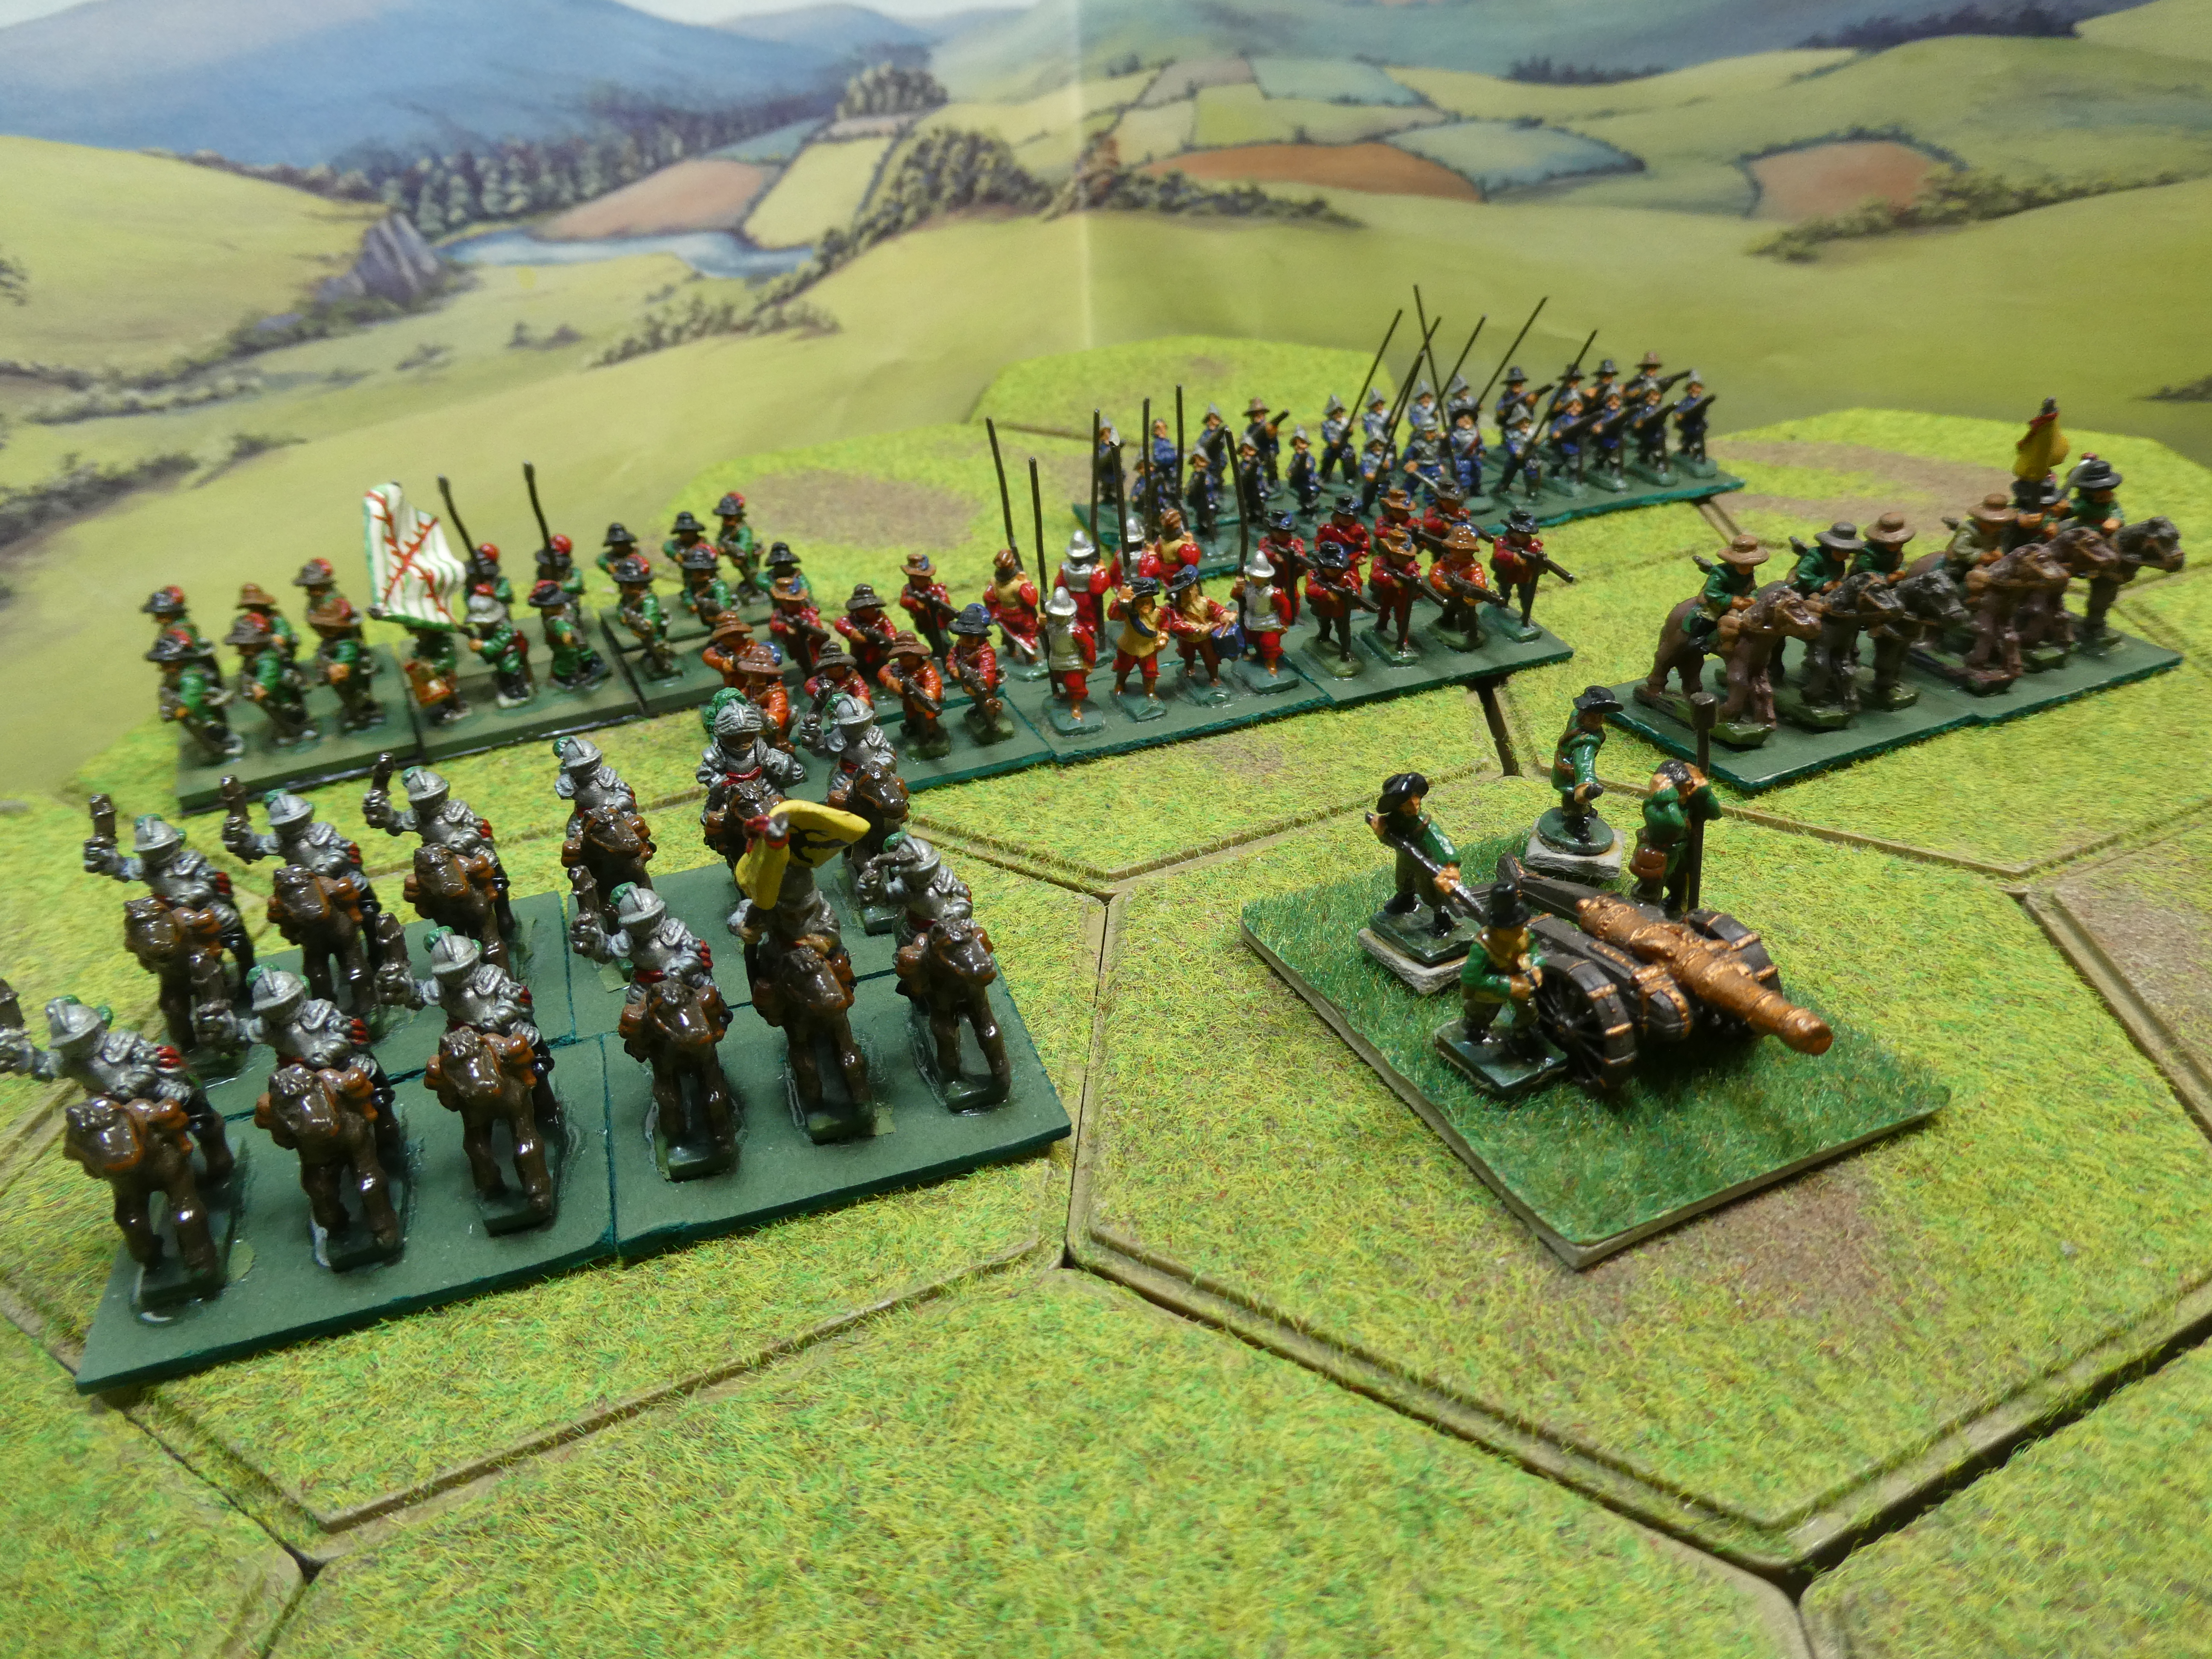
For obvious reasons, I was more involved and took more pictures of my side of the battlefield, which was perhaps a shame, as the really decisive action took place over on the other wing, as Reg's horse  battled with Tony/Rupert's Cavaliers!  Anyway, here's my cavalry wing  ( slightly better quality, as I had 'Gallopers'),  and the foot beyond: 

Parliament right-wing cavalry

   and my opponents on the Royalist left :


 Reg's figures were fairly 'vintage' ( I mean that in the nicest possible way) and included both 'second generation'  and 'third generation' Minifigs 15s - I have some of the '2nd Gen' myself, and I rather like them, I think they are  well-proportioned, crisply-sculpted and simple.  And  I reckon they were from the early 1980s, so 'vintage' indeed!  

Over on our left wing,  here are Reg's sturdy 'Caracolers'  moving up steadily:

Parliament left-wing cavalry 

 ..and here are a couple of Rupert's regiments coming in at the gallop ( or maybe 'a good round trot' at least) 

..vs. Rupert's Cavaliers 
 

To give an idea of how things developed, here's an overview of the battle, about the mid-point of the day : 


 Reg and I pretty much stood our ground and let Tony come to fight us - Tony attacked on both wings with his cavalry as expected, and used an interesting manouevre in the centre. He brought forward  most of his second line infantry units into the first line, hence coming at us with just one line  of infantry, and aiming to get superior numbers into action early on and overpower our first line ( not having moved forward much, we didn't have space to imiitate him, but equally I was happy to be more 'conventional' and keep the second line as reserves to feed into the fight as required.  Tony also came forward in something of an 'oblique order', having spotted that my cavalry wing was not going to advance beyond the hedgeline, so would not threaten his infantry flank, therefore  his left-wing foot could move further forward.  

The cavalry wings got stuck in, but not perhaps as expected. It's got to be said that Rupert had something of a bad day! As Reg likes to say, his favourite part of the Black Powder system is the 'Command Rolls',  required to allow units and groups of units to carry out their orders. A very simple die-roll mechanism means you just can't be sure if your orders will be carried out - and I think failures can easily be rationalised as due to messengers not getting through, orders being misunderstood, or regimental commanders being indecisive, incompetent or perhaps even drunk! Anyway for whatever reason, 'Rupert' had quite a lot of problems getting his splendid horsemen to dash forward - he wasn't alone as his opponent had quite a few failed rolls as well! Instead of the expected Royalist steamroller going over the Parliamentary wing, things developed in an much more back-and-forth way. Reg's cavalry could not counter-charge but there was nothing stopping them just charging, and they managed that well enough several times! Quite a classic 'whirling cavalry fight' developed, as you can see here 

Cavalry fight on Rupert's wing - not the expected walkover!

Reg used a simple token system for keeping track of unit status - the 'puffs of smoke' indicated Disordered units, the small green dice were for tracking casualties , and when a unit took enough hits to  reach 'shaken' status the green die was placed on a circular mdf token. So you can see the nearest unit in the picture ( Royalists) is looking rather battered! 

On my cavalry wing, I was well-cast as a cautious early Roundhead leader, deciding to hold the hedge line with my cavalry if possible, thus negating any charge bonus for the other side. Tony wasn't dicouraged by that, and got stuck in of course! We tussled long and hard over those hedges, but I'm glad to say my chaps held their ground, and the Royalists could not break us. Here's a typical melee across the hedge, with the larger red dice used to keep track of hits taken in the melee ( which may of course be 'saved'  before translating to the green casualty dice ).  Looks like my chaps (left) are getting the better of this one, just!   


I have to say I managed to miss photographing the most exciting incident on my wing - isn;t that always the way, too busy rolling the dice and reacting to the results! I got a bit complacent and moved one of my central foot regiments forward ( I had been maintaining an alignment with the hedges overall), and they were pounced on by Tony, who sent a cavalry unit galloping hell-for-leather to attack them in the flank  - aided by a highly successful 'up to three moves' command roll!  My regiment was able to go into 'hedgehog', and in fact the Cavaliers never made contact, as they had charged across the front of another Parliamentary regiment and a gun, who all fired like crazy - the horse took enough hits to force a Break Test, which sent them reeling back to their own lines.  They did however have an impact, as the poor Parliament infantry unit was now stuck in 'Hedgehog' and shot to pieces by Royalist foot and guns!

Infantry firefight on the Parliament centre left 

 All along the line the infantry and guns carried on firefights, with plenty of casualties taken and dished out, and Tony's tactic of bringing forward more units came close to working - at one point Reg had three adjacent units all teetering on the edge of breaking, which would have left a massive hole in our centre!  Lucky for us, Tony's next round of firing saw some low die-rolls, Reg was able to rally off some losses and we breathed again! 

and on our centre right 

 Above is my side of the infantry fight, and you can see where a first-line unit had routed under fire, but I was able to feed a second-line regiment into the gap - that felt like authentic tactics. 

Allowing for a lunch break etc,  I reckon we got about five hours of solid gaming in, and it was always absorbing and fun, thanks to my fellow players and the very 'playable' rules.  And the result? Well, on my flank we held those hedges fairly well, and didn't look like we'd be shifted; in the centre there had been fiercesome firefights but no-one had actually closed to 'push of pike', and things looked pretty evenly matched.  But on our left wing, Rupert's Cavaliers actually took quite a bashing from the Parliamentary horse, and I think in the end Rupert's wing lost half its units, and was therefore 'Broken' - quite the opposite result to what I had assumed! That left Reg with enough cavalry in good shape to start rolling up the Royalist foot on our left ( and remember they had advanced in a single line, no reserves - that may have been a fateful decision! ).  So at that point, and with an  appointment for dinner at the local pub, Tony graciously conceded, and 'twas a famous victory for Parliament!  Below you can see the final situation and my excellent fellow players :

 That was a great day's gaming!  Many thanks to Reg for hosting, great figures and table  and  a really good scenario, and Tony for his usual cunning and dynamic play, and all in a great friendly spirit!

We all had some thoughts on the game - we did wonder if the artillery were a bit too powerful, not so much due to the rules,  but perhaps there were too many guns? Both sides were  a little reluctant to charge their foot forward into melee, partly due to the expected effects of close-range guns on the chargers. I have Peter Young's book on the battle somewhere, and am interested to have a look at the OOBs and the numbers of guns.   I wondered if we had also set up a little too far apart - we had both light and medium guns, and both had to move forward slightly to get into range. I think historically the armies deployed within artillery range, and the battle opened with an exchange of cannon shot, as was typical at the time. So perhaps we should have started a bit closer, and given at least the medium guns the chance to shoot from the start, rather than the first couple of moves being taken up with shuffling forward into range. 

The rules, I thoroughly enjoyed - I've talked about about the command rolls, and I do think they are a very neat way of introducing 'friction' to proceedings, in a reasonably authentic way - note that a better commander will succeed with his orders more often, and your C-in-C has the opportunity to 're-roll' some of your failures, which allows you some more agency.   The firing and combat rules are really simple 'roll a bunch of D6', with generally 4,5 or 6 to hit, the opposition allowed saving rolls and the crucial '6 inflicts temporary disorder', which gives a further level of uncertainty - you might save all those hits, but still be disordered by the enemy fire.  As a beginner I didn't get all the concepts and mechanics  straight away, but certainly picked up enough to be playing quite happily, pretty quickly. Reg and Tony are big fans of rhe Warlord BP system, and I can entirely see why ( I just noticed Norm Smith his excellent Commanders web page giving a great little run-through of how the system works for a Napoleonic infantry 'column vs. line' assault - see  'A Run Out With Black Powder', 25th Aug 2025 - , he is clearly a fan too!).   Now I must say that from pure cussedness I think I am not going to get entangled in the Warlord 'universe' and start buying all the multiple editions and formats of rulebooks and scenario books and starter sets, but I'm more than happy to play them as a guest; might even look out for a second-hand set of 'BP' on ebay or whatever, just to be a bit more prepared in future!  

All in all, a really good day's gaming, in good company - many thanks indeed to both Reg and Tony. I look foward to further outings - hmm, it may be my turn to host next, and those recently-acquired 7YW figures might be useful..  I hope this has been interesting for readers, it was certainly enjoyable for me, both to play and to write about.    

Next time, I may be able to present some sort of 'parade' of vntage Minfigs 25mms. Until then, keep well, everyone. 

Friday, 9 May 2025

Quick-Fix Gaming: Dominion of Pike and Shot

 It's been far too long since I actually set up a game on my own table - there's just been a bit too much 'real life' stuff going on. However, recently some  other bloggers (in particular,  Bob Cordery)   highlighted a very simple series of rules known as 'Dominion of...'  by Steve Parker, which allow very quick games on a 'three by four'  grid table. You don't even need figures to try the rules, you can simply play the battle out using pencil and paper.  I like simple rules and these seemed to have something about them, so I spent the huge sum of (almost)  £5  on the PDF of  Dominion of Pike and Shot  from Wargames Vault.  Typically an 'army' in the rules is up to 6 units, and there is a selection of army lists in the basic rulebook,  so it was very easy to get out my veteran 15mm Thirty Years' War figures and  create forces for list no. 63, 30YW  French and no. 56  'German Catholic'  (let's call them Imperialists),  and give the rules a try.

initial setup, veiwed  from behind the French army
 

The army lists give similar but not identical forces for the French and Imperialists: each has two  units of Cuirassiers, defined as 'Melee Mounted'  and one unit of 'Carbineers' ( I assume 'Harquebusiers' ) which are 'Missile Mounted',   and then three units of Infantry.  The variation comes in the Infantry - the French foot are defined as Pike (plus Musket) - 'Melee Foot' - and the Imperialist foot are Musket ( plus Pike ) - 'Missile Foot'.   These classifications are the equivalent of  'Pike Heavy' and 'Shot Heavy' infantry formations in other rules, so the French are 'Pike Heavy' and Imperialists 'Shot Heavy' in these lists. From my prior knowldge I admit that  I would probably have suggested the other way round!  But I wonder if the idea of these lists is to emphasise the attacking Elan of the French by making their Infantry very much melee-oriented, while Imperialist foot are a bit more ponderous and defensive-minded.  Units can be deifned as 'Armoured' or 'Elite' but I kept it simple to start with, keeping all units 'vanilla', so to speak.     

The picture above shows the two forces deployed at the start,  shown from behind the French army. In the middle, the main forces face each other with each having a unit forming each of Left Wing, Centre and Right Wing. I went for a conventional setup of Infantry Centre, Cavalry on the wings, with the French deploying both their Cuirassiers while  the Imperialists placed Cuirassiers on their right, Carbineers to their left.   The remaining three units on each side are placed in 'Reserve' - those are the lines of units nearest to (French) and furthest from (Imperial) the camera.  A die roll decides which side is 'Attacker' and which 'Defender' - the Imperialists won that honour, and as a result the French had to deploy first, an the Imperialists 'moved' first each turn.  

Front Lines at start (French nearest camera) 

True to the period, there is a Bombardment phase before the first turn, even though  no artillery units are actually included - a nice simple way of reflecting the reality, where artillery often did not play much part beyond an initial cannonade. Each side chooses a target sector to bombard - Left, Right or Centre - and rolls a dice, and a 'hit' forces an targeted Infantry unit to retire, but a  Cavalry target if 'hit' is goaded into a charge. Risky, but presumably you aim to provoke them to charge recklessly against a better unit of yours.   This phase turned out to be quite eventful - the Imperialists bombarded the Cuirassiers on the French left, and 'hit', provoking a charge at the Imperial Cuirassiers opposite them. That meant combat between the two, at which point both promptly rolled high scores, and both units were destroyed!   Quite a shock for both sides, even before the first 'proper' move!  the French bombardment, meanwhile, had no effect. 

bombardment provokes Cavalry clash!

If a unit is defeated it is removed from the game - sudden death,  indeed - and must be replaced by a unit from the reserve, if one is available.  So as a result the Imperialists brought up their second Cuirassier unit, and the French their 'Carbineers'.   

Now on to Turn 1 - each side gets to attack in one sector, with Attackers ( Imperialists) going first. Both sides elected to attack with their respective Carbineers against opposing Cuirassiers  - the logic being that Missile troops get to attack first, so the Carbineers hope to shoot well enough to drive away their opponents before being charged.  It didn't quite work out, as the both Carbineers units shooting was ineffective, and the Imperial Cuirassiers promptly charged and destroyed the Carbineers on the French left (French Infantry regiment  'Bleu' moved up from Reserve to replace them),   Each side gets one attempt to 'rally' a destroyed unit, and at this point the French tried to rally their Cuirassier unit - and failed. So losses after turn 1 were: French 2 units, Imperials 1. 

End of Turn 1 (Imperialists to the right)
Then Turn 2 was quite bloody : Imperial Carbineers on their left wing managed to shoot down the opposing French Cuirassiers ( both French Cuirassiers now gone ) but honours evened when on the French left, the newly-arrived 'Veste Bleu' regiment chased away the Imperial Cuirassiers.   The French brought up their last reserve unit - 'Veste Vert' infantry,  while the Imperialists replaced their dispersed Cuirassiers with their own Green coated infantry.   Losses now  French 3 units, Imperialists 2, and the French cavalry have all been scattered. 
Turn 2 : French Cavalry seem to have 'gorn'
Turn 3 - on the Imperial right, their 'Gruner mantel'  foot attacked the French 'Veste Bleu' regiment. The Imperialist unit being 'Missile Foot', it fired first, but missed. The French being 'Melee Foot' then got to strike back - and also failed.  In turn, in the French centre the  'Veste Rouge' regiment attacked the Imperial 'Blauer Mantel' unit. Again the 'missile' troops (Imperialists) rolled first, but to no effect, and the French promptly charged home and routed the Imperial unit.  They were replaced by the 'Roter Mantel' regiment from reserves;  the Imperialists also took the chance to try rallying one of their lost Cuirassier units, and succeeded. That left the losses at end of Turn 3  French 3,  Imperialists 2. 

Turn 4 : On the Imperial left their Carbineers attacked the French 'Veste Vert' foot, to no effect, while on the French left, the struggle between their  'Veste Bleu' regiment and the  Imperial 'Gruner Mantel' ended in defeat for the Imperial regiment.  The newly-rallied Cuirassiers stepped up from reserve. Losses at end of Turn 4 were  three units each - neck-and-neck stuff - and we have an interesting situation,  with three French Infantry units facing only one Imperial foot and two horse units. 


End of Turn 4 : an interesting balance

The next turn was the first one without any losses - the Imperial Carbineers and French 'Veste Verts' tangled inconclusively, as did the French 'Veste Bleu' and Imperial Curassiers on the other flank. Losses remained at  three each.

After that comparitive lull, things livened up on Turn 6. On the Imperial left, the long struggle between their Carbineers and French 'Veste Verts' foot continued without a result, while on the French left their 'Veste Bleus' tried conclusions with the Imperial Cuirassiers - and the French regiment was promptly routed!  That brought losses to French 4, Imperial 3 and crucially left the Cuirassiers unopposed,  and able to turn inwards to take the French centre in flank. 

Turn 6 : French flank in danger..
Turn 7 therefore inevitably opened with the Imperialist Cuirassiers charging into the flank of the French centre - attacking from the flank gives a +1 on the die roll, and the defending unit cannot reply if they also have opponents to their front. The dice duly favoured the Imperialists, and the 'Veste Rouge' regiment was destroyed. 

Turn 7 : Imperial Cuirassiers strike
 

and with only one unit remaining, the French on their turn facing imminent defeat,  tried a last desperate attack with their 'Veste Vert'  regiment on the Imperial Carbineers - only to be scattered by a salvo from the horsemen ( I think we can conclude that the French infantry were none too enthusiastic in their attack, and needed little encouragement to skedaddle).  Thus Turn 7 ended wth all 6 French units routed, to Imperial losses of 3 units. 

The final blow -  last French regiment routed! 

 Well, that was rather fun.  Obviously very simple,  but quite tense and with a few surprises and subtleties in the mechanisms. I think it took about 90 minutes to play through, but that included taking detailed turn-by-turn notes, checking rules carefully and taking some photos, since it was a first try.  I think it would have probably taken less than half an hour if simply played.  Some interesting questions arise over details of the rules, which give advantage or disadvantage to units in combat in certain combinations. For example  'Missile Mounted' get +1 against 'Melee Foot' ( note that without that modifier the Melee unit would have a +1 advantage, but also that the Missile unit always fires first).  This is all quite subtle stuff, which  I will be interested to ponder over and try to decode all the ramifications of what on the face of it is a very simple combat mechanism. 

Overall, I enjoyed this - it certainly gave a very simple and quick means of 'scratching the itch' for a game, and I can see that it could be very useful for playing through mini-campaigns in short order. I note that there is a companion volume available with many scenarios recreating real battles of the period;  it may be interesting to see how White Mountain, Lutzen or Naesby translate to this small gridded-game format. Having recently bought a book about Fribourg, 1644, I wonder if I could work out a scenario for that? We shall see.  

Next, I need to 'crack on' with painting scenery for my Risorgimento 19th Century Italy project, and I feel a Portable Seven Years War  game is long overdue - and I also hope to get to the Partizan show at Newark in about a week's time, so plenty to be going on with and to generate future posts here. Until then, keep well, everyone.    


Friday, 31 January 2025

Still Alive - But Got Killed the Other Day

 Is 31st January too late to wish everyone a Happy New Year? I hope 2025 has started well for you all, anyway.  As may be obvious from my lack of updates, this month has been  a slightly  'Dry January' in hobby terms  ( and as a wise hobby friend said, don't try to write blog posts when you've got nothing to report ) -  but I am determined not to reach the end of a month with no updates whatsoever, especially in the run-up to what I believe may be called  the 'fiftth blogoversary' of this stream of inconsequential nonsense ( I really don’t know what he said at the end of that sentence, and I don’t think he did, either... ). And so, in the dying hours of this bleak midwinter month, a quick summary of recent hobby-related happenings, and a few thoughts and ideas for the future seem in order. 

I may not have run any actual games myself, but I have been lucky to have been involved in a few: many thanks to Jon Freitag, as ever, for inviting me to join in with two of his remote gaming extravaganzas. First up was his fourth iteration of the Italian Wars period battle of  Agnadello 1509; something of a nail-biting game in which Tony (MS Foy) and I as the Venetians came quite close to holding off  Mark (Jolly Broom Man) ,  Chris ( Nundanket ) and Dave ( LiverpoolDave )'s  French, partly by going against what seemed to have become the accepted wisdom of the previous three outings. A learning point from this - I think I had assumed we would lose, but if I had kept a closer eye on the scores we might have seen a chance to actually win!  Never assume.. Click on the link here for Jon's excellent report.    I did smile at Jon's writing at one point : By now, Alviano's attacks have run out of momentum - what in fact had happened was that my Heavy Cavalry  Men-At-Arms had pursued a badly-damaged French light horse unit, striking the routers from behind and rolling eleven dice against the French one - and then  I had rolled no hits with my eleven dice, and seen my brave knights slink away in disgrace! A moment to remember.  As you can see , the game was a really colourful affair, with some mighty struggles as the big pike blocks collided across the Venetians' defended ditch. 


The second offering from Jon was earlier this week - a complete change of theme, The Gunfight at Adobe Wells Station ... yesirree, a rootin' tootin' Wild West Gunfight!   Tremendous fun was had as (by coincidence ) the former Venetians Tony and I became Pinkerton Agents, defending a stash of weapons against a gang of lairy-looking desperadoes who strongly resembled the French nobiltiy of 1509.  My character 'The Accountant' managed an initial coup by fatally drilling Chris's  'ZZ Hood' right between the eyes,  but then fell to a rain of bullets and clubbed pistols from Mark's  villainous 'Wild Bill' Briscoe.  Meanwhile Tony's  'Careful' McMinn had been anything but careful, and took a whole lotta lead from 'Daring Dave' McGinty, and the Pinkertons were unceremoniously rubbed out.  A great game, with Jon reviving his version of 'The Rules With No Name' and figures after 25 years disuse - you did a good job of remembering them, Jon!  I liked the simple card-driven activation which sometimes gave a player two or even three actions on their turn, hence allowing a deadly 'reload - aim - fire' sequence, and the use of a 'joker' card to end the turn randomly - which quite often saved characters who had got into a very tight spot, by denying their opponent the chance to finish them off! Alas, The Accountant ran out of luck in the end,  and his books are now closed.  I borrowed the following pic from Jon's blog - the moment my man went down, in a close-quarters rooftop fight..


Chris aka 'Nundanket' has featured quite a lot in my hobby January - as well as the above we met in real life a couple of times. First was at the National Army Museum for one of their excellent Friday lunchtime talks, this time on the  Saratoga campaign of 1777.   Chris has posted a report of the talk here - note that if you can't make it in person to the talks, you can book in to watch them on-line, and well worth it they usually are.   Secondly, Chris and I were involved with  an evening of board wargaming in a London pub, playing my venerable (1983!)  Soldier King  game. Very much a 'learning the game' exercise for all concerned, but interesting, and we are arranging another try with the same group - in which we will hopefully move a bit quicker and get stuck in to some proper battles! Here is a picture (thanks again Chris!)  to give you an idea of the look of the thing 


So that's a summary of most of what I've been doing hobby-wise - you may have noticed that this does not ( shock, horror! ) include any painting.. Well, I have managed a few painting sessions on my 1859 Risorgimento  Piedmontese and Austrian 6mm armies, and they are 'getting there' but by no means complete, though I have been enjoying the process.  Here is a 'work in progress' sort of picture - Austrians mainly in white, Piedmontese in blue. I like the simple, semi-flat format of the Commission Figurines models, which are a mix of their Napoleonic and ACW ranges. 

on the workbench - just not often enough!


For the future, I have a couple of ideas  knocking around,  plus an invitation , as follows: 

D-Day Dodgers as a Mini-Campaign?

I was intrigued and inspired by a couple of posts from the always excellent Norm Smith on his Commanders website and/or  Battlefields and Warriors blog  ( and by the way, if you haven't already,  do yourself a favour and download his brilliant  2024 Christmas Newsletter ).  In these he highlighted a  piece in Matt OIrsik's 'Warning Order' free downloadable  wargaming magazine, issue no. 58, which in turn is inpsired by a very old series on 'One-Day-Campaigns' which appeared in early issues of Wargames Illustrated  back in 1987!  I remember those 1980s articles, too - quite inspiring. Norm is using the concept to set up a WW2 campaign for his 'Old School Tactical' boardgame collection, which you can read about on his site - he calls the campaign  Krosnogord 1944, and excellent it is too. I have been thinking that something similar might be a pretty good way to use my D-Day Dodgers  1943-45 Italian Campaign collection, having now painted a few units for Rapid Fire Reloaded, I need a framework for putting together game scenarios, and the 'linked maps/tables' format of the mini-campaigns suggested by Norm and Matt look like a pretty good idea. I am giving this some thought..I hope Matt won't mind too much if I show a screenshot of  part of his Warning Order article :

And of course, if you have not previously seen Warning Order, do have a look, it is an amazing piece of work and well worth supporting! 


Thirty Years War with Portable Pike and Shot ? 

I have got a bit tied up with painting figures for projects in the past few months, and it occurs I should change things up a bit and vary my routine by remembering the armies that are already painted, and could be used for actual games with very little effort.. in particular I've been thinking of my 15mm Thirty Years' War forces. I chanced upon some blog entries by Archduke Piccolo, who has tried re-fighting battles of the Thirty Years' War using Bob Cordery's  The Portable Pike and Shot Wargame - an example being his Portable White Mountain  from June 2024.  It made me think - I wonder if I could do that?  At around the same time, I noticed that Helion  have published a book about the battle of Fribourg 1644 :


Being a bit of a fan of Marshall Turenne ( slightly morbidly, I think I once saw the cannonball that killed him, in the Invalides museum  in Paris ), this could be a good one to try gaming, and my armies are supposed to be French and Imperialists ( OK, maybe it was Bavarians at Fribourg, but we'll overlook that! )  . The book will I assume have decent orders of battle, and they can hopefully be scaled down to the limited table and forces at my disposal - a sort of 'bathtub Fribourg', perhaps?  Actually I don't think the armies involved were all that large, at this late stage of the war, which may make it easier. So that's another book for for the wish-list - but it should be well-worth reading, Monsieur Thion being the expert on French armies of the period. 

A PBEM Seven Years War Campaign? 

Chris 'Nundanket' strikes again - he has kindly invited me to join a 'Play by Email' campaign he is planning, based on Frederick the Great's invasion of Bohemia in 1757. We talked about the idea when we met at the NAM (see above), and the discussion and some ideas batted around gave him the impetus to get started on it, I think. He has a bunch of willing generals lined up and an interesting co-operative/competitive format in mind, whereby we may be all playing Prussian commanders versus the umpire-driven or automated Austrians - it looks like it should be quite in interesting excercise. Thanks yet again, Chris, I look forward to it..  

What with getting the 1859 armies completed and hopefully a game on the table soon,  I think I have given myself plenty to be getting on with!  I've also rambled on quite long enough here, so I will call it a month and hope to come back with some actual progress in February ( which is tomorrow, of course- maybe not quite  that quickly, then!).  Meawhile I hope everyone out there is enjoying their hobby time, and until the next time keep well, everyone.   

Sunday, 9 April 2023

Forming an orderly (Painting) queue

I've been meaning to take up the paintbrushes for a while and not quite got around to it - there is plenty of unpainted lead and plastic waiting patiently in various boxes, which need my attention.  A few different circumstances combined to decide what to prioritise : 

1.  18th Century inspiration

I still have quite a few 18th Century figures awaiting painting, including lots of those that came from Eric Knowles collection and inspired me to start this blog - but what has nudged me to get some more 'tricorne' troops mustered was Neil Patterson's recent examples of lovely Spencer-Smith figures on his blog Aufklarungsabteilung.  Neil had very generously gifted  me some surplus Spencer-Smiths, and it's high time I  got some of them painted.  I've decided they will represent  troops from Saxony,  a 'third force' who may side with either  Austrians or Prussians according to whatever  the shifting alliances of my imaginary corner of Central Europe dictate. So, we have 16 infantry and 6 cavalry,  which will make a  couple of Portable Wargame units of foot and one of horse. Specific units yet  to be decided, but the cavalry will be cuirassiers, I think. I won't make as good a job as Neil has, but it should be interesting to try painting this very 'old-school' figures. The officers and ensign came already painted, but in a pale blue uniform (possibly a previous owner's  imagi-nation): sadly I can't really use that, but will try to simply give them new coats and flag while leaving other parts unchanged. Fingers crossed..

Spencer-Smiths: potential recruits for Saxony
 

While I am at it, my Prussian army really needs a further stiffening with line infantry, and I still have plenty of my 1970s-vintage Minifigs Prussian musketeers, awaiting refurbishment, so I have lined up another 16 of those for painting - two more foot units in Portable Wargame terms. Here they are, after a quick spray of grey acrylic primer  The ( slightly singed ) backdrop is a wooden box from a rather upmarket brand of ready meals available here in the UK - when  its original use is done with, quite handy as a painting tray..

Minifigs: vintage Prussians

2. Epic Freebies

The April issue of Wargames Illustrated magazine in the UK includes a free sprue of Warlord Miniatures new 'Epic ECW' figures. My copy carried the Cavalry variant, and here they are

Epic ECW from Wargames Illustrated
 

These are officially 13 or 14mm, I think, but should fit perfectly well with my 15mm 'Pike and Shot' armies, and apart from various mounted troops there are some foot figures ( possibly mounted dragoons and/or firelocks ) and a couple of small cannon - all pretty useful stuff.  I have sprayed them with primer, now just need to decide how they can be fitted in to my existing armies. On Instagram, Mike Siggins has featured the infantry sprue which is also available - he is quite impressed with them,   though less so with the cavalry, he says. They don't look too bad to me, with good but simple detail and the correct proportion that is more possible with plastics - they are hard plastic too, so they won't shed paint. And they were free! 


3. Trial  DBA Forces 

Following my recent post debating options for Ancient Greeks vs Persians, I took the plunge and bought sets of HaT 20mm figures - 'Alexander's Macedonian Army' (set 8088)  and 'Achaemenid Persian Army' ( set 8117 ). Full marks for Models 2U website for good prices and very prompt delivery. 


Each set is a mixture of figures from several other sets, giving a spread of all types in the relevant army and ideal for rules such as DBA.  Consulting my vintage DBA edition, I was quite easily able to select figures for a suitable army for each side ( sadly, no chariots for the Persians ). I spent a pleasant sunny Good Friday afternoon sat in the garden, cutting out  cardboard bases and lightly glueing the figures to them, just to see what they would look like  - and here they are: 

Alexander's all-conquering army..


..and the mighty Persian host


I was quite tempted to use 10mm or 6mm ( or even 2mm ) figures for these armies and go for the 'mass effect', but  given the rather symbolic nature of the DBA units/elements, I think larger figure scales and correspondingly fewer figures can work ( think of them more like chess pieces? ) , and these 20mm plastics are cheap too.  They will get a 'stiffener' coat of diluted PVA glue ( as they are soft plastic ), then a spray of primer, then the painting proper will commence - I am going to try a  'limited palate' approach to keep things simple. I will probably have to remove them from the bases to paint, and they come without long spears and pikes, so I will be raiding the plastic broom/brushes in the house for bristles to use for those..  I suppose I could even give them a try with the DBA rules right away, and never mind the painting - 'sacrilege' to some! 

So, now I just need to try to make a habit of picking up the paintbrushes for a short session  every day or so, and we'll see how all these various mini-projects shape up. I'm hoping that the variety will keep things interesting..


Jon Freitag's picture of his brilliant AWI game setup
 

Meanwhile, there has been some gaming, at a distance: I was lucky enough to be invited to one of Jon Freitag's excllent remote gaming sessions, where I played one of the British commanders in a game set in 1776 Long Island.  I'm afraid our attack on the revolting Colonials didn't go too well, but it was great fun all the same - many thanks to Jon ( who has documented proceedings in a typically well-presented  battle report  )  for brilliant hosting,  and my fellow players Chris 'Nundanket' , Mark 'Jolly Broom Man' and Steve ( of Postie's Rejects fame ). A really pleasant evening was had! 

Finally, I was  impressed with what Mark ( Man of Tin ) has done with the 28mm WW2 figures (acquired free with magazines) which I passed on recently : he is 'kit-bashing' them into  inter-wars imagi-nations skirmish forces, and  provides an interesting  progress report and insight into his approach, here - I will be fascinated to see how they look when painted up.  Great to know they are being used so well, when they could so easily have just been thrown away! 

That's all for now, but as you see I have plenty to be going on with. Keep well, everyone, and a Happy Easter to you all. 


Thursday, 16 February 2023

Portable Pike & Shot: Controlling the River

 Last time, I set up the forces and table for a trial game of The Portable Pike and Shot Wargame rules variant by Alan Saunders. I have now played the game, and can report how it went - quite well, actually! 

Herr General Blau's Imperialists approached from the South ( nearest camera ), and the French under General Le Rouge from the North, both intending  to seize control of two bridges across the river.  Both sides started off-table, and I decided to make their deployments quite random - I divided the table into 3 sections left/centre/right for each army, and rolled a 'D6' dice for each unit - roll 1 or 2 to enter on the left, 3 or 4 centre, 5 or 6 right - but no more than 3 units could arrive in each section.  The dice decreed that the Imperialists deployed all three of their infantry regiments on their left, with their cavalry and dragoons on the right and artillery in the centre,  while the French had two infantry regiments and their cavalry on their right, dragoons in the centre and the remaining foot regiment and artillery on their left.  So, both sides had sent strong forces to take the Western bridge, with fewer units going for the Eastern bridge, but with slight variations in the makeup of those sub-groups.  Hmm..how did the dice know that there was no bridge in the centre?

The rules decree an initiative die roll each turn, with the winning player going first and usually getting to activate more units. So initiative is quite important, and it must be said that the dice gods were on General Blau's side - the Imperialists won the initiatve on the first four turns, and in seven of the ten turns in all! Quite an advantage. By turn 2, both sides cavalry had crossed the river at their respective bridges ( French at West bridge, Imperialists at East bridge ), and 'contact' was made as the French horse charged into oncoming Imperial foot, specifically the Roter Mantel (thanks, Google translation) regiment. Close combat under these rules has a slightly amended system to Bob Cordery's original Portable Wargame - each side rolls a dice (with modifiers, e.g. for cavalry charging, or foot with pikes)  'to hit', and the highest modified score  gets to inflict damage first if hits have been achieved.  Both sides could suffer hits, of course. This seemed to work fairly well, avoiding multiple rounds of 'no effect' combat. In the first fight, the Imperial redcoats took a hit and suffered a loss of 1SP - first blood to the French.   At East bridge, the French Regiment Vert opened fire at the Imperial cuirassiers - with no effect.   

Turn 2 : Horse vs Foot at both bridges
 

On Turn 3, the Imperial foot at West Bridge tried to push back the French cavalry, but everything went wrong for them - the cavalry kept rolling sixes!  Roter Mantel regiment was forced to retreat, and the cavalry pursued (it's mandatory for horse to follow-up if close combat opposition retreats), crashing into regiment  Blauer Mantel, beating them and forcing them to lose 1SP rather than retreat and be pursued again! So much for the Imperial counter-attack.  Finally the 'Blaus' steadied things on their own activation, with a volley of musketry forcing the rampant cavalry to retreat back to the bridge.   That didn't stop the horsemen, though - in the French turn, they charged again! But the dice were not with them this time, and they 'bounced off'. They had thoroughly unnerved the Imperial infantry, and  bought time for French infantry to come up to West Bridge.  At East Bridge, the  French regiment Vert, facing enemy cavalry and dragoons, wisely took to the cover of wood, while their own dragoons moved up in support.

The clash at West Bridge continued the following turn, and the French cavalry's luck held under fire from Imperial muskets and newly-arrived cannon ( artillery are not very effective unless firing at close range - 2 hexes or less ), then charging yet again and taking anoother SP from Blauer Mantel regiment. In the centre, Imperial cavalry gave a nasty shock to the French dragoons ( which count as foot in combat, but of course have no pikes )  - 1 SP loss. At the end of Turn 4,  losses were French 1SP, Imperials 4SP, mainly due to those rampaging French cavalry!  Going well for the French, but the Imperialists had East Bridge, and three regiments of foot must eventually see off one cavalry?

Grinding on at West Bridge: Cavalry clash in the centre
 

Turn 5 - finally General Le Rouge won the initiative, and used it well. He pulled his cavalry unit back from the bridge and personally led it to the centre, promptly crashing into the Imperial cavalry, pushing them back and following-up. At West bridge,  regiment Rouge charged in, but were stopped by Imperial Blauer Mantel, losing 1 SP.  On the Imperial turn that fight continued, both sides losing 1 SP rather than retreat, both determined not to fall back from the bridge - desperate stuff. The Imperial Horse continued to be pushed back by their French opponents, and were now back to East Bridge.

And so things continued for another two turns, with a grinding fight between infantry regiments at West Bridge - French regiment Rouge reduced to 1SP and falling back, replaced by their regiment Bleu comrades, and neither side giving ground, Meanwhile the opposing cavalry duked it out in the centre. Losses mounted fast - by end of Turn 7,  losses were 7 SPs each ( both sides having  'Break Point'  at 11 SP ).

Infantry fight at West Bridge..
   

..and Cavalry fight in the centre
 

Turn 8 brought a twist - the initiative die roll was tied,  and in these rules that means a 'Random Event'. A couple of die rolls determined that this would affect the French, and the result was the other player picks one of the affected player's units and performs an action with it, including engaging in combat. It will still only shoot at or charge enemy units, but the decision to do so is in the hands of the player making the move.  So, one French unit would 'go rogue' for a turn;  I chose to make foot Regiment Bleu retreat a full move from West Bridge. Presumably the desperate fight had temporarily broken its morale.. Of course this 'opened up' West Bridge, and the Imperials promply won the re-roll for initiative and poured their infantry over the bridge, attacking the weakened  regiment Rouge - and destroying it!  The only consolation for the French was that in the continuing cavalry fight, the Imperial horse were reduced to only one remaining  SP, and their hold on East Bridge looked very shakey.  

Turn 8: 'Random Event' gives Imperials the bridge 
 

Next turn the Imperial infantry ( regiments Roter Mantel and Gruner Mantel ) kept pushing their lone French opponent (regiment Bleu) even further from West Bridge - bad news for General Le Rouge. However, in the East he threw everything at the Imperial cavalry -  his Regiment Vert charging out of the woods to support his cavalry - and finally broke them! Thus East Bridge taken by the French, to balance events to the West. At end of Turn 9 losses were  French 9 SP and Imperials 10SP -  only 2SP and 1SP from break points, who would crack first? 

Turn 10 was the end - and General Le Rouge's dice won the initiative, allowing him and his cavalry  to gallop over East Bridge, then swing West to threaten the Imperials at the other bridge from behind. Over in the West, Regiment Bleu steadied their muskets and delivered a volley at  Gruner Mantel regiment - and took 1 SP from them. Not much effect on a relatively fresh unit, but crucially it meant the Imperialists reached their 'Break Point' of 11 SP losses.  As such, on their turn they must take a 'Break Test' - a D6 roll, with modifiers relating to possession of objectives ( even, with both sides holding one bridge ) and proportion of units lost. The modifiers looked good at 'Plus 2' with a modified 4 or more required - but Herr General Blau  rolled a one!  His weary men's morale had clearly collapsed as the French Cavalry ran amok behind them - his army was deemed Broken, and victory went to the French!  Losses at the end - French 9SP, Imperial 11SP. 

Turn 10 - French Cavalry rampant (lower right) 
 

I really enjoyed this game, and I think the rules went pretty well.  I particularly liked the way the distinction between shooting and close combat is handled - with units adacent to each other able to simply shoot, but shooting having somewhat less effect, and close combat is the way to force a decisive result and to take ground. The scenario obviously tended to funnel the action into two 'bottlenecks' at the bridges, but that added to the tension as both sides contested those bridges determinedly, unwilling to retreat. Equally I thought the 'Random Event' added a nice bit of friction, and with only one such event coming up, it didn't overly randomise the game. The 'Break Point' rule seemed good too, as reaching Break Point does not mean automatic defeat - with good die-rolling, an army past its Break Point can keep fighting.  Not so for Herr General Blau, however! 

I hope you've enjoyed my account of the game, I certainly enjoyed playing the it, and will certainly  come back to these rules. Many thanks to Alan Saunders for them,  and to  Bob Cordery for publishing them in The Portable Pike & Shot Wargame. 

Next time - well, I have a few ideas, and not yet sure which one to pursue. Meanwhile I've also  enjoyed no less than two remote games in  the American War of Independence period ( Loose Files and American Scramble )  run by the excellent Nundanket - many thanks to him and the other players.  Until next time, keep well everyone. 

Saturday, 28 January 2023

Trying out the Portable Pike and Shot

Having given my Pike and Shot armies a couple of goes recently with different rule sets and enjoyed those games, I thought I'd like to have another game in the same period. I've been reading Bob Cordery's (and friends)  book The Portable Pike and Shot Wargame, which has several sets of rules, including two variants for ECW/30YW forces. Having looked through them, I was interested by Alan Saunders' ECW variant, which seems to have some good ideas which Alan explains in his Design Notes. 

Alan's rules are strictly 'ECW', but I think they'll stretch to being used with my Thirty Years War armies representing French and Imperialists - I tend to think that by the 1640s, a lot of the features of earlier 30YW armies such as 3/4 armoured Cuirassiers, mounted Arquebusiers and larger Tercios would have fallen out of use, even if some units still carried those names. Admittedly my armies of vintage figures maybe look a bit more 1620s/1630s, but I am choosing to overlook that! 

I'm going for a simple setup, from an old favourite source: Neil Thomas One Hour Wargames. I selected Scenario 3: 'Control the River'. Neil Thomas summarises as follows The Red and Blue armies represent portions of much larger forces. Their commanding generals have ordered them to seize two strategic river corssings, as a base for future operations.   As typical for OHW, there are six units per side, which is  within my reach. It's a simple, symmetrical layout, with a river dividing the field, crossed by two bridges, control of which is the objective for both sides.  

In the spirit of keeping things simple, I've also gone for symmetry in the opposing forces - which will represent the French and the Imperialists.  Here is the Imperial contingent: 


 It consists of :

        Two  Pike and Shot Infantry Regiments ( 'Grun' and 'Blau' ),  rated 'Trained',                                             each 4 Strength Points (SP) 

        One  Pike and Shot Infantry Regiment ( 'Rot'  ), rated 'Elite', 5 SP

        One unit of  Cuirassiers  ( Horse ), rated 'Trained' , 3 SP

        One unit of Dragoons, rated 'Trained',  3SP

        One unit of Artillery, rated 'Trained', 2SP  

A total of 21 SP. Alan's rules the army has a Break Point, equal to half its total SPs rounded up. So the Break Point for this army is 11 SP. When casualties reach the Break Point, the army must test each turn to continue fighting. For those interested in such things, the figures are 15mm scale and mostly from Mike's Models, Frei Korps 15 and Minifigs - as far as I remember, given they are some decades old! 

Obviously the French force is similar, though I made a slight variation in the morale ratings - all three French infantry regiments will be 'Trained', but their cavalry unit will be 'Elite'.  I have a shortage of Dragoon figures, so I have drafted in some of MacFarlane's Scots cavalry to represent Dragoons. Here is the French force


     which consists of :

        Three Pike and Shot Infantry Regiments ( 'Rouge', 'Vert' and 'Bleu' ),  rated 'Trained',                                             each 4 Strength Points (SP) 

        One unit of  Horse ( 'Turenne' ) rated 'Elite', 4 SP

        One unit of Dragoons ( 'MacFarlane' ), rated 'Trained',  3SP

        One unit of Artillery, rated 'Trained', 2SP 

Giving a total of  21 SP and Break Point at 11 SP.  Figures mostly a bit more recent, from Essex Miniatures, except the Scots and the Artillery which  Ross told me were 'old strip Minifigs' ( I think their first 15mm range ) from the late 1970s - real veterans!  

This is a simple  'encounter battle'  - at the start, neither side has troops on the table. The French represent 'Red' who will enter from the Northern ( top ) table edge on Turn 1 , while the 'Blue' Imperialists enter from the Southern table edge at the same time. It should be a nice straightforward scenario, and I hope an easy introduction to the rules.  Next time, we'll  see how it goes. Meanwhile keep well, everyone.