Showing posts with label Scenarios. Show all posts

Monday, 9 June 2025

Risorgimento 1859 : Preparing for Battle

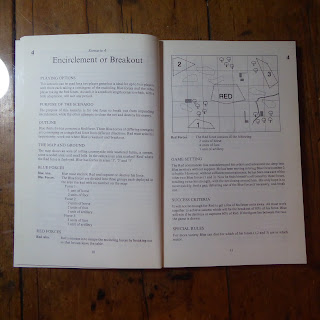
Having painted and based a reasonable  number of figures for my 'Risorgimento' 1859  Italian campaign project, I have recently managed to complete some scenery too, and found I had enough of both for battle to commence. 

This has all been inspired by Neil Thomas' excellent book Wargaming Nineteenth Century Europe 1815-1878, and I took a look at his suggested scenarios for a first game - one thing Mr. Thomas does very well is scenarios.   As I have limited space and not too much 6mm scenery, and have not used the rules before,  I thought a small battle would be the best place to start. It turns out he has just the thing: Scenario 5 - The Minigame.   This is designed for a table only 2 feet ( 60cm ) square, and five units per side - ideal for me. 

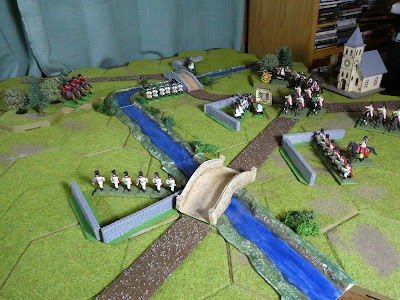
The terrain is very simple - a  village at a crossroads, a wooded area and a hill. Using my Hexon terrain and  6mm scenery I was able to create the table layout  quite easily.

The Battlefield: North at the top 
 

The hexes have no bearing on the game - just very easy to use and give a nice look! As you can see I don't have many trees, but there were just enough ( from Heroics and Ros, I think ) to mark out a 'wooded' area.  Buildings are from Timecast and roads MDF from Pendraken, 'surfaced' and painted by me. The village and the hill are objectives for both sides - to win, both must be controlled by the end of  Turn 10. 

Dice were rolled and a table consulted to decide on army composition. The resulting Austrian force was as follows: 

        2 x Line Infantry

        1 x Skirmishers

        1 x Cavalry

        1 x Artillery

   Quite a nice mix of an 'all arms' force. 

Their Piedmontest opponents came up with quite a different army: 

        3 x Infantry

        2 x Artillery 

This could be interesting!   

Next, roll for sides: Piedmont won an opposed die roll, and opted to be 'Defender', which seemed sensible given their lack of fast-moving troops. As Defenders, the Piedmontese now rolled to discover their baseline - the dice determimed this would be the Southern table edge.   

Finally 'Pre-Battle Events', an interesting way to introduce some 'friction'  - quite fun for a solo gamer. Each side rolls a dice and consults another table : the Austrians rolled up 'Flank March', meaning that two of their units will appear on either enemy flank. At least one of these must be Cavalry, and none may be Artillery.     Another die roll will decide upon which of Turn 2, 3 or 4 they arrive. 

Piedmont was less fortunate, rolling up a 'Bogged Down' event -  one Artillery unit is eliminated. Not so good! 

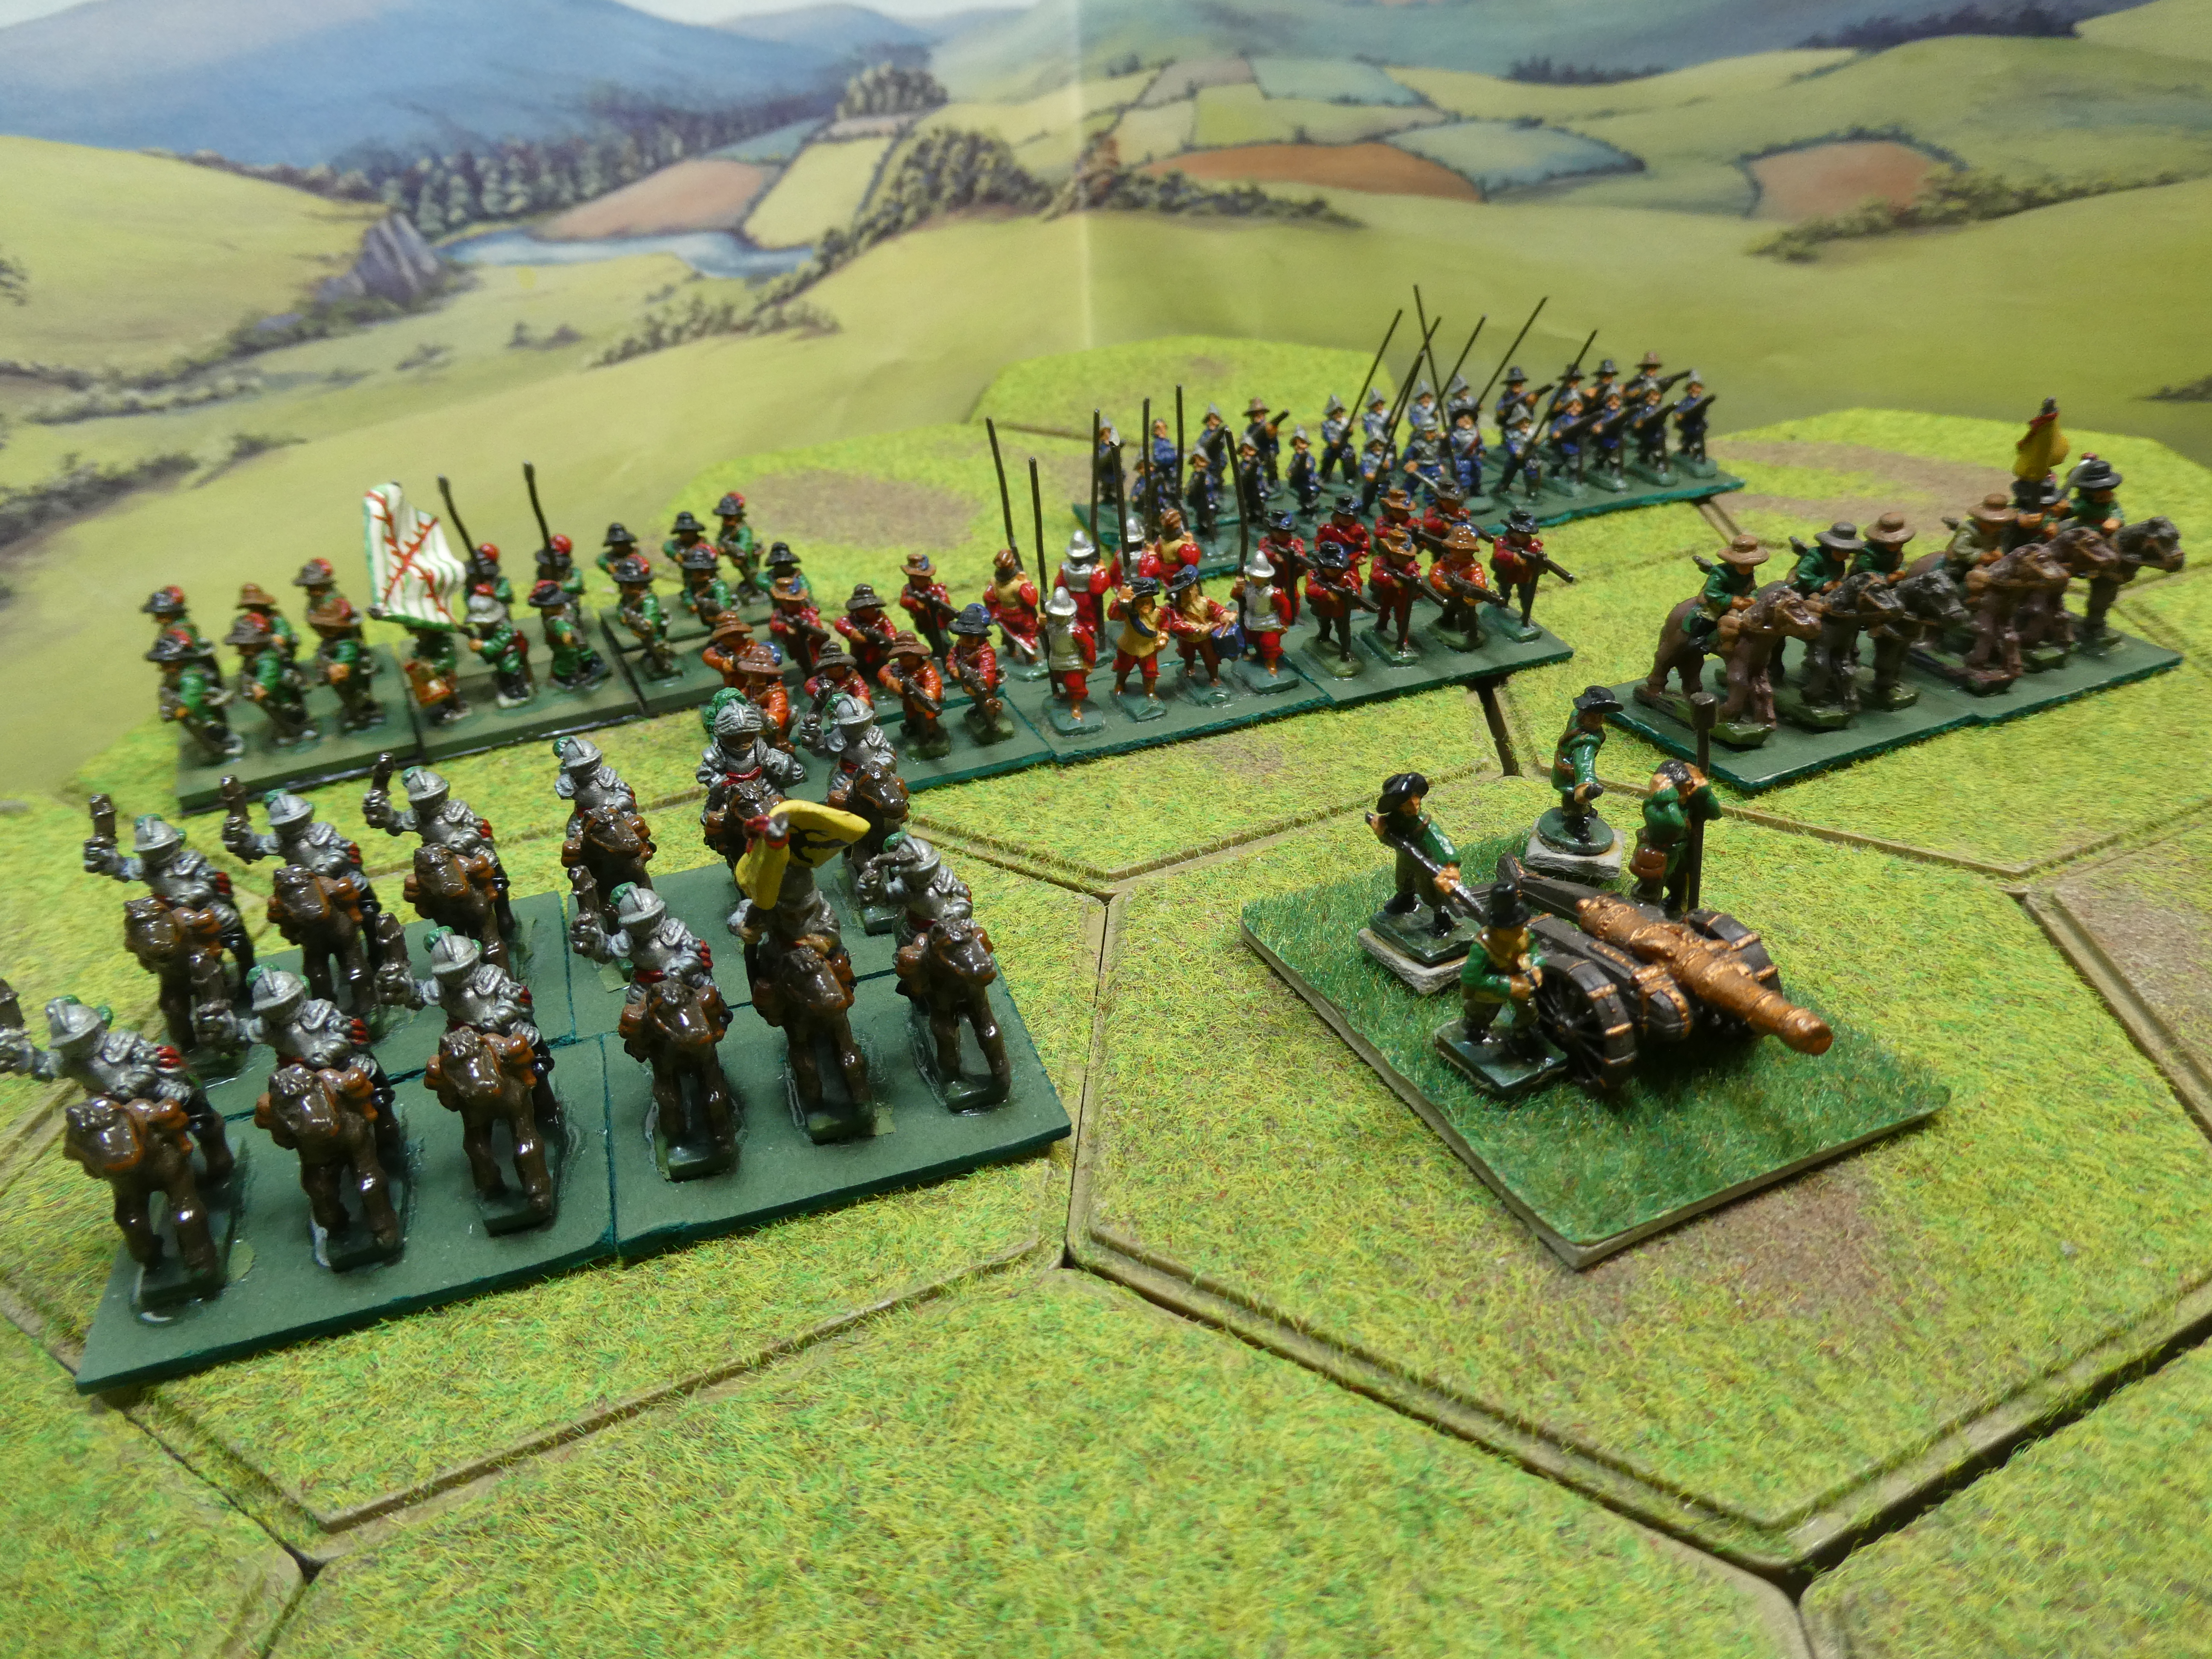
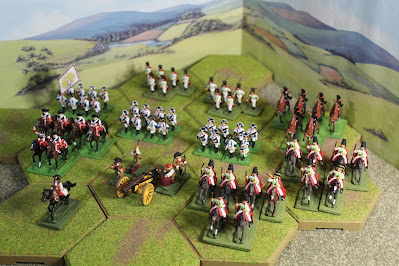
Here are the resulting armies: 

Austrian attackers

   
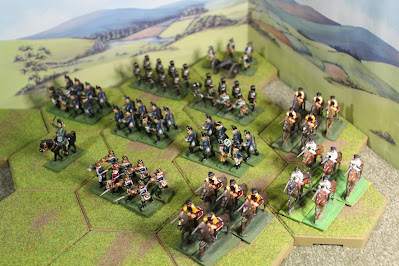
defending Piedmontese 

Figures are a mix of Baccus metals ( they have a Risorgmento' range for this exact period )  and Commission Figurines MDF ( a  polyglot mix from their ACW and Napoleonic ranges ) 

Working more or less from the suggested  army lists which are also in the book,  the units are organised as follows: 

Austrians:    Line Infantry ( 2 units)  Average Quality, Rifled Musket, Loose Order 

                    Skirmishers  (Feld-Jagers)  : Elite,  Rifled Musket

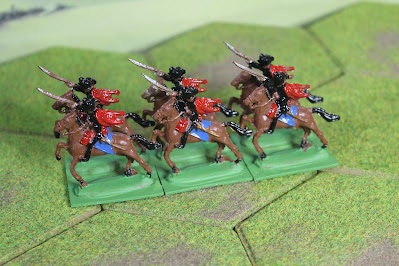
                    Cavalry  ( Cuirassiers ) :  Average Quality

                    Artillery : Smoothbore 

  Piedmont:   Line Infantry  (2 units) : Average, Rifled Musket, Loose Order 

                     Grenadiers (1 unit ) :  Elite, Rifled Musket, Loose Order 

                      Artillery : Smoothbore. 

Conveniently, both sides get just one Elite unit, and artillery are equally matched - the Austrians just have that one unit advantage owing to the poor quality of Piedmontese roads! 

Now to deployments - Defender first, each side within 15cm of their baseline, omitting the Austrian 'Flank March' units.   Here's how they deployed:

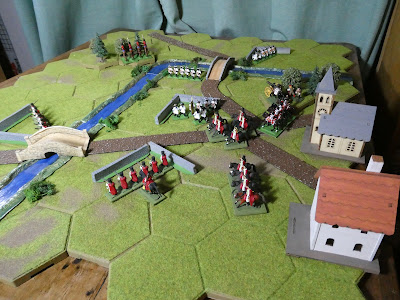
Initial setup - Piedmontese nearest the camera

The defending Piedmont general secured the hill objective with a unit  of infantry and his guns, placed his Grenadiers more centrally by the road,  and  was wary of a possible flank attack through the woods, hence placed his other infantry unit on there.  The Attacking Austrian general was obliged to use his cavalry unit and one other for his Flank March - he chose his next-fastest moving unit, the Feld Jagers. That gave something of a quandry there were only  remaining 3 units - two infantry and one artillery -on the table at the start. How to attack against superior numbers?  He decided to 'demonstrate' at first, placing one infantry unit  on the road through the village, guns in the centre and the other infantry unit  out on his right ( East ) flank.  The 'Flank March' force arrival time  was diced for - they would appear on Turn 3, and on the  East table  edge. The more open flank would allow freedom to the cavalry, and hopefully allow the hill objective to be assaulted promptly.  The Piedmontese may have made a mistake in assuming the woods on their left might be infiltrated..   

Here's an 'aerial view', taken perhaps by an intrepid passing balloonist 

 The scene is set, the forces are about to engage. At the time of writing, the game has not yet been played through, so we will have to wait for the next post here to see the outcome. Let's hope it's an interesting one!  Until then, keep well everyone.

Friday, 18 August 2023

The Fight for Der Sachsenhügel

There's been a distinct lack of actual gaming on this blog in recent weeks ( in fact, probably months), and the newly-painted 1750s Saxons needed some experience, so I thought it was time to get a Seven Years War period game on the table. I had a look through Neil Thomas' One Hour Wargames - always a good source of simple scenarios - and came up with Scenario 4 'Take the High Ground'. The attraction was that it involves one army ( 'Red' )  being split into two contingents, which I could set up as an allied army of Austrian and Saxon troops, facing Prussian  ('Blue') opposition. The scenario specifies six units per side, and  I used the 'OHW' army selection charts - the dice gave an interesting setup, as neither side received any cavalry! 

The selected forces were as follows: 

'Red' ( Allies ) : 4 Infantry, 1 Artillery, 1 'Skirmish' ( which I counted as Light Infantry ). 

'Blue' ( Prussians ):  3 Infantry, 1 Artillery, 2 Skirmish/Light Infantry :

Using my own 18th Century variant of Bob Cordery's Portable Wargame rules, this translated as 

Allies: 

- 1st and 2nd Battalions Saxon Regiment Friedrich August, each  4 Strength Points (SP)

- 1st and 2nd Battalions Austrian Botta d'Adorno Regiment , each 4 SP

- one Battalion Austrian  Grenzer Light Infantry, 3SP 

- one battery of Austrian Guns,  2SP 

- Commander - our old favourite  General Dachs,  6SP

Total 27 SP, Exhaustion Point =  9 SP

Allies..
 

and Prussians :

- 1st and 2nd Battalions 9th Line Infantry 'Jung Kleist'  each 4SP

- 1st Battalion 44th Fusilier regiment, 4SP

- one battalion Jaegers ( Light Infantry ) ,  3SP

- one battalion Von Kleist Frei Korps ( Light Infantry ), 3SP 

-  one battery of Prussian Guns, 2SP 

- Commander  Generalleutnant von Gehirne -  6SP

Total 26SP,  Exhaustion Point = 9SP.  

.. and Prussians

For simplicity, all units and commanders are rated 'Average'.

The scenario specifies that the Allies must place just  two units on the table initially, holding a hill in the middle of the battlefield,  with the rest of the force entering from the North table edge on turn 2, while the Prussians can bring on their entire force from the South table edge on Turn 1. It seemed appropriate  that the two Allied units deployed on the hill should be the two Saxon infantry battalions, hoping to hold the position until their Austrian confederates could reinforce them. And thus we have the fight for Der Sachsenhügel (  'The Saxon Hill', if I can trust Google Translate ),

Here is the initial setup, with North at the top and the novice Saxons in position on a pretty simple terrain. Let the battle commence.. 


I used Bob's card-driven activation system, which essentially allowed each side to activate 3, 4 or 5 units each turn, depending on a card draw (I decided that shooting,  or continuing an ongoing  close combat, does not require an activation).  The 'One Hour Wargame' scenario allows all the Prussian   units to enter on Turn 1, but I allowed the activation mechanism to limit that slightly - the Prussians  only scored 3 activations that turn, so only 3 units could enter. Accordingly, they brought on both battalions of 9th Jung Kleist infantry, and the Jaegers. The Allies only had the two Saxon units on the table - they opened musketry fire on the Prussian line infantry, and 1st Friedrich August scored an immediate success, taking 1 SP from 1st Jung Kleist. First blood to the Saxons! 

Opening volley from the Saxons..

In Turn 2,  the Allies only scored 3 activations so only 3 units could enter. For both sides I decided that their units arriving at the table would be in a pre-determined 'marching order', representing a column of march coming up the road - it seemed only sensible, for example,  to put Light Infantry units at the front ( and where available, another as rearguard ). Allied troops could only enter by the road or East of it, while Prussians could enter anywhere along their baseline,  but in reality the advantage of increased  movement tended to dictate that units entered via the road.   Wearing my  'Prussian hat', perhaps I should have considered advancing  several units up the Western side of the table to take the hill in flank, knowing that the Allies would have a long march to counter such a move?  Oh well, maybe next time..

Turn 4: Frei Korps in flanking move?

By Turn 4 both sides had a mix of Line and Light Infantry ( Botta D'Adorno and Grenzers vs. 44th Fusiliers and Jaegers )  disputing possession of the road, while the Prussian gun had opened a bombardment of the Saxons on the hill. Saxon musketry scored more successes, further reducing both battalions of 9th regiment Jung Kliest, but in turn the Prussian volleys had forced  one of the Saxon units to retire  from the crest of the hill.  The Prussians had made a tentative move on their left flank, bringing on the Von Kleist Frei  Korps to threaten  West of the hill, and forcing 1st August Freidrich to re-position to face them. Losses by this point were Prussians 3 SP, Allies 1SP. 

Turn 5 : Prussians in diagonal line from bottom left


Perhaps more by accident than design, by Turn 5 the Prussian force was arranged in a nice diagonal line - a sort of 'oblique order' ?  The Austrian artillery had deployed in the wood, aiming to dominate the road and give fire support to their comrades on the hill - but were promptly attacked by Prussian Jaegers sneaking up on them through the trees, and forced to retire. The Austrian guns took little part in events after this. 

Grenzers ( left ) and Jaegers skirmish on the wood

On Turn 6,  Prussian musketry having previously forced both Saxon units to step back, both battalions of  9th Jung Kleist regiment stormed onto the hill (despite the Allies now having 3 battalions there ) , and in the ensuing close combat 2nd  Saxon battalion suffered 2 SP losses - and was now reduced to 1 SP ( the Saxons on the whole seemed to be better at shooting than melee, I wonder if that reputation will stick to them?).  Meanwhile in the Eastern woods Prussian Jaegers and Austrian Grenzers fought it out, and the Grenzers came off worst to start with. By the end of the turn, Losses were Prussians 4 SP, Allies 5SP , which looked like something of a turning point. 

Jung Kleist storms the hill
 

Fighting continued on the hill, with the stronger 1st Saxon battalion being forced to retire, but the Prussians unable to finish off the crippled 2nd battalion - in fact losing 1 SP to the plucky Saxons in close combat. In the East, 1st Botta d'Adorno got the better of a musketry duel with Prussian 44th Fusiliers, and Grenzers and Jaegers still disputed the wood, with Grenzers now  getting the upper hand.  At the end of Turn 8 things had turned around again, and  losses were Allies 6SP, Prussians 7SP. 

Turn 8 : Action all along the line
 

For Turn 9, the Allies won the initiative and moved first, with 1st Botta d'Adorno forcing 44th Fusiliers to retreat, but making no progress in the fight for  the hill - indeed the Saxon 1st battalion took another 1 SP loss. And then the Prussians struck back - in the wood, their Jaegers' musketry took another 1 SP from the Austrian Grenzers, and in close combat on the hill, von Kleist Frei Korps took a further  1 SP from Saxon 1st  Friedrich August battalion. Thus the Allies had suffered the loss of 3SP in a single turn, and this was too much - total losses now stood at  Prussians 7SP, Allies 9SP, which meant that General Dachs' Austrians and Saxons had reached their Exhaustion Point.  Being now unable to take offensive action, the Allies could only try to fend off further Prussian attacks, and they would be unlikely to be able to throw the Prussians off the vital hill - so the chance of an allied victory now looked very slim. I decided to call the game there, with General Dachs conceding defeat.  A hard-fought victory for the Prussians, and a bit of a bruising first combat for my newly-raised Saxons! 

Still, a nice fun game, with a real see-saw, back-and-forth affair, the Prussians suffering more losses early on, getting ahead when they stormed onto the hill, only to suffer reverses in the woods and along the road,  before finally the tide turned decisively on Turn 9.   The rules work pretty well, Bob Cordery's basic Portable Wargame engine is lovely and simple, great for small-ish games like this, and a good base for 'tinkering', of course! I quite like the variable activation card draw, which puts a moderate, not excessive, limit on players actions and forces them to prioritise. I think the close combat system is a bit indecisive and maybe tends to draw out melees for longer than necessary, and  I have seen some suggested amendments which I think I may adopt. Of course, many thanks once again  to Bob for getting me started with this!

And many thanks also to Jon Freitag at Palouse Wargaming Journal who provided my other recent gaming experience, with his fantastic 'Hammering Sickles'  ACW Gettysburg game, which I was privileged to take part in a recent iteration of. Great fun, despite being thoroughly trounced by Johnny (or rather, Mark and Chris) Reb.  I can't possibly better Jon's report of the game, which you may well have already enjoyed. If not, it's thoroughly recommended! 

Sickles getting roundly hammered..
 

Having 'scratched the itch' of gaming a bit, there's plenty of painting to do, and some interesting recent purchases to join the - ahem -  Garrison... about which, more next time. Until then, keep well, everyone.     

Saturday, 28 January 2023

Trying out the Portable Pike and Shot

Having given my Pike and Shot armies a couple of goes recently with different rule sets and enjoyed those games, I thought I'd like to have another game in the same period. I've been reading Bob Cordery's (and friends)  book The Portable Pike and Shot Wargame, which has several sets of rules, including two variants for ECW/30YW forces. Having looked through them, I was interested by Alan Saunders' ECW variant, which seems to have some good ideas which Alan explains in his Design Notes. 

Alan's rules are strictly 'ECW', but I think they'll stretch to being used with my Thirty Years War armies representing French and Imperialists - I tend to think that by the 1640s, a lot of the features of earlier 30YW armies such as 3/4 armoured Cuirassiers, mounted Arquebusiers and larger Tercios would have fallen out of use, even if some units still carried those names. Admittedly my armies of vintage figures maybe look a bit more 1620s/1630s, but I am choosing to overlook that! 

I'm going for a simple setup, from an old favourite source: Neil Thomas One Hour Wargames. I selected Scenario 3: 'Control the River'. Neil Thomas summarises as follows The Red and Blue armies represent portions of much larger forces. Their commanding generals have ordered them to seize two strategic river corssings, as a base for future operations.   As typical for OHW, there are six units per side, which is  within my reach. It's a simple, symmetrical layout, with a river dividing the field, crossed by two bridges, control of which is the objective for both sides.  

In the spirit of keeping things simple, I've also gone for symmetry in the opposing forces - which will represent the French and the Imperialists.  Here is the Imperial contingent: 


 It consists of :

        Two  Pike and Shot Infantry Regiments ( 'Grun' and 'Blau' ),  rated 'Trained',                                             each 4 Strength Points (SP) 

        One  Pike and Shot Infantry Regiment ( 'Rot'  ), rated 'Elite', 5 SP

        One unit of  Cuirassiers  ( Horse ), rated 'Trained' , 3 SP

        One unit of Dragoons, rated 'Trained',  3SP

        One unit of Artillery, rated 'Trained', 2SP  

A total of 21 SP. Alan's rules the army has a Break Point, equal to half its total SPs rounded up. So the Break Point for this army is 11 SP. When casualties reach the Break Point, the army must test each turn to continue fighting. For those interested in such things, the figures are 15mm scale and mostly from Mike's Models, Frei Korps 15 and Minifigs - as far as I remember, given they are some decades old! 

Obviously the French force is similar, though I made a slight variation in the morale ratings - all three French infantry regiments will be 'Trained', but their cavalry unit will be 'Elite'.  I have a shortage of Dragoon figures, so I have drafted in some of MacFarlane's Scots cavalry to represent Dragoons. Here is the French force


     which consists of :

        Three Pike and Shot Infantry Regiments ( 'Rouge', 'Vert' and 'Bleu' ),  rated 'Trained',                                             each 4 Strength Points (SP) 

        One unit of  Horse ( 'Turenne' ) rated 'Elite', 4 SP

        One unit of Dragoons ( 'MacFarlane' ), rated 'Trained',  3SP

        One unit of Artillery, rated 'Trained', 2SP 

Giving a total of  21 SP and Break Point at 11 SP.  Figures mostly a bit more recent, from Essex Miniatures, except the Scots and the Artillery which  Ross told me were 'old strip Minifigs' ( I think their first 15mm range ) from the late 1970s - real veterans!  

This is a simple  'encounter battle'  - at the start, neither side has troops on the table. The French represent 'Red' who will enter from the Northern ( top ) table edge on Turn 1 , while the 'Blue' Imperialists enter from the Southern table edge at the same time. It should be a nice straightforward scenario, and I hope an easy introduction to the rules.  Next time, we'll  see how it goes. Meanwhile keep well, everyone.

Wednesday, 16 November 2022

Return to Kirchendorf, by Twilight

Having used the introductory Cheriton scenario to put on a trial game using In Deo Veritas rules, it was very convenient to find that the same battle is also one of the introductory scenarios in the Twilight of the Divine Right rulebook. A great chance to compare and contrast the two systems!  (Fleurus, 1622 is also an introductory game in both sets - perhaps because they both involve fairly small forces and should be quite simple battles? Twilight was published in 2018 and IDV only in 2020, so perhaps the latter couldn't resist being 'inspired' by the former? ) . So, let's look at the battle  again, this time through  the Twilight lens. 

First thing to note is the much wider area of battlefield that is used - where IDV started with the armies close together and action imminent in a relatively small space, Twilight places them much further apart and with a commensurately wider field of action and much more terrain.  Here is the map they use  ( I photographed the page from the rulebook, if this breaks any copyright then I will be happy to remove if asked ):  

That's an awful lot of hills..

The previous game really only covered the Cheriton Wood and Middle Spur area in the centre, as you can see this is much wider.  The main armies start on baselines and behind ridges, so main bodies can't actually see each other at the start.  Parliament has an advance party of detached musketeers in Cheriton Wood ( top right ) , and the Royalists have a foot regiment on the highest ground, marked 'Lisle' in the centre of the map - so there should be some action pretty quickly as the respective main battles run into  those two parties. 

Ok, so how about trying to set up that table? One nice thing about the rules is that they use 'Base Widths' for measurement, and the size of the battlefield is given in Base Widths (BW)  too. That made it quite simple to scale the suggested 20BW by 20BW battlefield to my roughly 3 feet by 3 feet table - I have ended up with a 'Base Width' of 40mm as a result.    What was not so simple was finding all those hills and roads - it took almost every piece of 15mm  terrain I had!  Luckily I made a habit some years ago of picking up a few more hills from Total System Scenic ( TSS ) every time I went to the SELWG show at Crytal Palace - several of these were taken out of their stapled bags for the first time for this setup. 

I had just about enough terrain!

Note that the higher 'South Spur' is made by the time-honoured method  of placing CD cases under the cloth for the first contour,  then TSS hill pieces on top for the second contour.  Not so elegant, but effective.

Now for the opposing forces: as in the previous game, I have used my vintage 15mm Thirty Years War 'Imperialists'  to stand in for Parliament, and French as substitute Royalists. Given the 30YW setting, this will of course again be the imagined battle of Kirchendorf.  Forces as follows: 

The Imperialist / Parliamentary army..

First the Imperialists ( Parliament ), commanded by Waller ( shall we call him a Germanic-style  'Mauer' ? ), organised as follows: 

Infantry ( Waller / 'Mauer' ) 

     1 unit Detached Musketeers, Trained, 'M' ( Muskets only )

     3 units Trained, 'MX'  ( about 3:2 muskets to  pikes )

     1 unit Trained, 'MX'   ( London Trained Band ) 

     1 Field Gun,  Trained

Cavalry ( Balfour,  google translate suggests 'Balvier' ) 

    2  units Trained, Dutch style

    4 units Trained,  Dutch Style 

    1 unit Trained, Dragoons 


..and their French/Royalist opponents

Now the French ( Royalists ),  commanded jointly by Hopton and Forth, organised as follows:

Left Wing ( Hopton  - shall we call him Sautville [ hop' + 'town' ] in French? It has a ring to it..  ):

        Detached Musketeers : 1 unit Elite, Small, 'Assault Tactics', Musket only 

         2 units Infantry,  Trained, Small, 'MX'  

         1 Field Gun, Trained 

         2 units Cavalry, Trained, Large, Swedish style 

         2 units Cavalry, Trained, Swedish style 

Right Wing ( Forth - I'll go with Le Quatre, which is cheating, I know! ) :

        1 unit Infantry, Trained, Small, 'MH'  ( about 2:1 muskets to pikes ) 

        2 units Cavalry, Trained, Swedish Style

I had some fun with English to German and English to French translation web pages for the commanders' names, but of course plenty of English, Scots, and Irish ( and no doubt,  Welsh ) officers fought in the Thirty Years War, in many forces on all sides, so I could have just kept  the English names, I guess!    

A few words of explanation - units are 'Regiments' or equivalent, and each unit ( except guns and baggage ) has two bases.  A standard Infantry 'regiment' is made up  of about 1,000 troops,  but they can also be designated as 'Small' (about 800)  or 'Large' (about 1200). Infantry are also categorised by the ratio of Musket to Pike  - see 'M', 'MX', 'MH' in the descriptions above, and then there are some other special attributes such as the 'Assault Tactics' which denotes foot who fire a salvo and immediately charge into combat. 

Cavalry regiments are about 500 for a standard unit,  400 for Small and 600 for Large. As you can see they are also categorised in different ways, and we have Swedish ( charge at the trot firing pistols as they close ),  and Dutch ( fire pistols first, then charge if the target is disrupted ) style horse,  and some  Dragoons.    

Artillery are either Field Guns ( 3 to 12 pounders )  or Light Guns ( under 3 pounder ) - we have only Field Guns. Both armies have a 'Baggage' unit - 'used to show the direction for pursuit', say the rules. 

Finally, all units have a 'quality' rating which is 'Raw', 'Trained' or 'Elite' - self-explanatory, I hope. I think you can see that there is quite a bit more detail to keep up with in the makeup of units than there was in In Deo Veritas - I think I'm glad to see things like 'Swedish' and 'Dutch' style cavalry being included, though they ( and the musket:pike  ratios for foot ) will need to be remembered and recorded on some sort of roster,  or by using labels or markers.  

Over all, the Imperialists have 5 Foot and 7 Horse units, versus the French 4 Foot and 6 Horse, and each side has one Field Gun battery - so a slight strength advantage to the Imperialists. The French have those 'Elite' musketeers, and perhaps a bit more 'dash' with their Swedish-style cavalry.  The  scenario Victory Condtions  are simple for this scenario - the Royalists ( French ) simply have to remain undefeated under the rules. As with IDV, the armies are organised in 'Wings', and if half of an army's Wings are lost then the army as whole tests for morale - failing that test results in defeat. 

Now at last, the table with forces deployed - not necessarily the final dispositions, just a trial to see what they looked like,  with Imperialist / Parliament nearest the camera.

As you can see, the armies fit into the space well enough - I was able to deploy the Imperialists near the camera in two lines, which is sensible for the period. The French are a little more spread out, with infantry in a single line - I may revisit that for the actual game. 

So there we are. I've had a read-through of the rules - I need to allocate some single mounted figures to be the commanders, but given that,  I think we are just about ready to go.  Alas 'real' life may now intervene, so there may be a bit of a pause before the game gets played, but I'll try to get it done as soon as I can.   

I hope this is interesting for readers,  I'm looking forward to playing the game and seeing how the rules play out, and reporting back on how it goes.  Until then, keep well, everyone.  

Wednesday, 21 September 2022

Trailing the Pike, at last

Before I was so easily distracted by the Eighteenth Century,  I had always meant to resume wargaming with the 'Pike and Shot' era,  and in particular the English Civil War / Thirty Years War period, of  around 1620 to 1650. 

Like most British gamers I suspect, my first contact with the period would have been from reading about the ECW,   which is of course the wrong name, given extensive Scottish and Irish involvement.  'The Wars of the Three Kingdoms'  is a bit of a mouthful,  but more appropriate. By the way, does anyone have a better suggestion?   King Charles' Wars, perhaps?  He was at the centre of most of them, and conveniently his successor after he lost his head was also Charles ('King Charles'- now where have I heard that recently?). I remember Stuart Asquith's series of articles in 'Battle for Wargamers' circa 1978 were quite inspiring.   But for me, there was a turning point when I chanced upon C.V. Wedgewood's The Thirty Years War,  when I was about 18.  I had no idea of that war's  existence beforehand,  I had no knowledge of the political structure of Europe (especially Germany) at the time, and I was rather entranced by what seemed a ruritanian fantasy forerunner of the present polity. As Wedgewood described the multitude of city-states and principalities that made up the Holy Roman Empire, I couldn't quite believe it wasn't all just an invented story, and really happened - and  it was fascinating. Sweden as a super-power?  A fairy story, surely?   And the characters - Gustavus Adolphus, Wallenstein, Tilly, Richelieu, poor Frederick Palatine  'The Winter King' of Bohemia  and his plucky ( English ) wife , crafty old Maximilian of Bavaria, the  Emperors Ferdinand  father and son, dashing French Generals Conde and Turenne - I'm afraid Charles, Rupert, Fairfax and even Cromwell couldn't compete, I was always  going to 'do' 30YW from then on.


I collected Pike and Shot forces in 15mm, which was quite new back then - I have some early Minifigs and a few Peter Laing figures, and quite a few chunky 'Mikes Models' ( predecessors of Essex Miniatures, I think? ).  More recently I've added some modern Essex and Peter Pig figures - many of which still await painting.  An Imperialist army seemed an obvious choice, but I managed to avoid picking Swedes as their opponent - with their salvo-firing foot and hard-charging cavalry, they seemed a bit too 'super-hero'ish.  I plumped for the French - I think I liked the idea that they were perhaps  rather showily-dressed,  and of the elan that won their stunning victory at Rocroi. 


So, now I'm ready to give pike and shot another go, and see how I get on. From the many rule sets accumulated over the years ( see my previous post ) I am going to give Philip Garton's  In Deo Veritas a try. As stated before, it is heavily influenced by Frank Chadwick's classic Volley and Bayonet, and it allows 'big' battles to be fought - my current collection looks to be just about big enough to start playing. Helpfully, the rules have four suggested scenarios of historical battles to recreate, so why not use one of those?  I think I have sufficient forces for the ECW battle of Cheriton - but of course, my troops are supposed to be Imperial and French. So, with a little help from Google Translate,  welcome to Kirchendorf, somewhere in the Rhineland.. The (somewhat dour?)  Imperialists will take the part of Parliament, while the Royalists become the (more flamboyant)  French - that seems fairly appropriate.

To give an idea, here is a slightly wobbly photo of the page from the In Deo Veritas rulebook showing the suggested terrain ( I hope this is not violating any copyrights, if requested I will happily remove the picture ).  Note the large wooded area, and that the Southern part of the table is higher ground. 


Imperialists/Parliament deploy in the South , and  French/Royalists in the North

The basic tactical unit in the rules is the Brigade ( smaller units designated 'companies' ), and  for this scenario the  opposing forces are as follows: 

Imperialist ( Parliament )  : 10 brigades cavalry, 6 brigades infantry,  2 companies Dragoons, 2 batteries Field Artillery.

French ( Royalist ) :  8 brigades cavalry,  6 brigades infantry,  1 battery Field Artillery. 

Each side has one of their foot brigades deployed as 3 'companies' of detached Musketeers, in the wooded area. 

These forces represent armies of about 10,000 and 8,500 respectively, so we have a not-too-big  'big' battle, which should be a good introduction.  I have just about enough figures to make up these forces, where a 'brigade' stand measures 75 by 40mm. I can get about 6 cavalry and 16 infantry figures to represent a brigade , with 3 dragoon or 4 infantry figures per 'company'.  Fortunately my troops are based mainly in threes and fours rather than whole units  for other rules, so my previous regiments and squadrons could be broken down into the  multiple 'brigades'  represented in these rules.

Having worked all that out, now here are the Imperialists : 

Painters of a sensitive disposition may wish to look away now.  Please excuse the dubious painting, (especially the flags) - I was very young, and it was a long time ago, before highlights and washes were invented.. But I am going to keep them just as they are, as they are a connection with times long past.  A little test of figure identification: I think the majority are Mikes Models, but the sky blue coated foot unit at the back is mainly early Minifigs ( the standard-bearer may be Peter Laing? ), the red-coated unit are later Minifigs, and the dark blue coated unit from Frei Korps, all late 1970s/early 1980s vintage.  Not sure about the guns and gunners!  I'm pleased to say that MacFarlane's Scottish  Foot and Horse will make their debut too, the Scots having obviously agreed a good price for their services from the Emperor.

And their French opponents:  


Another mixed bag of figures - I think the foot are mostly Mikes Models ( with a few more recent Essex among them ), this time it's the cavalry that are varied. The left wing horse units (nearest camera) include Peter Pig, Essex, and two generations of Minifigs.  Over on the other wing, Cuirassiers are backed-up by the King's Musketeers, and some (perhaps anachronistic)  Chevaux Leger lancers.  

I think we can sum up the opposing forces as - a right old mixture!

Having sorted out the rules and figures, next we need the battlefield. The rules assume a 6 ft by 4ft table, but I have only 3ft by 3ft, so some adjustment is necessary. I propose to simply halve the movement and shooting distances, so I have the equivalent of 6ft by 6ft.  I've kept the the unit 'footprints' unchanged ( Brigades 75mm by 40mm ) , so in effect they are double the expected size. I thought that making them half-size too would make a 'brigade' into a single rank  of 4 infantry, which wouldn't look (half)  so good.  So, I just have to hope that doesn't cause any rules issues. We'll see.. 

I had a first go at setting a table based on the scenario map, and it looks ( with a somewhat creased terrain cloth, that will need sorting out! )  something like this: 


Hopefully you can just about see that the Southern part of the battlefield is slightly higher ground, by dint of the good old-school 'books under the cloth' method. Having looked at it, I am wondering if the woods are a bit large, given the number of units each side has to deploy - and only the three detached musketeer units  for each side will deploy in the woods. I may decide to shuffle the woodland  to the East,  shrinking it  to give the main forces a bit more elbow room. 

So there we are, the basics of a battle, I hope. A few variables that may or may not cause problems, but there's only one way to find out - give it a try! 

If all goes well, my next post will be the battle report - though I'm afraid a lot of 'events, dear boy, events' may get in the way, as they have been doing for the past few weeks. So  I apologise in advance if there is a bit of a pause before that next post appears. But I'm certainly looking forward to giving thse rules a try, and giving my polyglot vintage armies their first proper 'go' in a long time! Until then, keep safe, and well, everyone. 


Monday, 24 January 2022

Ready to fight, and Turkish Tropicality

Having had a think about the setup,  here's the proposed layout for the climactic battle at Zouache in my 'Soldier King' campaign.  Many thanks to commenters who made very sensible suggestions regarding the layout: I have taken them on board!

Western approaches ( Prussian Cavalry route )  

It will be a battle for two river crossings , the Northern one being the destination of the Prussian Infantry force, and the Western one approached by their cavalry. I decided the attackers would start off-table, and I made a tentative Austrian deployment to defend the position. 

Looking North ( awaiting Prussian foot and guns )

This may all be subject to ( further! )  amendment, but in essence the Austrians have their  Botta d'Adorno brigade ( their best foot ) in the North awaiting the Prussian infantry, and their weaker Grenzer foot facing West and the expected cavalry column. Most Austrian cavalry is held in reserve, but the Schwarzer Hussars are cunningly concealed on a a wooded hill by the Northern road, ready to swoop on the flank of the approaching enemy columns.  Prussian order of arrival is yet to be decided, and the Dice Gods will play some sort of role in that.  The walled enclosures  stand in for 'entrenchments' and command both bridges - no attacker can cross the bridge before  the adjacent defences have been cleared. It may be a tough nut to crack..


Tropical 'Spit' kit : reassuringly few parts

Meanwhile, a shopping trip to Bury St. Edmunds this weekend allowed a visit to 'Model Junction' and a look at their fairly random selection of 1/72 scale model kits for WW2 vehicles and aircraft. I found an interesting ( and inexpensive) kit which may be useful for my 'D-Day Dodgers' Italian Campaign forces.  It's a  'Tropical' Spitfire VB/ VC , which will go very well with the P-40 Kittyhawk I already have.  The kit is  made by 'PM Model'  - a new name on me - and is from Turkey, though distributed via Bachmann.  It's a very simple kit, which suits me fine, and it has a choice of three suggested colour schemes and decal sets, these being for the RAF in Tunisia 1943,  the USAAF in North Africa 1943, and the Turkish Air Force 1942. That last one would be an unusual option for a kit-basher!  It turns out the Turks were very worried about being surrounded by German and Italian occupied territory plus Axis-aligned neighbours such as Bulgaria, and acquired as many combat aircraft as possible, mostly British, French and American types.  They  finally entered the war, on the Allied side, in February 1945.  I wonder if  anyone has thought of  a 'what-if ' campaign whereby Hitler decides to outflank the Soviets via Asia Minor in say, 1942? Leaving aside such wild surmise,  I think it might be fun to paint this as  the USAAF version - I seem to remember a photo of such an American-operated 'Spit' crash-landed on a beach in Sicily or Italy. 

Next time, back to  1757 'somewhere in Central Europe' as the Prussians make their  attempt on the river crossings at Zouache.  Meanwhile keep well, and safe, everyone. 


Sunday, 2 January 2022

Battle Planning: thinking allowed

A Happy New Year to one and all!  Last time in the 'Soldier King' campaign, we set up the general situation for something of a climactic battle, as the Prussians launched their army into the attack on the Austrian forces at the city of Zouache. Having decided on a battle, I now have to work out how to turn it into a game, using the (somewhat  limited)  resources I have available.  It's quite a challenge, and I am not certain how I am going to make it work, but hope that with a little thought,  I will be able to  see a way forward. And it might be interesting to post my thoughts as I go - 'show your working', as the dreaded exam papers used to say.   

Despite my earlier concerns, one thing I do have is sufficient troops. Here is the defending Austrian force: 

General Dachs steps up

I am going to start by assuming they will be organised with troop designations and Strength Point (SP)  values from 'The Portable Wargame' , as follows:  

Commander - General Dachs :       6 SP       

Three battalions Botta d'Adorno  Line Infantry,   rated Average,   each  4 SP

Two  battalions  'Grenzer' foot , rated  Inferior , each 3SP 

One squadron  Erzherhog Ferdinand Cuirassiers.  rated Inferior,   2SP 

Two  squadrons  Grenzer Hussars,  rated Average,  each 3 SP

One squadron  'Schwarzen' Hussars.  rated Inferior,  2 SP

One gun and crew,  rated Average,  2 SP.

 Giving a total of  36 SP , and Exhaustion Point reached at a loss of 12 SP.

And the attacking Prussian array: 

Von Gehirne's powerful force


Commander - Generalleutnant  von Gehirne :  6 SP 

One battalion,   44th Fusilier Regiment,  rated Elite,  5 SP

Three battalions Jaegers ( fighting as Line infantry ) , rated Average, each 4 SP 

Two battalions  von Kleist Frei Korps,  rated Average, each 4 SP    

Three Squadrons  Cuirrassiers, rated Elite,  each 4 SP

Two Guns  and crews, rated Average, each 2 SP

 Making  a total of  47 SP , and Exhaustion Point reached at a loss of 16 SP.

To arrive at these SP values, I translated  the Soldier King troop quality 'Guards' to be Portable Wargame 'Elite',   while 'Veterans' in Soldier King became 'Average' , and 'Levy' became 'Inferior'. There is no separate representation of artillery in 'Soldier King' forces, so I have fairly arbitrarily allocated one gun to the defending Austrians, and two guns to the attacking Prussians ( this keeps the Strength Point 'ratio'  a bit more in line with the board game army strengths ). Bear in mind that although my first thought is to continue with 'Portable Wargame' rules, ( specifically the Napoleonic Brigade-level version,  with my own tweaks for the Seven Years War ), this is not set in stone, hence organisations/unit configurations  may change.  One concern is , with only a 3 foot square ( or 9 by 9 hexes )  battlefield, are these forces too large? 

I had worried that I would struggle to field all the required units in my customary formats - especially Prussian infantry, but the numerous Jaegers I acquired from the Eric Knowles collection were a big help, making up three battalions. They will fight as' Line' infantry, but I won't worry too much about that - after all in several  of the my earlier games they have served as Line, and sometimes even fought for the other side! I do have a couple of units of Prussian line infantry in the early stages of painting, but realistically they won't be ready in time for this game. So,  Jaegers it is, and the fiercesome Prussian drill masters will enjoy instilling/beating some discipline and order into them..  

The one area I almost did struggle with was light cavalry, given the Austrians needed three squadrons - Eric Knowles' trusty Grenze Hussars only provided two. But then I lighted on some of the plastic  Spencer-Smiths most generously gifted to me by Neil Patterson of the Aufklarungsabteilung blog,  and resplendent in a rather cool, if  basic, all-black uniform.  A quick basing job, and the 'Schwarzen Hussars' were recruited!  I assume these may have been inspired  by the  Prussian Ruesch Hussars or 'Deaths Heads'.  So again, we have some possibly Prussian troops lured to the other side, presumably by large bribes and the attractions of Viennese cafe society - so much more fun than Berlin! Here they are - 'button counters' may wish to look away now:

Latest recruits - the men in black

Yes, pretty basic, and maybe not too accurate, but needs must - perhaps fittingly, they are going to be rated 'Inferior'  quality in the rules. So they may just run away at the first  cannonade, anyway! Or they may perform wonders - we shall see. They'll do fine on the table, for now, and I will take a cue from Brigadier Peter Young, quoted in a fascinating blog post from Tragardmastare recently : 'with apologies to perfectionists in the sphere of military millinery'.   I'm also reminded of one of Conrad Kinch's 'Send Three and Fourpence' articles in Miniature Wargames magazine,  entitled something like 'The Art of Coarse Painting' - in which he adopts Management Consultant lingo re: 'Minimum Viable Product' (MVP). So, Ladies and Gentlemen, I give you the MVP (or as Google translator has it, Minimal Lebensfähiges Produkt )  Hussars..

So, we have our forces. Now for possibly the most difficult part - the table.  With nine hexes by nine, or 3 feet square available - bluntly, will the armies ( 21 units in all ) fit in?  This is where it may get interesting. But that will have to wait for the next post, as the hour is late, the candles almost burnt down, plenty more thought is  required, and I don't wish to overstay my welcome.

It remains to once again wish you all a very Happy New Year, let's hope 2022 is an improvement - though perhaps that won't be until our unwanted guest Mr. Omicron has done his worst. I predict a quiet January at home, which may at least allow some more  hobby time. Keep well, and safe (and 'boostered', if possible), everyone. 

Wednesday, 20 January 2021

Scenario planning, and nice nostalgia

Having set up the situation for the second battle of  my 'Soldier King' campaign in the previous post, it's an interesting challenge to work out a tabletop scenario.   

All (red ) roads lead to Rahden - and battle

The issues are that (i) the forces are radically unequal, (ii) I'm not sure I have enough figures to represent them all on one table, and if I have, (iii)  I'm not sure I will have space for them all on my three feet square table. So I've been thinking a bit about how to represent the forces and produce an interesting ( and hopefully not too  one-sided) game.  The thing to avoid, it strikes me, is having the heavily outnumbered Austrians just dug in at the town, being ground down by frontal  assaults from their attackers.   It's a nice problem to have, of course, and not least because it has sent me to look in some grand old books and publications. 

The simplest option is a basic one-off battle scenario, and  I found something that looked relevant in Grant and Asquith's  'Scenarios for All Ages' - entitled 'Encirclement or Breakout'.         

from the masters of scenarios


On a single table , 'Red' is stuck in the middle, with no less than three 'Blue' forces of varying strengths closing in from various directions. Very conveniently, I have an Austrian army  in Rahden, with three Prussian contingents converging on them by  separate roads.  In the scenario, the Red objective to escape, getting his units off the table - and perhaps this is  the best hope for the Austrians in Rahden. Can they find the weakest of the surrounding forces and brush it aside, thus escaping? Can Blue close the net around them, and capture a good proportion?    So, a potentially useful scenario - though conditions (ii) and (iii) may not be met very easily, given my resources of figures and space. I think Charles Grant and Stuart Asquith assumed a fairly large table and plentiful troops for their setups! Also, with such a disparity between the two armies, in a small space there might not be much scope for finding that crucial gap.. but it's worth considering. 

I think perhaps a better bet, though, is some sort of 'mini-campaign' arrangement,  with a map area that encompasses several 'tables-worth' of country with the town at the centre, and  the Prussian forces arriving at different times on their respective roads, giving the Austrians the possibility of fighting them 'in detail'  in more equal combats,  while trying not to be worn down by repeated battles.  A smaller version of the King Harold's 1066 situation, perhaps?   General inspiration for this comes from Donald Featherstone's War Game Campaigns - he clearly loved  the  map-to-table translation of action. I think I acquired the John Curry re-print first, but then found the original at Salute or SELWG the other year and couldn't resist. Anyway, great for getting the ideas going. 

So good, I bought it twice

Finally, one of those lovely series of magazine articles from the old days that never quite gets 'archived' from the mental files system. In this case,  George Gush's  'One-Day Wargame Campaigns',  which turns out to have  been the first proper  article in the first issue of 'Miniature Wargames',  back in , was it 1983?     

Issue no. 1, article no. 1 - not a bad start..  

Really aimed at big club  games involving multiple players, a large space and as many figures as possible, so not quite appropriate here! I think I thought of it because of the mulitple-table aspects. Anyway, it gave me a very pleasant hour's reading on a grey winter's day, and those games must have been great fun.  George Gush was an early hero, from his Airfix ECW guide, WRG Renaissance period rules,  and his 'Renaissance Armies',  which I still have  ( sporting a 'Fourth Form Prize' label inside the cover, it was a long time ago! )  - and of course he gave me the title of this blog.  Is George still with us, does anyone know? 

All the above is of course  a way of saying  'I haven't set up the battle yet',  but ideas are being mulled over..which is all part of the fun.   Keep safe, and well, everyone. 


Monday, 17 August 2020

Battle for the Bridgehead

The Bridgehead: sadly no giant cats here..

 Having gained some new recruits to my forces, I thought it was time to revisit The Portable Seven Years War. What has been happening in our somewhat obsure corner of central Europe? The Prussians, perhaps smarting from the repulse of their earlier incursion, have re-grouped and are essaying  another raid into Austrian terrritory. 

Once again I turned to Neil Thomas'  One Hour Wargames  excellent scenario suggestions, and soon found an interesting example with an element of the cross-border raid. Specifically, scenario number 5 : 'Bridghead'. As Neil Thomas describes it,   

'The Blue  army has discovered a river crossing in Red territory, and is aiming to secure it. The Red general is frantically trying to mobilise every available unit, in order to stop the enemy bridgehead from being formed'.  

'Blue' will be the Prussian raiders, and 'Red' the Austrian defenders. Conveniently I am able to use a 9 by 9 hex layout, which is the same size as Mr. Thomas' suggested 3 feet square table; see the picture above, looking South to North. ( Sadly the giant cat, deployed by  'Red' as shown in Ross Mac's recent Battle Gameof the Month post for the same scenario, was not available to me ).   

The scenario specifies that each side has 6 units, and the Prussians will have just one unit deployed at the start, just North of the bridge. They then add  one unit per turn from Turn 2 to Turn 6, entering on the road at the Southern edge.  The Austrians start with no units in position, but deploy two units on each of turns 1, 3 and 5,  each group's entry point decided by dicing - either at the Western edge by the wood, by  the road from  the North, or at the Eastern edge by the hill. Given this  sequence of events, the defenders will actually outnumber the raiders on Turn 1, Turn 3 and Turn 5, and may be able to isolate and  overwhelm the the invader's  vanguard early on - so it should be interesting stuff.

And so to the available forces: using the random selection method from Neil Thomas' book, I rolled the dice and came up with the following nicely varied brigades  ( with Strength Points  for Bob Cordery's Portable Napoleonic Wargame ) :  

Prussians:  

Three units Line Infantry : two of Line Fusiliers, one of Von Kleist Frei Korps  (each 4SP )

Two units Cavalry :  one of von Kleist Uhlans, one of von Kleist Horse Grenadiers (each 3 SP) 

One unit 'Rifles'  ( singly-based figures detached for this purpose from Von Kleist Frei Korps )              - 3 SP. 

And of course their commander, Eric von Jemanden, his hasty promotion confirmed after the               narrow victory at Heiligtumshugel .

The two units of cavalry should give them some advantage in striking fast to gain the bridgehead. All units are rated Average except the Elite Rifles; with von Jemanden's 6SP, the force total is 27 SP, and thus their Exhaustion Point is reached at the loss of  9 SP. 

And here they are, on the march for the bridge : 

Prussian raiders : plenty of cavalry for a strike force


Austrians: 

Four Units Line infantry - two from the newly-recruited Botta regiment, two from our old                  friends the 'Wildganse' Jaegers (really Prussians, cunningly inveigled into migrating to Vienna)               - each 4 SP.

One unit 'Rifles' , actually  dismounted Grenze Hussar figures  - 3 SP.

One unit Artillery  ( 2 SP).

Their commander, the brave General Dachs, successful in repelling invaders in the previous                    campaign. 

No cavalry, but lots of infantry firepower and some artillery support should be good in defence. All units are rated Average except the Elite Rifles; with Dachs'  6SP, the force total is also 27 SP, and  Exhaustion Point is reached at the loss of  9 SP.


Dachs' defenders: Botta regiment debut

I decided that the Prussians would be able to specify the order in which their units arrived, since they were the attackers and will have planned the operation and their order of march;  while the Austrians would randomly select the units in each  arriving group, as well as the entry point, thus reflecting their hurried scraping-together of a defending force.   Neil Thomas specifies a maximun of 15 turns, with victory to the side holding the bridgehead,  with no enemy units on the North bank of the river within 3 hexes of the bridge.   

And so, let the battle commence. Von Jemanden decided that his advance guard would be the von Kleist Uhlans;  Dachs' die rolling  selected the first battalion Botta regiment and the Rifles, entering by road from the North on turn one.   Sensibly the Bottas deployed into line to receive any possible Uhlan charge, while the rifles took to the hill in dispersed formation: 

Turn One: 'Uhlans, sir!'  'Muskets ready, my lads..'
 

And there we have it. Next time, we shall see how things turn out.  Keep well, everyone.