Showing posts with label Soldier King. Show all posts

Friday, 31 January 2025

Still Alive - But Got Killed the Other Day

 Is 31st January too late to wish everyone a Happy New Year? I hope 2025 has started well for you all, anyway.  As may be obvious from my lack of updates, this month has been  a slightly  'Dry January' in hobby terms  ( and as a wise hobby friend said, don't try to write blog posts when you've got nothing to report ) -  but I am determined not to reach the end of a month with no updates whatsoever, especially in the run-up to what I believe may be called  the 'fiftth blogoversary' of this stream of inconsequential nonsense ( I really don’t know what he said at the end of that sentence, and I don’t think he did, either... ). And so, in the dying hours of this bleak midwinter month, a quick summary of recent hobby-related happenings, and a few thoughts and ideas for the future seem in order. 

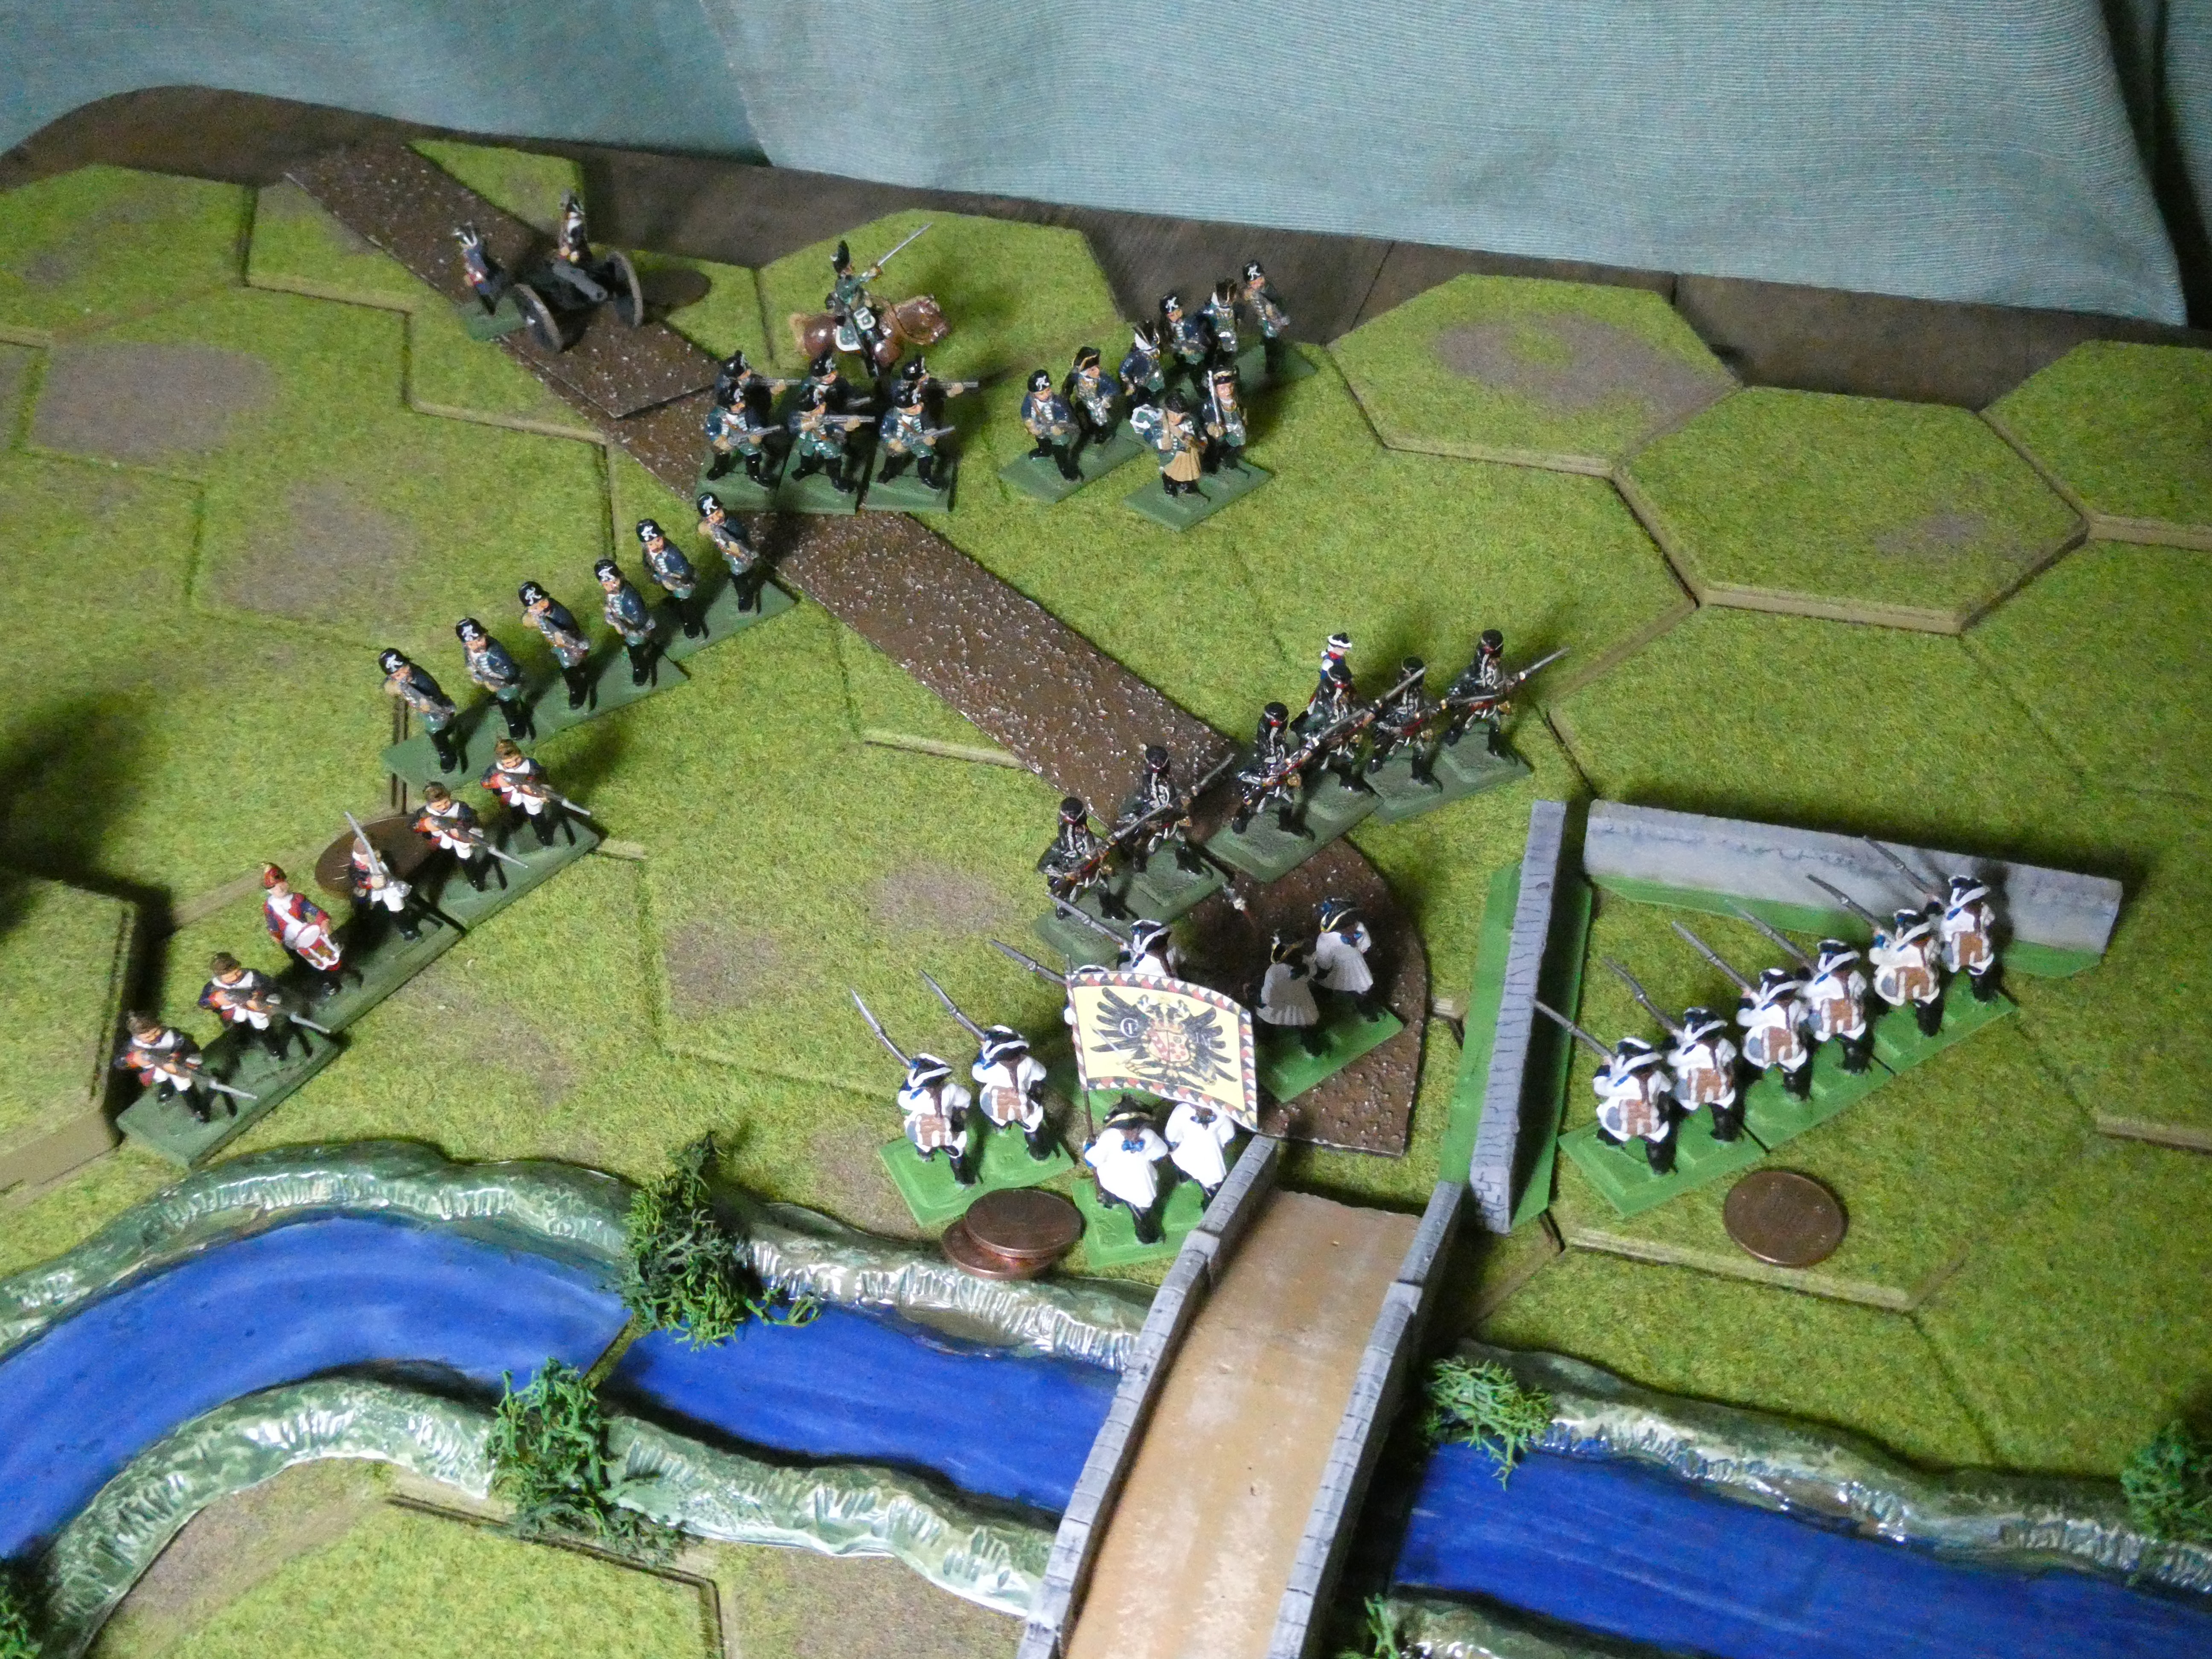
I may not have run any actual games myself, but I have been lucky to have been involved in a few: many thanks to Jon Freitag, as ever, for inviting me to join in with two of his remote gaming extravaganzas. First up was his fourth iteration of the Italian Wars period battle of  Agnadello 1509; something of a nail-biting game in which Tony (MS Foy) and I as the Venetians came quite close to holding off  Mark (Jolly Broom Man) ,  Chris ( Nundanket ) and Dave ( LiverpoolDave )'s  French, partly by going against what seemed to have become the accepted wisdom of the previous three outings. A learning point from this - I think I had assumed we would lose, but if I had kept a closer eye on the scores we might have seen a chance to actually win!  Never assume.. Click on the link here for Jon's excellent report.    I did smile at Jon's writing at one point : By now, Alviano's attacks have run out of momentum - what in fact had happened was that my Heavy Cavalry  Men-At-Arms had pursued a badly-damaged French light horse unit, striking the routers from behind and rolling eleven dice against the French one - and then  I had rolled no hits with my eleven dice, and seen my brave knights slink away in disgrace! A moment to remember.  As you can see , the game was a really colourful affair, with some mighty struggles as the big pike blocks collided across the Venetians' defended ditch. 


The second offering from Jon was earlier this week - a complete change of theme, The Gunfight at Adobe Wells Station ... yesirree, a rootin' tootin' Wild West Gunfight!   Tremendous fun was had as (by coincidence ) the former Venetians Tony and I became Pinkerton Agents, defending a stash of weapons against a gang of lairy-looking desperadoes who strongly resembled the French nobiltiy of 1509.  My character 'The Accountant' managed an initial coup by fatally drilling Chris's  'ZZ Hood' right between the eyes,  but then fell to a rain of bullets and clubbed pistols from Mark's  villainous 'Wild Bill' Briscoe.  Meanwhile Tony's  'Careful' McMinn had been anything but careful, and took a whole lotta lead from 'Daring Dave' McGinty, and the Pinkertons were unceremoniously rubbed out.  A great game, with Jon reviving his version of 'The Rules With No Name' and figures after 25 years disuse - you did a good job of remembering them, Jon!  I liked the simple card-driven activation which sometimes gave a player two or even three actions on their turn, hence allowing a deadly 'reload - aim - fire' sequence, and the use of a 'joker' card to end the turn randomly - which quite often saved characters who had got into a very tight spot, by denying their opponent the chance to finish them off! Alas, The Accountant ran out of luck in the end,  and his books are now closed.  I borrowed the following pic from Jon's blog - the moment my man went down, in a close-quarters rooftop fight..


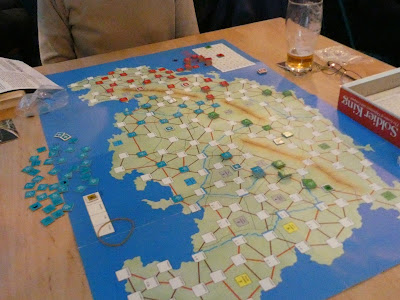
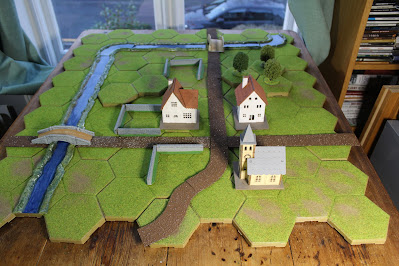
Chris aka 'Nundanket' has featured quite a lot in my hobby January - as well as the above we met in real life a couple of times. First was at the National Army Museum for one of their excellent Friday lunchtime talks, this time on the  Saratoga campaign of 1777.   Chris has posted a report of the talk here - note that if you can't make it in person to the talks, you can book in to watch them on-line, and well worth it they usually are.   Secondly, Chris and I were involved with  an evening of board wargaming in a London pub, playing my venerable (1983!)  Soldier King  game. Very much a 'learning the game' exercise for all concerned, but interesting, and we are arranging another try with the same group - in which we will hopefully move a bit quicker and get stuck in to some proper battles! Here is a picture (thanks again Chris!)  to give you an idea of the look of the thing 


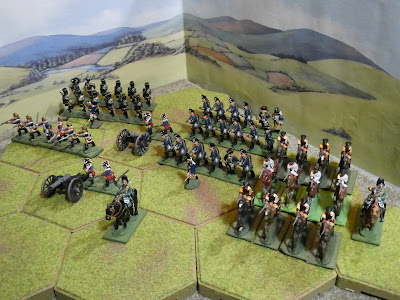
So that's a summary of most of what I've been doing hobby-wise - you may have noticed that this does not ( shock, horror! ) include any painting.. Well, I have managed a few painting sessions on my 1859 Risorgimento  Piedmontese and Austrian 6mm armies, and they are 'getting there' but by no means complete, though I have been enjoying the process.  Here is a 'work in progress' sort of picture - Austrians mainly in white, Piedmontese in blue. I like the simple, semi-flat format of the Commission Figurines models, which are a mix of their Napoleonic and ACW ranges. 

on the workbench - just not often enough!


For the future, I have a couple of ideas  knocking around,  plus an invitation , as follows: 

D-Day Dodgers as a Mini-Campaign?

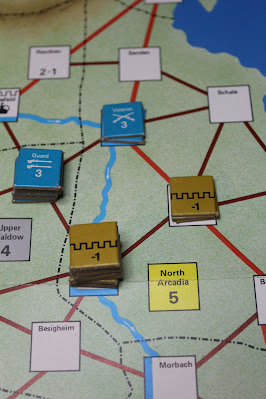
I was intrigued and inspired by a couple of posts from the always excellent Norm Smith on his Commanders website and/or  Battlefields and Warriors blog  ( and by the way, if you haven't already,  do yourself a favour and download his brilliant  2024 Christmas Newsletter ).  In these he highlighted a  piece in Matt OIrsik's 'Warning Order' free downloadable  wargaming magazine, issue no. 58, which in turn is inpsired by a very old series on 'One-Day-Campaigns' which appeared in early issues of Wargames Illustrated  back in 1987!  I remember those 1980s articles, too - quite inspiring. Norm is using the concept to set up a WW2 campaign for his 'Old School Tactical' boardgame collection, which you can read about on his site - he calls the campaign  Krosnogord 1944, and excellent it is too. I have been thinking that something similar might be a pretty good way to use my D-Day Dodgers  1943-45 Italian Campaign collection, having now painted a few units for Rapid Fire Reloaded, I need a framework for putting together game scenarios, and the 'linked maps/tables' format of the mini-campaigns suggested by Norm and Matt look like a pretty good idea. I am giving this some thought..I hope Matt won't mind too much if I show a screenshot of  part of his Warning Order article :

And of course, if you have not previously seen Warning Order, do have a look, it is an amazing piece of work and well worth supporting! 


Thirty Years War with Portable Pike and Shot ? 

I have got a bit tied up with painting figures for projects in the past few months, and it occurs I should change things up a bit and vary my routine by remembering the armies that are already painted, and could be used for actual games with very little effort.. in particular I've been thinking of my 15mm Thirty Years' War forces. I chanced upon some blog entries by Archduke Piccolo, who has tried re-fighting battles of the Thirty Years' War using Bob Cordery's  The Portable Pike and Shot Wargame - an example being his Portable White Mountain  from June 2024.  It made me think - I wonder if I could do that?  At around the same time, I noticed that Helion  have published a book about the battle of Fribourg 1644 :


Being a bit of a fan of Marshall Turenne ( slightly morbidly, I think I once saw the cannonball that killed him, in the Invalides museum  in Paris ), this could be a good one to try gaming, and my armies are supposed to be French and Imperialists ( OK, maybe it was Bavarians at Fribourg, but we'll overlook that! )  . The book will I assume have decent orders of battle, and they can hopefully be scaled down to the limited table and forces at my disposal - a sort of 'bathtub Fribourg', perhaps?  Actually I don't think the armies involved were all that large, at this late stage of the war, which may make it easier. So that's another book for for the wish-list - but it should be well-worth reading, Monsieur Thion being the expert on French armies of the period. 

A PBEM Seven Years War Campaign? 

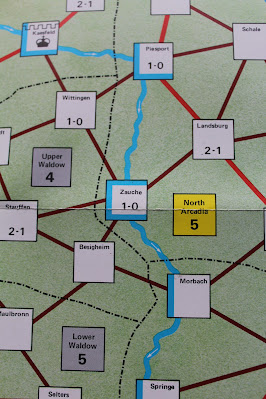
Chris 'Nundanket' strikes again - he has kindly invited me to join a 'Play by Email' campaign he is planning, based on Frederick the Great's invasion of Bohemia in 1757. We talked about the idea when we met at the NAM (see above), and the discussion and some ideas batted around gave him the impetus to get started on it, I think. He has a bunch of willing generals lined up and an interesting co-operative/competitive format in mind, whereby we may be all playing Prussian commanders versus the umpire-driven or automated Austrians - it looks like it should be quite in interesting excercise. Thanks yet again, Chris, I look forward to it..  

What with getting the 1859 armies completed and hopefully a game on the table soon,  I think I have given myself plenty to be getting on with!  I've also rambled on quite long enough here, so I will call it a month and hope to come back with some actual progress in February ( which is tomorrow, of course- maybe not quite  that quickly, then!).  Meawhile I hope everyone out there is enjoying their hobby time, and until the next time keep well, everyone.   

Tuesday, 29 March 2022

Conclusions at Zouache - finally

Turn 9 situation - Austrians holding out well
 

We left ( far too long ago, unfortunately )  the Prussian attack on the Austrians at  Zouche, in my 'Soldier King' inspired campaign,  after Turn 8. As a quick recap, at the Western road the Prussian cavalry force of three regiments of elite Cuirassiers had scattered a defending regiment of  poor-quality Grenzer foot,  and now came up against the sole Austrian Heavy Cavalry unit, who had gamely engaged them - but how long could they last?  In the North, the main Prussian column of Infantry and artillery  were hoping to recover after the chaos and confusion inflicted by the rampaging Schwarzer Hussars, and another Austrian Light Cavalry unit - and were preparing to   launch a major assault on the  Austrian foot regiments of the Botta d'Adorno brigade holding  the river crossing.  Well,  I finally found the time to finish the game, and now I can give an update on how it turned out. So, without further ado.. 

Grenze Hussars causing more mayhem, briefly
 

Turn 9 was notable mainly for cavalry action : at the West road, the lone Austrian Cuirassier unit found itself attacked by twice its number of elite  Prussian 'Heavies', but held its ground in the resulting melee, even forcing one enemy unit to retreat. In the North, the Austrian 1st Grenze Hussars charged and ran amok, forcing both the Prussian field gun and 1st Jaegers to retire,  following-up twice and finally being halted by 1st von Kleist foot.  Once again the Austrian Light Cavalry brought disruption to the Prussian main force. Would they ever press home their attack? 

In the event,  next turn things began to go the attackers way at last - the Austrian 1st Hussars took hits in melee with von Kleist  and from a volley from Prussian Jaegers,  and were destroyed as a result - and the quality of Prussian cavalry began to tell at the Western road, with the Austrian cuirassiers reduced to 1 remaining Strength Point ( SP ). The final Prussian unit ( 3rd Jaegers ) arrived on the table, giving them five regiments against the two Austrian foot units holding the North bridge - and the 1st von Kleist foot were first to charge against the 1st Botta regiment in its defensive position. The melee was initally inconclusive, but continued for the next four turns with losses on both sides, 1st Von Kleist actually fighting  both Austrian regiments at various times, and  allowing the rest of the Prussian foot to come up into firing range. Losses at end of Turn 10 were level, at 11 SP each - bad news for the weaker Austrian force. Was the tide beginning to turn?

Von Kleist charges - with powerful backup

Prussian pressure was maintiained in Turn 11, starting with their howitzer scoring a  hit which finally broke  the Austrian Cuirassiers.  Their place was taken immediately by 2nd Grenze Hussars, but the chances for one Light Cavalry unit agains three Prussian Heavy Cavarly regiments did not look good. and they straight away  sufffered a first 1SP loss in melee. Meanwhile in the North, the two Botta foot  regiments each lost 1 SP, attacked by the Prussian foot using both  musketry and the bayonet.  Losses now Prussians 13 SP, Austrians 14 SP - 6 Austrian losses in only 2 turns, and  now only 2 SP between them and Exhaustion Point. 

On the next turn, in the West a combination of howitzer fire and Prussian charges pushed the Austrian 2nd Hussars back over the bridge, allowing Prussian cavalry to finally cross the river.  In the North, Prussian foot continued to advance, as the  Austrian 1st Botta regmiment remained locked in combat with 1st von Kleist, holding on determinedly to their fortified postion - von Kleist did however manage to force 2nd Botta to retire, back over the bridge.   But that very determination to hold their ground  cost the Austrians  dear,  when on Turn 13  1st Botta suffered another hit in close combat with von Kleist, and yet another from a volley by 1st Jaegers,  and took  2 SP losses rather than be pushed out of their defensive position - these were the 16th and 17th  Austrian SP losses, which took them to 'Exhaustion Point'.  From now on they could make  no aggressive moves, only hold on or retreat.  Turn 13 had certainly been unlucky for General Dachs.

Turn 14, Austrians hard pushed in the North ( profusion of pennies indicating losses ) 

On Turn 14 the Austrians started well, their gunners scoring  a hit that finished off 1st von Kleist foot, worn out by its multiple charges on the Austrian foot.  But Prussian musket fire from their Fusiliers and Jaegers scored a further two hits on 1st Botta foot -  this time they retreated to avoid destruction, being pushed back over the bridge to join their 2nd Botta comrades. In turn, 1st Botta's own fire at least drove  2nd Jaeger back.  

Turn 15, the last of the game - the depleted Austrian forces won the initiative die roll but could make no aggressive moves, and elected to simply stand - but their gunners scored a lucky hit which killed the von Kliest's brigadier, who had joined the Prussian Fusilier regiment after his own troops had been knocked out. This unfortunate gentleman's loss cost the Prussians 3 SPs - dangerous for them.  Their own howitzer ended a successful day by  hitting and finally eliminating 2nd Botta regiment. Knowing that exhaustion loomed, the Prussian commander urged his cavalry  on in a last charge, with 2 Cuirassier units slamming into Austrian 2nd Hussars, who lost 1 SP but held on agianst the odds. A general advance of Prussian foot in the North looked to finally cross the bridge against little opposition.

Final charge of  the Prussian Heavy Horse
 

And so it finsihed,  as the end of  Turn 15 brought welcome darkness to the exhausted troops. Exhausted indeed - a tally of the losses came to  Austrians 19 SP,   Prussians 21 SP - both sides well and truly passing their respective Exhaustion Points.   So, in terms of the tabletop game, a draw - but from the campaign perspective, I think quite a bad reverse for General Dachs and his Austrians. They  suffered the complete loss of five regiments, who will be eliminated from the campaign game ( units only 'damaged' by partial loss of strength points will continue, and re-gain strength as further recruits come in ).    The Prussians lost only a couple of regiments, albeit experienced ones, though they were unlucky to have one brigadier wounded and one killed, costing 5 SPs in all - if not for those two losses, they would not have reached Exhaustion Point.   

I should put in a word for the gunners - though unable to open fire until Turn 7,  the Prussian howitzer took 3 SPs from the Austrians, delivering the final  coup de grace to both the Austrian Cuirassiers and 2nd Botta regiment. The Austrian field guns scored no less than 6 SPs of hits against the Prussians, battering the Fusilier regiment for 2 SPs, finishing off 1st von Kleist and finally killing its Brigadier!  Only the Prussian field gun did badly, spending a lot of time trying to avoid the attention of various Austrian Hussars. 

How it ended  - darkness will be welcome to all

Phew. I have limited time and space for games, and this took  four gaming  sessions, spread over 6 weeks - I didn't mean to  be quite  so slow!  But worth it, I think, and good to run a slightly larger game and prove it could work in the limited space. Bob Cordery's 'Division Level' Portable Wargame rules turned out to be just about right for the task. At least with a small table, simple hex terrain and relatively small forces and units, the setting-up and dismantling of the game at each session was quite quick. 

So, where next with the campaign? Well, winter is coming - both sides will go into winter quarters and try to raise new recruits to their armies.  But they may also take the opportunity to open negotiations  - in particular the Austrians must be worried about the losses they have taken, and the threat to their 'home' territories. Perhaps it's time for diplomacy?

As usual, I hope you've enjoyed following this, as I certainly did playing and writing it up. Time for  a change of period next time?  Meanwhile thanks for reading this far, and keep well, and safe, everyone. 


Saturday, 19 March 2022

It's Only A Game..

Sad news for the wargame blogging community this week, with the ( I hope temporary ) suspension  of Norm's brilliant 'Battlefields and Warriors' blog.  He says  "I have come to realise that a far too significant proportion of my spare time / behaviour is being drawn to the screen to the point that other areas of life / wargaming relatively diminish."  Also as an example, he mentioned his latest post about boargaming Ligny, which was 4000 words long "and yet by today had garnered just 5 different voices in the comments". That last point makes me feel particularly guilty. I have hugely enjoyed Norm's blog since finding it, especially his fantastic extended game reports, but I haven't very often commented. I think that's probably been at least partly because I haven't felt able to add much that would match up to Norm's very high standards and wonderfully thoughtful writing! Of course one could just say 'great post, thanks!' but there's a limit to how often you can do that..  Ironically I had only just got round to reading the Ligny post, and was thinking about leaving a grateful comment (yes, honestly!), when Norm announced his break and disabled comments on his blog. Sorry Norm!

I think Norm makes a very good point about screen time vs. 'real' time : there are so many blogs out there, let alone Facebook groups, YouTube channels, etc etc, one could just spend all one's spare time on them and never do any actual gaming, let alone post to one's own blog! In Norm's case, he must also spend quite a large amount of time commenting on other blogs, again always giving greatly perceptive and thoughtful input. On this blog, I feel I've been amazingly lucky with the quantity and quality of comments I've received from the start, and I'm very, very grateful to all who have contributed. I think one should probably write a blog mainly for one's own enjoyment , or at least 'what sort of thing would I like to read?' , but it's always a great encouragement to get some nice comments - and it must be rather depressing to put the effort into a blog post, and get no response, as one sometimes sees. Having said that, despite the prevalence of 'bots' skewing the statistics, one can also be encouraged by the numbers of views on the blog - and I note that Norm said he was getting 12,000 views per month, to which all I can say is, wow! I am really chuffed if I get one-tenth of that number - and thanks again, to all who look in now and again and add to those figures.

Anyway, I do hope Norm's absence is not a long one, and I promise to leave more appreciative comments in future! It was great to see the many positive responses to Jon Freitag's post on the same subject, and I must also mention a really fantastic post, also inspired by Norm's announcement, from Aaron/Prufrock on his 'Here's No Great Matter' blog.  He makes the crucial point that "The important thing is to recognise that a hobby has to be about enjoyment. It can't be about meeting expectations - well, it can be for a while, but that is unsustainable."  ,  and I think that's what we should all remember - it's only a game, after all.  Post on your blog when you feel good about it, enjoy it, and  don't feel under pressure.  If a post is getting too long, you can always split it up, and give 'em a cliffhanger! ( I am seriously guilty of doing that with my recent game report, I know!).  


Soldier King: first real outing in decades!

In other news: I  recently ventured out, for the first time in over two years, to 'Drafts' boargame cafe in London's Waterloo, to meet gaming buddies Napoleon Dave and Rupert the Boardgamer, and for a not-too-challenging return to gaming we had a go at 'Soldier King' , the game I've been using to drive my 7YW campaign for this blog. I think I bought it pretty much on first publication, which I see was 40 years ago ( ouch!) , and I doubt if it has been actually played since the 80s ( Simon Bryant and Tony Toms of the Medway area, are you out there? ) .  The cafe was scarily noisy and crowded with 'young persons', which I admit unnerved me somewhat - we debated, was it always like that? (we were always the oldest customers in the place, that's for sure!) But the game was fun, and went well, despite a quirk of the map design that seemed to give a distinct possibility that one player could win the game on turn one!  I failed ( luckily for my popularity!) to  exploit that, and we got through a good number of turns in a 3-hour session, and enjoyed a chat ( over the noise!) and some decent food and drinks - and as far as I know, none of us got Covid, somewhat to my surprise! Thanks, Dave and Rupert. 


Finally I want to highlight a couple of recent magazines, if you'll indulge me. First up, 'Miniature Wargames' issue 467 ( March 2022 ) - John Treadaway has excelled himself with this issue, there's some really good stuff in it, I think, such as: 

 (a) Conrad Kinch's regular column,  featuring  a fun '18th Century Kriegspiel' game he has played remotely with his friends using a simple magnetic whiteboard and home-made terrain and unit markers, with a scenario pinched from C.S. Grant - quite inspiring, and emphasises how such setups can be a surprisingly realistic 'command experience' for the players.    

(b) a really excellent 8-page article from Peter Warren of Anschluss Publishing, the  'Malati Bridge' scenario for Sicily 1943,  designed for their 'The War on the Ground' rules, but adaptable to other Battalion/Battlegroup level WW2 rules.  I remember their excellent game at 'Salute' lat year, and I quite fancy to get the rules, if only for the sake of reading them! 

(c) John's report on the 'Broadside' show in December -  can't see myself in the pics, though! Maybe that's for the best..

(d) Dave Tuck's 'The Battle of the Ginnis, a tribute to Peter Gilder's Sudan Campaign Rules' with the players all being British commanders and the umpire controlling the Mahdists,  or equally playable as a solo game. Interesting ideas, vintage figures, and  Peter Gilder's legacy lives on.. 

(e) Gerry Sutcliff's 'An Army in a Day' - painting an entire 2mm scale  army in a day. Which makes me strangely tempted to try it, albeit this would be a gratuitous piece of 'mission creep'! Hmmm, 1859 Italy, maybe? 

(f) book reviews including Arthur Harman's review of 'Paddy Griffiths' Game of War: Reflections of a Lifetime of Wargaming'  from the History of Wargaming Project. Pretty much  everything Paddy Griffith wrote is worth reading, surely? 

... 'and many, many  more' as the K-Tel TV ads used to say..


 and finally 'Arqubusier' , the journal of The Pike and Shot Society, volume XXXVII number 5. This has been rather delayed, for which the editor apologises ( did I hear a rumour that he had a major IT malfunction? ) .  I like the editorial comment where he says 'The Chairman has given the Temporary Editor a very stern talking to!'   -  the Chairman being  Stephen Ede-Borrett, and the Temporary Editor - Steven Ede-Borrett...

I've not read it all yet, but here's the contents page, with some interesting stuff as always: 

They seem to have a bit more wargame-y content these days, alongside the purely historical. I'll be interested to read Robbie Roddis' account of The Army of Cesare Borgia, and also David Flintham's pieces on London and King's Lynn in the Civil Wars -  I think these may be versions of the on-line talks he has given for the Battlefields Trust .   I do very much  like the P&SS;  the period  was my wargaming 'first love', mainly thanks to Goerge Gush and C.V. Wedgewood, and I really must get it into this blog!  One article I have read is a glowing review  of Barry Hilton's 'Every Bullet Has Its Billet: a guide to wargaming the late 17th Century'.  I may or may not ever game the period, but if the review is to be believed, the book will be well worth reading anyway. 

That's probably too much from me, but I have enjoyed writing it, so that's the main thing. Next time, I hope to finally complete the account of the Battle at Zouache - which has been three months in the making.. I can reveal that the actual game has been completed at last! 

Until then  keep  safe, and well, everyone, and keep enjoying your hobby - it's only a game, after all.


Tuesday, 8 March 2022

The Action at Zouache - part 2

Before we were so rudely interrupted,  we left the Prussian attack on the town of Zouache ( in my 'Soldier King' boardgame-based campaign )  after only three turns, though there had been plenty of action due to the pell-mell charge of the Austrian Schwarzer Hussars.   This single unit had stopped the Prussians' main column in its tracks, its infantry having to face about to meet the threat from behind, all thoughts of attack temporarily forgotten. Quite a start! 

The battle continued, with two distinct actions going on - first the Prussian cavalry and their attempt to force a crossing of the western bridge,  and then the 'main event' of the Prussian infantry and artillery column in the North, trying to regain the initiative after the shock of the Hussars ambush. We'll look at them one at a time, starting in the West. 

Opposing Cuirassiers at  the western bridge  
 With the Austrians' 1st Grenze foot threatened by no less than three regiments of Elite Prussian Cuirassiers, the defenders' situation looked challenging,  to say the least. On Turn 4, Austrian general Dachs  ordered his single Cuirassier unit towards the bridge, to offer assstance to the Grenzers. 1st and 3rd Prussian Cuirassiers threatened the Austrian foot from the front, while 2nd Cuirassiers circled to the North, aiming to take the infantry in the rear - on Turn 5, the Grenzers  gave them a brisk volley, driving the horsemen back.  

Meanwhile the Austrian Erzerhog Cuirassiers cantered  across the bridge and charged - hitting the Prussian 3rd Cuirassiers, and starting a milling cavalry fight that continued without conclusion, until on Turn 7 the dice decided it had gone on long enough - both sides took a hit, and both got a 'retreat' result, rather realistically falling back from each other for a brief respite. At the same time  the Prussian 2nd Cuirassiers charged the Grenzer foot, who took a hit, and lost 1SP, which left them with only 1SP remaining.  

Turn 8 : last gasp for Grenzer foot
With things looking perilous for the foot, the Austrian Cuirassiers had little alternative but to charge back into melee in support, resuming their fight with 3rd Cuirassiers. The dice was against the Austrian horse, and they took a 1 SP loss  - but they continued fighting, keeping the Prussians  engaged in melee through Turn 8, and crucially keeping the road to the bridge closed. However this was not enough to save the Grenzer foot, who finally went down under a succession of charges from Prussian 1st and 2nd Cuirassiers, losing their final SP on Turn 8 and being wiped out. Given the odds, they had put up a decent fight. 


Hussars running amok, Prussians in chaos
The main event, and the focus of both sides' major efforts, continued to be in the North, where the main Prussian column had been thrown into such confusion by the Schwarzers ambush. Here, Austrian commander had ordered his 1st Grenze Hussars foward over  the northern bridge to assist the Schwarzers, and on Turn 4 they joined in the fight - charging 1st von Kleist foot from behind, while the Schwarzers gave the same treatment to the limbered  Prussian howitzer unit. More confusion for the Prussians, now assailed by two bodies  of Hussars!   The Prussian Fusilier regiment tried close combat against the Schwarzers -  only to be forced to retreat - and the Prussian Howitzers tried to slip away towards the nearby wooded hill. This all added up to anothet turn of precisely zero progress in the attack on Zouache town. 

Turn 5 saw the Austrians win the initiative die roll again - the dice really were  favouring them.   1st Grenzer Hussars continued their melee with 1st Von Kleist foot, while the Schwarzers charged yet again, catching the limbered Howitzers once more, and taking 1 SP from them. Encouraged by the mayhem being inflicted on the Prussians,  Dachs ordered his 2nd Botta foot forward, crossing the northern bridge to support their entrenched comrades there, and put more pressure on the hapless Prussians. 

But on the Prussian turn things began to look up. Their Fusiliers loosed off a volley against the Schwarzer Hussars, and inflicted 1 SP loss on them - their first significant casualties ( by this point they had inflicted 4SP losses on Prussian units!). The two von Kleist units, with a combination of close combat and firepower, forced  1st Grenze Hussars to retreat twice, and the Prussians were able to bring on reinforcements - 1st Jaeger foot, led by their brigadier, arrived and lunged straight into close combat with  the wavering Schwarzers. Some measure of relief for the Prussians, though Turn 5 ended with losses at Prussia -7SP to Austria -2SP.

Next turn,  the by now obligatory Austrian initiative win saw them play first again, with the Schwarzers continuing to harry the Prussian howitzers, and the Grenzer Hussars forcing 2nd von Kleist regiment to retreat - with disastrous consequences, as this brought the Prussian unit into musket range of both Botta regiments - who promptly volleyed, and took 2 SPs from the von Kleists - a shattering blow! 

The Prussian infantry now responded with their own muskets - 1st von Kleist regiment took 1 SP from the Grenze Hussars, and 1st Jaegers finally dealing the fatal blow to the Schwarzer Hussars by taking a second SP off them - as a 'Poor' rated unit, that was the end of their brief but glorious fight .They had caused complete confusion and stopped the main Prussian column dead in its tracks, and inflicted double the losses they suffered themselves - heroic stuff.  

The end of the Schwarzer Hussars
 All this time, neither side's artillery had been able to fire - the Prussians being still limbered ( and trying to dodge enemy Hussars ), and the Austrians simply out of range.  But by Turn 7, the Prussian howitzer unit had reached the wooded hill, - within range of the Austrian gunners! Who promptly missed, but the howitzers,  having lost 1SP already, were in rather a risky position.  

At last,  the Prussians won the initiative for Turn 7, and the Howitzers were able to unlimber, looking to bombard the Austrian Grenzer foot guarding the western bridge ( they did not have the range to reply to the Austrian guns ). 

Von Kleist foot kept up their volleys, again forcing the Grenzer Hussars to retreat.Their field gun unit  also unlimbered, and the 2nd Jaeger regiment arrived on-table: Prussian numbers finally beginning to build up. But the Austrians fought back, with 2nd Botta regiment's musketry forcing 2nd Von Kleist to retreat, and 1st Grenze Hussars charging in, taking the final SP and scattering the hapless 2nd Von Kleist regiment. The Hussars surged forward again, now charging the unlimbered Prussian field guns before they had the chance to fire. 

Turn 8 began with both sides' artillery able to fire - the Prussian Howitzers bombarding the Grenzer foot at the Western bridge, but missing.  The Austrian gunners were more successful, and the unfortunate howitzers were forced to retreat. More bad news for the Prussian artillery followed, with the Field Guns attacked by 1st Grenze Hussars, and losing 1 SP.  But finally the Prussian foot began to rally.  A volley from 2nd Jaegers again drove the Hussars back, and the Fusiliers were at  last able to resume the advance towards the northern bridge. Now the Prussians had four foot regiments available, with one more Jaeger unit still to arrive, with which to assail the two Botta regiments by the bridge - as long as they could keep those annoying Hussars at bay.

Turn 7: Hussars fight on, but will Prussian numbers tell?
 And there we must leave things, for now. It's been a ding-dong fight so far, both sides giving and taking casualties, and fortunes ebbing and flowing often,  within the same turn. The Prussian cavalry have made some progress and may be able to use their numbers to sweep the Austrian Cuirassiers aside and cross the Western bridge, while their infantry in the north finally disposed of the rampaging Schwarzer Hussars, and are marshalling their superior numbers for a push at the northern bridge, where weight of firepower may be telling.  But perhaps crucially, the price has been high  - at the end of Turn 8, casualties stand at Prussians -11SP,  Austrians -7SP. Both sides have 9 SP to spare before reaching exhaustion, at which point the attackers would have to call off their assault.  It's worth noting that the difference of 4 SPs between the protagonists losses is the number inflicted by those swashbuckling Schwarzer Hussars, who behaved heroically in their first fight, despite their raw ( rated 'inferior' in the rules ) status. With their wild charge falling upon the Prussian column, they may well prove to  have done enough to save the Austrian position at Zouache. 


With apologies for the delayed appearance of this episode,  'time and space', ghastly world events  and the toad, work having intervened  -  my next task is to reset the table and play out the denoument. Will Prussian discipline and numbers prevail? Or have their early reverses cost them too much? Will the plucky defenders hang on? We can only wait and see.. Until next time, keep well, and safe, everyone.  


Sunday, 13 February 2022

Soldier King campaign : Battle joined at Zouache

After rather too much thinking and many adjustments to the table, I finally made a start with the battle at Zouache in my 'Soldier King'  Seven Years War period campaign. Even then, due to issues of  'time and space' as ever, the despatch riders from the battle front have been somewhat delayed. But we can relay their contents now, and I can start by showing  an 'aerial view' of the battlefield: 

Austrian defenders await the onslaught

The armies are as described a couple of posts back : the Austrians are in position and awaitng the Prussian attack, with ( broadly ) their Botta d'Adorno infantry brigade, and their gunners covering the northern road and bridge,  the 'Grenzer' foot guarding the western approach, and the cavalry mostly held in reserve, save for the 'Schwarzer' Hussars  cunningly concealed on the wooded hill, hoping  to ambush the Prussian northern column. 

The Prussians have their infantry and guns arriving on the northern road, and their powerful cavalry (three regiments of elite Cuirassiers )  from the west.  I thought I'd add some uncertainty into the arrival timings, with the aid of the dice - each column would roll a dice each turn, with a 5 or 6 required to arrive on turn 1,  then a 4,5 or 6 on turn 2 and so on.  

The rules being used are from Bob Corderey's  'Portable Napoleonic Wargame' - the Division-level game,   with some improvised amendments for the Seven Years War period ( mainly to compel Infantry to deploy in line to fight , and not use squares or  attack columns ).   For command and initiative, I used Bob's playing-card driven activation system - the Austrians will get to activate 4,5 or 6 units per turn, and the more numerous Prussians 5,6 or 7 units. I completely arbitrarily decided that the daylight ( and thus the game)  would last 15 turns - a 'Neil Thomas' day?

And so to Turn 1 : which Prussian column would appear first? The dice were rolled, and neither column rolled high enough. The eerie calm about the town remained; for the Prussians, precious time ticked away. But on Turn 2, the dice favoured the Prussians, and both columns arrived on their respective roads. I decided that on the arrival move for each column, as many units could be introduced as the physical space and move distances allowed - the  activation  card system  would apply from the following turn. Accordingly, all three Prussian Cuirassier  regiments advanced up the western road, while in the North the von Kleist Brigade led, in march column along the road, followed by the field guns, then the 44th Fusilers moving South from the road, and finally the howitzer unit. 

Enter the Prussians..
 

Action was immediate - Prussian 1st Cuirassiers charging at the 1st Grenze infantry in their entrenched positon - and being repulsed. The  Grenzers' position controlled the road, and the Prussians would not be able to reach the bridge without contacting them. The other two Cuirassier units fanned out, 2nd regiment swinging North with the aim of outflanking the Grenzers. 

The defenders used the normal card activation system from the start, and drew  5 activations. And they started well - the 1st Grenzers let go a volley at their 1st Cuirassier attackers, scored a hit, and inflicted the first SP loss of the game.  The Austrian 'secret weapon' was unleashed - the Schwarzer Hussars emerged from the wooded, hill and came down 'like the wolf on the fold' charging the flank of the Prussian  Fusiliers!  Fortune was  with them - in the resulting close combat die roll, the Fusilers took a hit, and elected to lose 1 SP rather than  retreat  - because the rules would  allow the cavalry to simply follow up a retrest, and keep attacking.  First blood to the Austrians, 2 SPs to nil, and a sharp start to the action. 

Schwarzer Hussars pounce on Prussian column..

At the start of turn 3, artillery fire was an option, but both Prussian gun untis  were still limbered and on the move, and  the Austrian gun on the northern hill had no target in range. The initiative die roll gave Austria first move, and the dice continued well and truly in their favour  First the Grenzer foot fired again, this time  at 3rd Cuirassier, forcing a retreat - but also wounding the accompanying Brigadier - and 2 more SPs lost!  The Schwarzer Hussars charged again, and again the Fusiliers took a hit, this time opting to retreat  and allowing the Hussars to follow-up - which brought them into contact with the limbered-up Prussian field guns, a juicy target! The dice rolled, and again the Schwarzers won - the gun unit retreated one hex, and the Hussars again followed-up - that now  brought them into contact with the rear of the von Kleist brigade column.  Roll those dice again - they won again! Von Kleist brigade suffered a 'lose SP' result - and the rules say that where two foot units are in the dame hex, both units must suffer the SP loss. So, 1 SP loss for each of the Von Kleist units. Quite a spectacular run of victories for the Schwarzer Hussars - a raw unit, in their first fight!   


Schwarzers getting amongst 'em: chaos ensued!

 The Prussian main column had been thrown into thorough disarray by the rampaging Hussars.  Austrian General Dachs saw his chance for an 'aggressive defence', moving his 1st Grenzer Hussars over the North bridge to threaten the Prussian column even  more, and 1st Botta foot to the bridge in support.


Grenzers in a tight spot..

On their turn the Prussians drew 7 activations, much needed. In the West, the entrenched Grenzer foot suffered charges from both 1st and 3rd Cuirassiers  - the 1st were again repelled, but the 3rd did better, and the Grenzers suffered the first Austrian SP loss ( and being rated  'poor', they only had 3 SPs to start with ). How long could they hold out against repeated charges?  

Turn 3:in the North, defenders attack!  

In the North the Prussians tried to restore some order from the chaos inflicted by rampaging Austrian Hussars - Fusiliers and von Kleist foot hurriedly shaking out into battle lines against them, and the Howitzer unit making for the wooded hill. And so a tumultuous turn ended, with losses standing at Austrians 1SP, Prussians 6SP - a rocky start for the attackers! 

End of Turn 3 - a pretty good start

 The main Prussian column in the North has been thrown into confusion by the descent of the Schwarzer Hussars, its advance stopped in its tracks,  and the Austrians are throwing more cavalry forward, aiming to mulitply the chaos - but the numbers are with the attackers, and there are no less than three more infantry regiments waiting to enter the fight. In the West, the lone Grenzer foot unit looks to be in trouble against three Elite quality Heavy Cavalry units, but have inflicted some pain ( and 3 SP losses ) on their assailants and their brigade commander, and if the Prussian horse do eventually  brush past  and over the bridge, they will run into four more Austrian units.  So it looks interesting - and a good point to take a break, before this post gets a shade too long.  I hope this has been fun to read, as it certainly was to play, and now that the despatches  have started to arrive back at respective headquarters, there will be more to tell quite soon.   Until then, keep well, and safe, everyone. 


Monday, 24 January 2022

Ready to fight, and Turkish Tropicality

Having had a think about the setup,  here's the proposed layout for the climactic battle at Zouache in my 'Soldier King' campaign.  Many thanks to commenters who made very sensible suggestions regarding the layout: I have taken them on board!

Western approaches ( Prussian Cavalry route )  

It will be a battle for two river crossings , the Northern one being the destination of the Prussian Infantry force, and the Western one approached by their cavalry. I decided the attackers would start off-table, and I made a tentative Austrian deployment to defend the position. 

Looking North ( awaiting Prussian foot and guns )

This may all be subject to ( further! )  amendment, but in essence the Austrians have their  Botta d'Adorno brigade ( their best foot ) in the North awaiting the Prussian infantry, and their weaker Grenzer foot facing West and the expected cavalry column. Most Austrian cavalry is held in reserve, but the Schwarzer Hussars are cunningly concealed on a a wooded hill by the Northern road, ready to swoop on the flank of the approaching enemy columns.  Prussian order of arrival is yet to be decided, and the Dice Gods will play some sort of role in that.  The walled enclosures  stand in for 'entrenchments' and command both bridges - no attacker can cross the bridge before  the adjacent defences have been cleared. It may be a tough nut to crack..


Tropical 'Spit' kit : reassuringly few parts

Meanwhile, a shopping trip to Bury St. Edmunds this weekend allowed a visit to 'Model Junction' and a look at their fairly random selection of 1/72 scale model kits for WW2 vehicles and aircraft. I found an interesting ( and inexpensive) kit which may be useful for my 'D-Day Dodgers' Italian Campaign forces.  It's a  'Tropical' Spitfire VB/ VC , which will go very well with the P-40 Kittyhawk I already have.  The kit is  made by 'PM Model'  - a new name on me - and is from Turkey, though distributed via Bachmann.  It's a very simple kit, which suits me fine, and it has a choice of three suggested colour schemes and decal sets, these being for the RAF in Tunisia 1943,  the USAAF in North Africa 1943, and the Turkish Air Force 1942. That last one would be an unusual option for a kit-basher!  It turns out the Turks were very worried about being surrounded by German and Italian occupied territory plus Axis-aligned neighbours such as Bulgaria, and acquired as many combat aircraft as possible, mostly British, French and American types.  They  finally entered the war, on the Allied side, in February 1945.  I wonder if  anyone has thought of  a 'what-if ' campaign whereby Hitler decides to outflank the Soviets via Asia Minor in say, 1942? Leaving aside such wild surmise,  I think it might be fun to paint this as  the USAAF version - I seem to remember a photo of such an American-operated 'Spit' crash-landed on a beach in Sicily or Italy. 

Next time, back to  1757 'somewhere in Central Europe' as the Prussians make their  attempt on the river crossings at Zouache.  Meanwhile keep well, and safe, everyone. 


Thursday, 13 January 2022

Battle Planning : A Bit Of A Re-think

I've had a bit of a re-think.. In my last post, I set out the likely forces involved in the upcoming battle in my 'Soldier King' campaign, with the Prussians attacking their Austrian foes in defensive positions  at the town of Zouache.  I had established that I have sufficient troops to portray the opposing armies in Bob Cordery's Brigade Level 'Portable Wargame'.  All well and good, BUT what I have been worrying  about is the small size of battlefield I can use, relative to both those army sizes,  and  also the topographical layout of the area to be disputed.  

I think I should  show the campaign map, to illustrate my concerns. It looks like this: 

Zouache:  a river runs round it

The Austrians are of course positioned at Zouche. The Prussians have their infantry and guns advancing down the road from Wittingen in the North, while their cavalry has swung around to the West and is approaching from Stauffen.  As you can see, the town is in the bend of a  river - so there must be a bridge into the town on each approach road, which the Prussians are going to have to secure. It's the combination of river, two bridges, and town that I fear will  make things difficult to fit into a 9 by 9 grid. I had a go at a layout: 

Terrain: first draft
 

Hmm... I can fit the two bridges and the river in, with a bit of distance between so the defenders are stretched a little by the flanking cavalry column. But there's no space for the approach: if the Austrians contest the bridges, battle will be  joined immediately and all the fighting take place at the edge of the table, and being pretty static too.  I wondered if the Prussian cavalry might be assumed to have rushed the Western bridge, allowing a bit of manouevering once across, but that seems a bit unfair on the defenders - who are after all supposed to be 'entrenched'. If I put the river and bridges closer to the centre of the table, then maybe there's not much room for movement once the bridges have been crossed - they will be too close together.

I think the problem is maybe that I am  trying to cram too many troops and too much action into a small space, and it's just going to bog down.   Thinking time.. 

One option might be to 'mini-campaign' it. I did this quite successfully before, at Rahden earlier in this campaign. Draw a map of the general area, encompassing  multiple tables worth of terrain, and use map  movement to determine where and when contacts between opposing forces occur, transferring to a table when battle is joined. It worked quite well for Rahden, and also reminded me of Charles Grant's system used in 'Wargame Tactics', where the initial moves of larger tabletop battles were made on maps, allowing an element of  pre-game manoeuvre and surprise. However, I think in this case there's less of a case for map movements, as the position is fairly well decided already : the Austrians are pretty much dug-in at the town, and the Prussians are attacking from two directions, already obvious. Austrian cavalry  could be sent out to harrass the approaching Prussians, but that's about the only map-movement option, really. Hmmm...

So my next idea is to address the issue of numbers of troops and available space :  I can't increase the space available,  but maybe I can change the scale - 'zoom out', so to speak?  Maybe what I need is for the table to represent a larger area, so the troops are able to fit into less space, not move so fast across the table, and not shoot so far, as they do in the Brigade level game of The Portable Wargame.  And of course, I need look no further  than... the next chapter of Bob's book 'The Portable Napoleonic Wargame'! Here we have the Division level game, and I think it might just do the trick.  It allows two infantry units (notionally regiments, in a brigade )  to occupy the same grid area, and they move and shoot over shorter distances.  The forces available would translate into two or three infantry brigades and one or two cavalry brigades for each side (plus artillery units),  which would seems fairly manageable and hopefully make the table a bit less crowded. 

So, let's see how the forces might  now look - first the Austrians: 


    Commander - General Dachs :       6 SP       

    Botta d'Adorno Brigade ( 3 SP ) 

            - Three regiments  Botta d'Adorno  Line Infantry,   rated Average,   each  4 SP

    Grenzer Brigade ( 3 SP ) 

           - Two regiments  'Grenzer' foot , rated  Poor, each 3SP 

    Erzherhog Ferdinand Cuirassier regiment,.  rated Poor,  3SP 

    Grenze Hussar brigade  ( 3 SP ) 

             - Two regiments   Grenze Hussars,  rated Average,  each 3 SP

    'Schwarzen' Hussar Regiment,  rated Inferior,  2 SP

    Artillery battalion , rated Average, 2 SP

 Giving a total of  46 SP , and Exhaustion Point reached at a loss of  16 SP.


And the Prussians: 


        Commander - Generalleutnant  von Gehirne   :  6 SP 

        44th Fusilier Regiment,  rated Elite,  5 SP

        Jaeger Brigade ( 3 SP ) 

            - Three regiments  Jaegers ( fighting as Line infantry ) , rated Average, each 4 SP 

        Von Kleist Brigade ( 3 SP ) 

            - Two regiments  von Kleist Frei Korps,  rated Average, each 4 SP    

        Heavy Cavalry Brigade ( 3 SP ) 

            - Three Regiments  Cuirrassiers, rated Elite,  each 5 SP

        One  Battalion Field Guns and crews, rated Average,  2 SP

        One Battalion Howitzers and crews, rated Average, 2 SP

 Making  a total of  59 SP , and Exhaustion Point reached at a loss of  20 SP..

It's interesting that the Strength Points values of the armies have increased by about a quarter, partly at least due to the allocation of points to the Brigade commanders. Movement and firing distances are slightly shorter than in the 'Brigade' game, and two regiments can occupy one hex - so the my limited table space should feel a bit more spacious for the forces involved. 

Now I just need to figure out the terrain  - which still needs some hard thinking, I reckon, and battle may commence. But it's past my bedtime, so that will have to wait for the next post. With apologies for the slow progress on this, due to our old friends 'time and space, dear boy..' ( just work and domestic duties, really - and some  January/ Pandemic  ennui, I think ).   I am very aware that this has been very slow  - can't help comparing  with the fantastic amount of work put in by Nundanket on his planned Hohenfriedberg  game - now that's how to prepare for a battle! 

I will try to be a bit quicker with the next post, which may even see the forces engaged. Meanwhile keep well, and safe, everyone. 


Friday, 24 December 2021

Soldier King Campaign : a bloody big battle?

It really is time some wargaming got done. 

One minute it's early December, the next minute it's almost Xmas, it seems.. Real life intrudes far too much for my liking, 'time and space', as always are in short supply. Thankfully, the very sociable Mr. Omicron has not approached our door, as far as we know.  In between the shopping and card-writing (and not forgetting, also work), a small amount of hobby activity has taken place - concerning my Seven Years War campaign based on the 'Soldier King' boardgame.  

We left things at the end of Summer 1757, with a daring Austrian cavalry raid on a Prussian outpost, which made off with vital supplies but at some cost, one unit of Cuirassiers being lost; and a  superior  Prussian force still threatened to overrun the Austrian home territories.   The next campaign move therefore being Autumn 1757, I rolled dice for initiative, and Austria won the right to move first - buying them time to  organise some sort of defences.  The dice gods have a habit of getting things right, it seems - it would have been less interesting if Prussia had taken the initiative and possibly just overrun the hapless Austrians before they could get organised.  Rolling a further die gave them four 'marches' , i.e the opportunity to move four 'stacks' of units, each unit being allowed a maximum of two marches. These were used to reinforce the main Austrian army at the city of Zouache, with a small flank guard at the crossroads of  Landsburg - and both of those commands were able to use one 'march' activation to entrench.   Austrian forces are notably weaker than the Prussians, but have made the best of their precarious situation.  With apologies for less-than exciting illustrations, here is the situation:

Zouache on the river, Landsburg to the NE
 

So, Prussian turn next - they rolled a splendid six marches.  A dilemma presented itself - would they go for the blunt instrument of a straightforward attack on the main Austrian force at Zouache, or try to manoeuvre and outflank them? The lightly-held outpost at Landsburg is more valuable for recruitment, so taking it would be a longer-term benefit ( with the winter recruiting season approaching ) , and would outflank the enemy main force and threaten to cut its communications, and leave the Austrian homeland in danger.  However, the season was late, ( this is the last turn before winter ) the roads somewhat indirect,  and the limitation of two 'marches' per unit would not have allowed exploitation of any advantage if Landsburg was taken. If the Austrian main force could simply be attacked and defeated now, their resistance would be at an end, and the campaign won.  Given all that, I put it to the Dice Gods : roll one die, with a roll of 1 or 2 meanng 'manoeuvre', and 3 to 6  'attack'. I rolled... a '3', so 'attack' it is! 

With plenty of moves available, the Prussians were able to marshal their forces and launch a two-pronged attack - with their infantry approaching Zouache from the North, while cavalry swung in from the West. And so, battle will be joined. 

In 'Soldier King' units, the defending Austrians have the following: 

        Infantry : 3 units Veterans,   2 units Levies 

        Cavalry  :  1 unit Heavy ( Levies ) , 3 units Light ( 2 veteran, 1 Levy ) 

While Prussia's attacking army is as folows: 

    Infantry : 1 unit Guard, 5 units Veterans 

    Cavalry : 3 units Guard Heavy. 

Prussians (blue) stronger in all departments

Translating to The Portable Wargame, that would be about 28 Strength Points of Austrians versus 37 Strength Points for the Prussians. Quite an advantage to the attackers, but against 'entrenched' defenders, that should even things up a bit. 

I now have to decide exactly how to play this out - in particular, have I even got enough figures? That's a lot of Prussian infantry units!  I may need to hurry up and finish painting the troops I recently made  a start on.  Or, perhaps try different rules and/or a different representation of units? Some more  thinking will be needed. Owing to circumstances ( i.e the amazing spread of Omicron ) I do not have any social engagements at all over the next week or so - there should at least  be plenty of  time to spend on this, once the big day is out of the way, leftovers eaten and the washing-up done...

So I hope to report on this fairly soon - in the meantime here's wishing a very merry Xmas to all my readers and followers!  Let's hope things are brighter in 2022. Keep safe, and well, everyone.