Showing posts with label Portable Wargame. Show all posts

Friday, 18 August 2023

The Fight for Der Sachsenhügel

There's been a distinct lack of actual gaming on this blog in recent weeks ( in fact, probably months), and the newly-painted 1750s Saxons needed some experience, so I thought it was time to get a Seven Years War period game on the table. I had a look through Neil Thomas' One Hour Wargames - always a good source of simple scenarios - and came up with Scenario 4 'Take the High Ground'. The attraction was that it involves one army ( 'Red' )  being split into two contingents, which I could set up as an allied army of Austrian and Saxon troops, facing Prussian  ('Blue') opposition. The scenario specifies six units per side, and  I used the 'OHW' army selection charts - the dice gave an interesting setup, as neither side received any cavalry! 

The selected forces were as follows: 

'Red' ( Allies ) : 4 Infantry, 1 Artillery, 1 'Skirmish' ( which I counted as Light Infantry ). 

'Blue' ( Prussians ):  3 Infantry, 1 Artillery, 2 Skirmish/Light Infantry :

Using my own 18th Century variant of Bob Cordery's Portable Wargame rules, this translated as 

Allies: 

- 1st and 2nd Battalions Saxon Regiment Friedrich August, each  4 Strength Points (SP)

- 1st and 2nd Battalions Austrian Botta d'Adorno Regiment , each 4 SP

- one Battalion Austrian  Grenzer Light Infantry, 3SP 

- one battery of Austrian Guns,  2SP 

- Commander - our old favourite  General Dachs,  6SP

Total 27 SP, Exhaustion Point =  9 SP

Allies..
 

and Prussians :

- 1st and 2nd Battalions 9th Line Infantry 'Jung Kleist'  each 4SP

- 1st Battalion 44th Fusilier regiment, 4SP

- one battalion Jaegers ( Light Infantry ) ,  3SP

- one battalion Von Kleist Frei Korps ( Light Infantry ), 3SP 

-  one battery of Prussian Guns, 2SP 

- Commander  Generalleutnant von Gehirne -  6SP

Total 26SP,  Exhaustion Point = 9SP.  

.. and Prussians

For simplicity, all units and commanders are rated 'Average'.

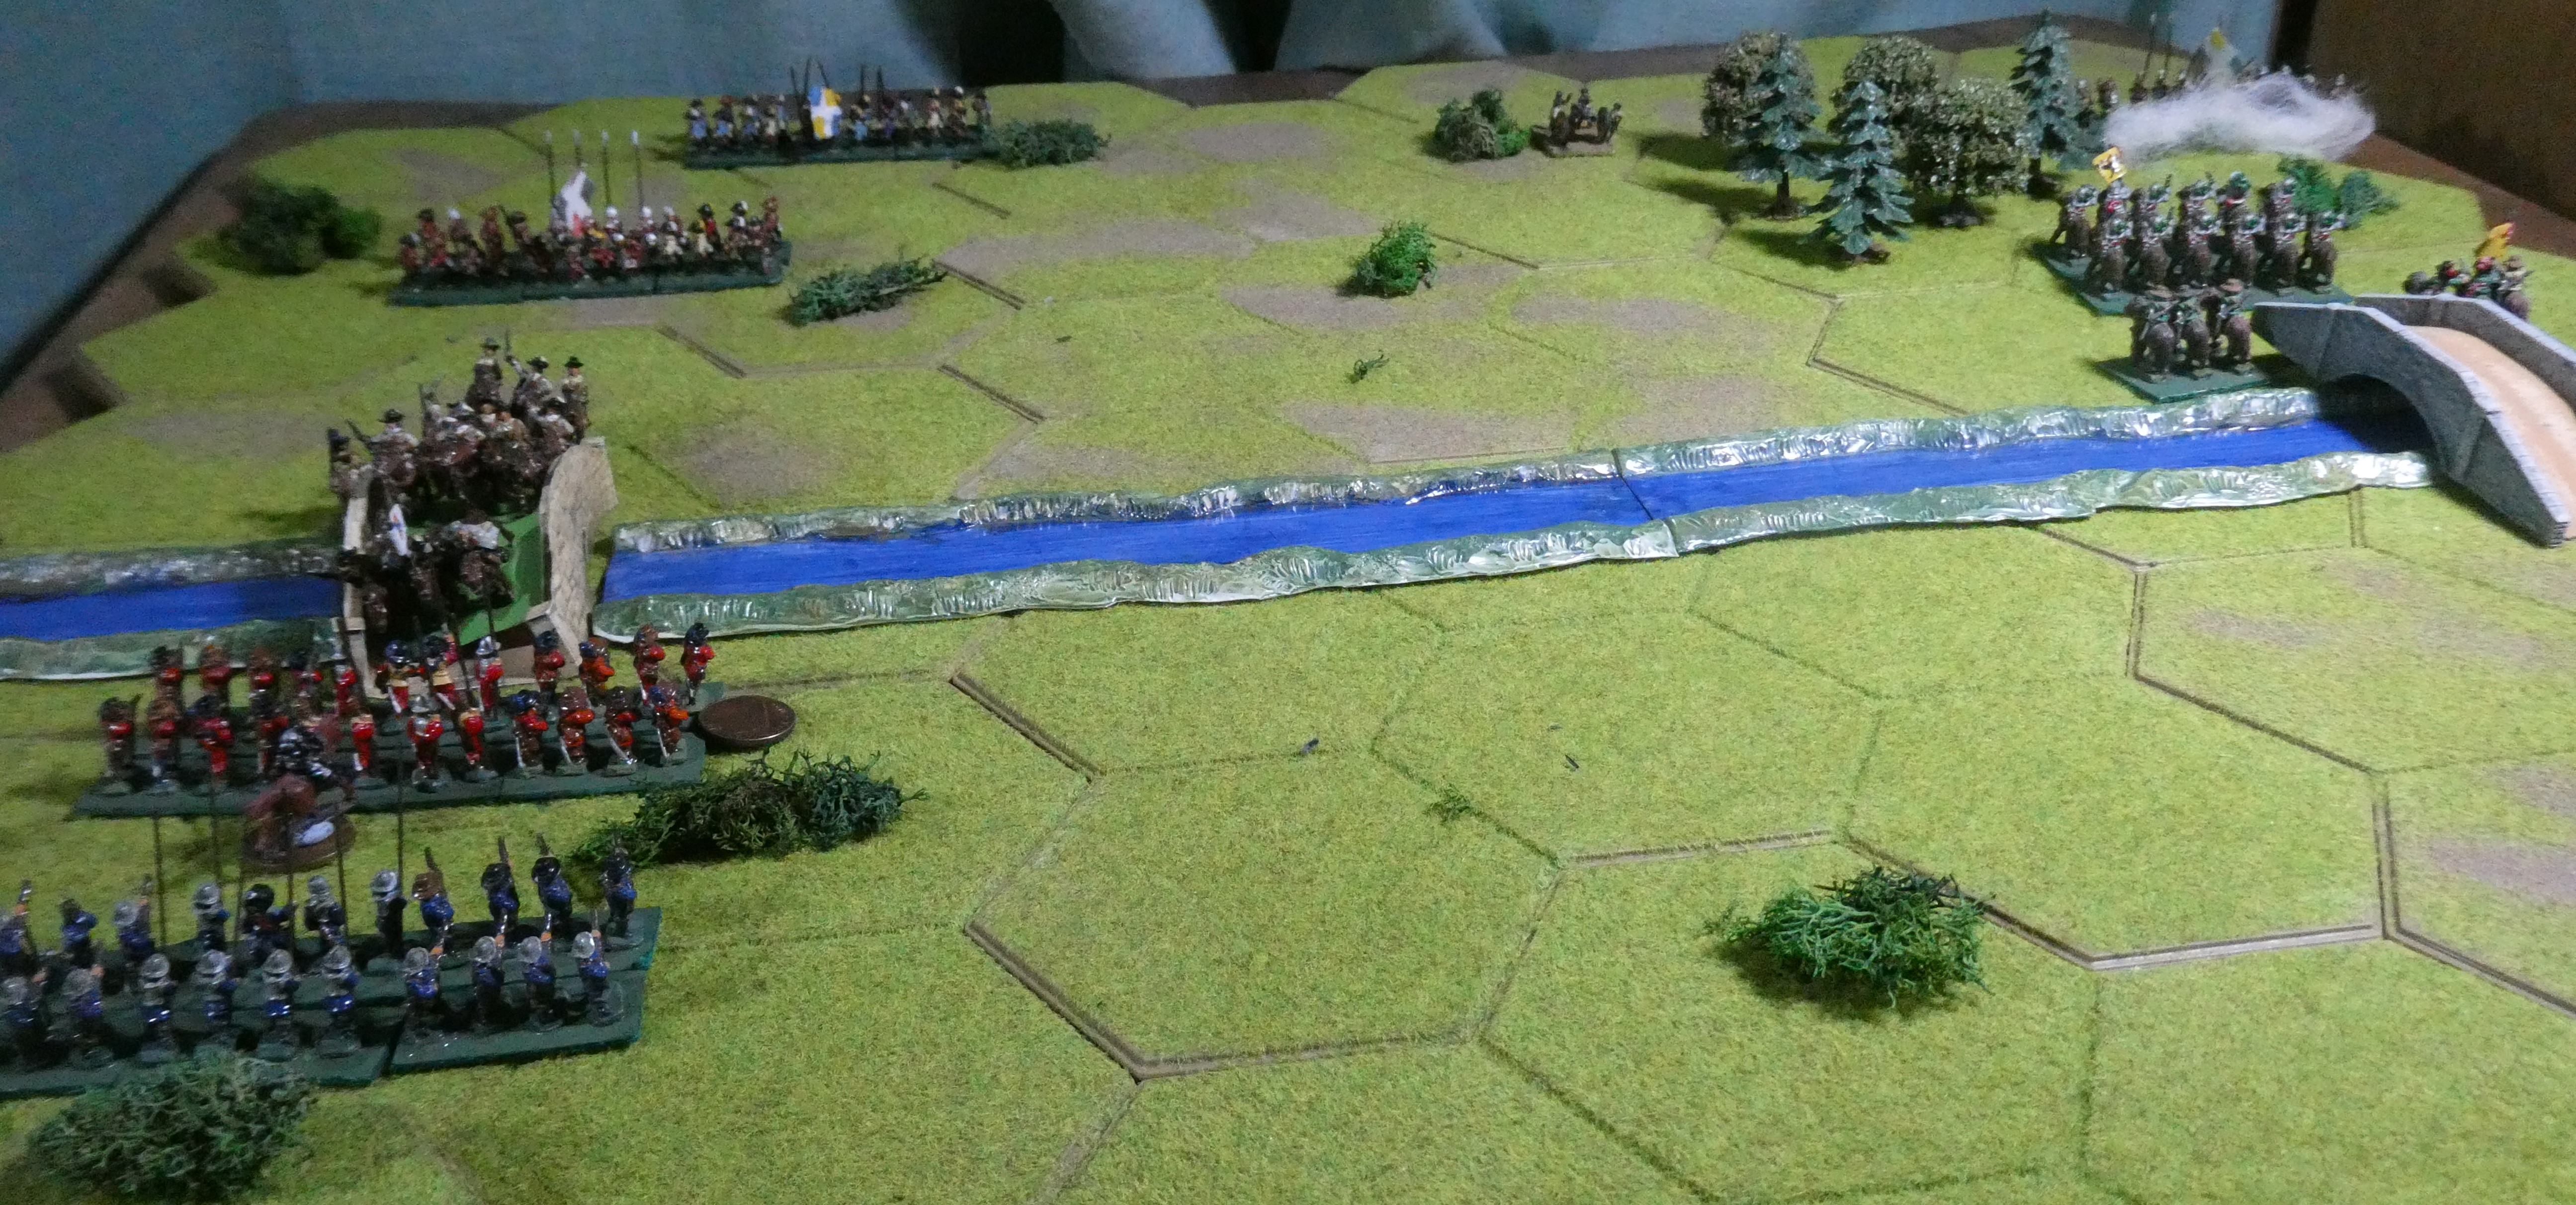
The scenario specifies that the Allies must place just  two units on the table initially, holding a hill in the middle of the battlefield,  with the rest of the force entering from the North table edge on turn 2, while the Prussians can bring on their entire force from the South table edge on Turn 1. It seemed appropriate  that the two Allied units deployed on the hill should be the two Saxon infantry battalions, hoping to hold the position until their Austrian confederates could reinforce them. And thus we have the fight for Der Sachsenhügel (  'The Saxon Hill', if I can trust Google Translate ),

Here is the initial setup, with North at the top and the novice Saxons in position on a pretty simple terrain. Let the battle commence.. 


I used Bob's card-driven activation system, which essentially allowed each side to activate 3, 4 or 5 units each turn, depending on a card draw (I decided that shooting,  or continuing an ongoing  close combat, does not require an activation).  The 'One Hour Wargame' scenario allows all the Prussian   units to enter on Turn 1, but I allowed the activation mechanism to limit that slightly - the Prussians  only scored 3 activations that turn, so only 3 units could enter. Accordingly, they brought on both battalions of 9th Jung Kleist infantry, and the Jaegers. The Allies only had the two Saxon units on the table - they opened musketry fire on the Prussian line infantry, and 1st Friedrich August scored an immediate success, taking 1 SP from 1st Jung Kleist. First blood to the Saxons! 

Opening volley from the Saxons..

In Turn 2,  the Allies only scored 3 activations so only 3 units could enter. For both sides I decided that their units arriving at the table would be in a pre-determined 'marching order', representing a column of march coming up the road - it seemed only sensible, for example,  to put Light Infantry units at the front ( and where available, another as rearguard ). Allied troops could only enter by the road or East of it, while Prussians could enter anywhere along their baseline,  but in reality the advantage of increased  movement tended to dictate that units entered via the road.   Wearing my  'Prussian hat', perhaps I should have considered advancing  several units up the Western side of the table to take the hill in flank, knowing that the Allies would have a long march to counter such a move?  Oh well, maybe next time..

Turn 4: Frei Korps in flanking move?

By Turn 4 both sides had a mix of Line and Light Infantry ( Botta D'Adorno and Grenzers vs. 44th Fusiliers and Jaegers )  disputing possession of the road, while the Prussian gun had opened a bombardment of the Saxons on the hill. Saxon musketry scored more successes, further reducing both battalions of 9th regiment Jung Kliest, but in turn the Prussian volleys had forced  one of the Saxon units to retire  from the crest of the hill.  The Prussians had made a tentative move on their left flank, bringing on the Von Kleist Frei  Korps to threaten  West of the hill, and forcing 1st August Freidrich to re-position to face them. Losses by this point were Prussians 3 SP, Allies 1SP. 

Turn 5 : Prussians in diagonal line from bottom left


Perhaps more by accident than design, by Turn 5 the Prussian force was arranged in a nice diagonal line - a sort of 'oblique order' ?  The Austrian artillery had deployed in the wood, aiming to dominate the road and give fire support to their comrades on the hill - but were promptly attacked by Prussian Jaegers sneaking up on them through the trees, and forced to retire. The Austrian guns took little part in events after this. 

Grenzers ( left ) and Jaegers skirmish on the wood

On Turn 6,  Prussian musketry having previously forced both Saxon units to step back, both battalions of  9th Jung Kleist regiment stormed onto the hill (despite the Allies now having 3 battalions there ) , and in the ensuing close combat 2nd  Saxon battalion suffered 2 SP losses - and was now reduced to 1 SP ( the Saxons on the whole seemed to be better at shooting than melee, I wonder if that reputation will stick to them?).  Meanwhile in the Eastern woods Prussian Jaegers and Austrian Grenzers fought it out, and the Grenzers came off worst to start with. By the end of the turn, Losses were Prussians 4 SP, Allies 5SP , which looked like something of a turning point. 

Jung Kleist storms the hill
 

Fighting continued on the hill, with the stronger 1st Saxon battalion being forced to retire, but the Prussians unable to finish off the crippled 2nd battalion - in fact losing 1 SP to the plucky Saxons in close combat. In the East, 1st Botta d'Adorno got the better of a musketry duel with Prussian 44th Fusiliers, and Grenzers and Jaegers still disputed the wood, with Grenzers now  getting the upper hand.  At the end of Turn 8 things had turned around again, and  losses were Allies 6SP, Prussians 7SP. 

Turn 8 : Action all along the line
 

For Turn 9, the Allies won the initiative and moved first, with 1st Botta d'Adorno forcing 44th Fusiliers to retreat, but making no progress in the fight for  the hill - indeed the Saxon 1st battalion took another 1 SP loss. And then the Prussians struck back - in the wood, their Jaegers' musketry took another 1 SP from the Austrian Grenzers, and in close combat on the hill, von Kleist Frei Korps took a further  1 SP from Saxon 1st  Friedrich August battalion. Thus the Allies had suffered the loss of 3SP in a single turn, and this was too much - total losses now stood at  Prussians 7SP, Allies 9SP, which meant that General Dachs' Austrians and Saxons had reached their Exhaustion Point.  Being now unable to take offensive action, the Allies could only try to fend off further Prussian attacks, and they would be unlikely to be able to throw the Prussians off the vital hill - so the chance of an allied victory now looked very slim. I decided to call the game there, with General Dachs conceding defeat.  A hard-fought victory for the Prussians, and a bit of a bruising first combat for my newly-raised Saxons! 

Still, a nice fun game, with a real see-saw, back-and-forth affair, the Prussians suffering more losses early on, getting ahead when they stormed onto the hill, only to suffer reverses in the woods and along the road,  before finally the tide turned decisively on Turn 9.   The rules work pretty well, Bob Cordery's basic Portable Wargame engine is lovely and simple, great for small-ish games like this, and a good base for 'tinkering', of course! I quite like the variable activation card draw, which puts a moderate, not excessive, limit on players actions and forces them to prioritise. I think the close combat system is a bit indecisive and maybe tends to draw out melees for longer than necessary, and  I have seen some suggested amendments which I think I may adopt. Of course, many thanks once again  to Bob for getting me started with this!

And many thanks also to Jon Freitag at Palouse Wargaming Journal who provided my other recent gaming experience, with his fantastic 'Hammering Sickles'  ACW Gettysburg game, which I was privileged to take part in a recent iteration of. Great fun, despite being thoroughly trounced by Johnny (or rather, Mark and Chris) Reb.  I can't possibly better Jon's report of the game, which you may well have already enjoyed. If not, it's thoroughly recommended! 

Sickles getting roundly hammered..
 

Having 'scratched the itch' of gaming a bit, there's plenty of painting to do, and some interesting recent purchases to join the - ahem -  Garrison... about which, more next time. Until then, keep well, everyone.     

Thursday, 16 February 2023

Portable Pike & Shot: Controlling the River

 Last time, I set up the forces and table for a trial game of The Portable Pike and Shot Wargame rules variant by Alan Saunders. I have now played the game, and can report how it went - quite well, actually! 

Herr General Blau's Imperialists approached from the South ( nearest camera ), and the French under General Le Rouge from the North, both intending  to seize control of two bridges across the river.  Both sides started off-table, and I decided to make their deployments quite random - I divided the table into 3 sections left/centre/right for each army, and rolled a 'D6' dice for each unit - roll 1 or 2 to enter on the left, 3 or 4 centre, 5 or 6 right - but no more than 3 units could arrive in each section.  The dice decreed that the Imperialists deployed all three of their infantry regiments on their left, with their cavalry and dragoons on the right and artillery in the centre,  while the French had two infantry regiments and their cavalry on their right, dragoons in the centre and the remaining foot regiment and artillery on their left.  So, both sides had sent strong forces to take the Western bridge, with fewer units going for the Eastern bridge, but with slight variations in the makeup of those sub-groups.  Hmm..how did the dice know that there was no bridge in the centre?

The rules decree an initiative die roll each turn, with the winning player going first and usually getting to activate more units. So initiative is quite important, and it must be said that the dice gods were on General Blau's side - the Imperialists won the initiatve on the first four turns, and in seven of the ten turns in all! Quite an advantage. By turn 2, both sides cavalry had crossed the river at their respective bridges ( French at West bridge, Imperialists at East bridge ), and 'contact' was made as the French horse charged into oncoming Imperial foot, specifically the Roter Mantel (thanks, Google translation) regiment. Close combat under these rules has a slightly amended system to Bob Cordery's original Portable Wargame - each side rolls a dice (with modifiers, e.g. for cavalry charging, or foot with pikes)  'to hit', and the highest modified score  gets to inflict damage first if hits have been achieved.  Both sides could suffer hits, of course. This seemed to work fairly well, avoiding multiple rounds of 'no effect' combat. In the first fight, the Imperial redcoats took a hit and suffered a loss of 1SP - first blood to the French.   At East bridge, the French Regiment Vert opened fire at the Imperial cuirassiers - with no effect.   

Turn 2 : Horse vs Foot at both bridges
 

On Turn 3, the Imperial foot at West Bridge tried to push back the French cavalry, but everything went wrong for them - the cavalry kept rolling sixes!  Roter Mantel regiment was forced to retreat, and the cavalry pursued (it's mandatory for horse to follow-up if close combat opposition retreats), crashing into regiment  Blauer Mantel, beating them and forcing them to lose 1SP rather than retreat and be pursued again! So much for the Imperial counter-attack.  Finally the 'Blaus' steadied things on their own activation, with a volley of musketry forcing the rampant cavalry to retreat back to the bridge.   That didn't stop the horsemen, though - in the French turn, they charged again! But the dice were not with them this time, and they 'bounced off'. They had thoroughly unnerved the Imperial infantry, and  bought time for French infantry to come up to West Bridge.  At East Bridge, the  French regiment Vert, facing enemy cavalry and dragoons, wisely took to the cover of wood, while their own dragoons moved up in support.

The clash at West Bridge continued the following turn, and the French cavalry's luck held under fire from Imperial muskets and newly-arrived cannon ( artillery are not very effective unless firing at close range - 2 hexes or less ), then charging yet again and taking anoother SP from Blauer Mantel regiment. In the centre, Imperial cavalry gave a nasty shock to the French dragoons ( which count as foot in combat, but of course have no pikes )  - 1 SP loss. At the end of Turn 4,  losses were French 1SP, Imperials 4SP, mainly due to those rampaging French cavalry!  Going well for the French, but the Imperialists had East Bridge, and three regiments of foot must eventually see off one cavalry?

Grinding on at West Bridge: Cavalry clash in the centre
 

Turn 5 - finally General Le Rouge won the initiative, and used it well. He pulled his cavalry unit back from the bridge and personally led it to the centre, promptly crashing into the Imperial cavalry, pushing them back and following-up. At West bridge,  regiment Rouge charged in, but were stopped by Imperial Blauer Mantel, losing 1 SP.  On the Imperial turn that fight continued, both sides losing 1 SP rather than retreat, both determined not to fall back from the bridge - desperate stuff. The Imperial Horse continued to be pushed back by their French opponents, and were now back to East Bridge.

And so things continued for another two turns, with a grinding fight between infantry regiments at West Bridge - French regiment Rouge reduced to 1SP and falling back, replaced by their regiment Bleu comrades, and neither side giving ground, Meanwhile the opposing cavalry duked it out in the centre. Losses mounted fast - by end of Turn 7,  losses were 7 SPs each ( both sides having  'Break Point'  at 11 SP ).

Infantry fight at West Bridge..
   

..and Cavalry fight in the centre
 

Turn 8 brought a twist - the initiative die roll was tied,  and in these rules that means a 'Random Event'. A couple of die rolls determined that this would affect the French, and the result was the other player picks one of the affected player's units and performs an action with it, including engaging in combat. It will still only shoot at or charge enemy units, but the decision to do so is in the hands of the player making the move.  So, one French unit would 'go rogue' for a turn;  I chose to make foot Regiment Bleu retreat a full move from West Bridge. Presumably the desperate fight had temporarily broken its morale.. Of course this 'opened up' West Bridge, and the Imperials promply won the re-roll for initiative and poured their infantry over the bridge, attacking the weakened  regiment Rouge - and destroying it!  The only consolation for the French was that in the continuing cavalry fight, the Imperial horse were reduced to only one remaining  SP, and their hold on East Bridge looked very shakey.  

Turn 8: 'Random Event' gives Imperials the bridge 
 

Next turn the Imperial infantry ( regiments Roter Mantel and Gruner Mantel ) kept pushing their lone French opponent (regiment Bleu) even further from West Bridge - bad news for General Le Rouge. However, in the East he threw everything at the Imperial cavalry -  his Regiment Vert charging out of the woods to support his cavalry - and finally broke them! Thus East Bridge taken by the French, to balance events to the West. At end of Turn 9 losses were  French 9 SP and Imperials 10SP -  only 2SP and 1SP from break points, who would crack first? 

Turn 10 was the end - and General Le Rouge's dice won the initiative, allowing him and his cavalry  to gallop over East Bridge, then swing West to threaten the Imperials at the other bridge from behind. Over in the West, Regiment Bleu steadied their muskets and delivered a volley at  Gruner Mantel regiment - and took 1 SP from them. Not much effect on a relatively fresh unit, but crucially it meant the Imperialists reached their 'Break Point' of 11 SP losses.  As such, on their turn they must take a 'Break Test' - a D6 roll, with modifiers relating to possession of objectives ( even, with both sides holding one bridge ) and proportion of units lost. The modifiers looked good at 'Plus 2' with a modified 4 or more required - but Herr General Blau  rolled a one!  His weary men's morale had clearly collapsed as the French Cavalry ran amok behind them - his army was deemed Broken, and victory went to the French!  Losses at the end - French 9SP, Imperial 11SP. 

Turn 10 - French Cavalry rampant (lower right) 
 

I really enjoyed this game, and I think the rules went pretty well.  I particularly liked the way the distinction between shooting and close combat is handled - with units adacent to each other able to simply shoot, but shooting having somewhat less effect, and close combat is the way to force a decisive result and to take ground. The scenario obviously tended to funnel the action into two 'bottlenecks' at the bridges, but that added to the tension as both sides contested those bridges determinedly, unwilling to retreat. Equally I thought the 'Random Event' added a nice bit of friction, and with only one such event coming up, it didn't overly randomise the game. The 'Break Point' rule seemed good too, as reaching Break Point does not mean automatic defeat - with good die-rolling, an army past its Break Point can keep fighting.  Not so for Herr General Blau, however! 

I hope you've enjoyed my account of the game, I certainly enjoyed playing the it, and will certainly  come back to these rules. Many thanks to Alan Saunders for them,  and to  Bob Cordery for publishing them in The Portable Pike & Shot Wargame. 

Next time - well, I have a few ideas, and not yet sure which one to pursue. Meanwhile I've also  enjoyed no less than two remote games in  the American War of Independence period ( Loose Files and American Scramble )  run by the excellent Nundanket - many thanks to him and the other players.  Until next time, keep well everyone. 

Saturday, 28 January 2023

Trying out the Portable Pike and Shot

Having given my Pike and Shot armies a couple of goes recently with different rule sets and enjoyed those games, I thought I'd like to have another game in the same period. I've been reading Bob Cordery's (and friends)  book The Portable Pike and Shot Wargame, which has several sets of rules, including two variants for ECW/30YW forces. Having looked through them, I was interested by Alan Saunders' ECW variant, which seems to have some good ideas which Alan explains in his Design Notes. 

Alan's rules are strictly 'ECW', but I think they'll stretch to being used with my Thirty Years War armies representing French and Imperialists - I tend to think that by the 1640s, a lot of the features of earlier 30YW armies such as 3/4 armoured Cuirassiers, mounted Arquebusiers and larger Tercios would have fallen out of use, even if some units still carried those names. Admittedly my armies of vintage figures maybe look a bit more 1620s/1630s, but I am choosing to overlook that! 

I'm going for a simple setup, from an old favourite source: Neil Thomas One Hour Wargames. I selected Scenario 3: 'Control the River'. Neil Thomas summarises as follows The Red and Blue armies represent portions of much larger forces. Their commanding generals have ordered them to seize two strategic river corssings, as a base for future operations.   As typical for OHW, there are six units per side, which is  within my reach. It's a simple, symmetrical layout, with a river dividing the field, crossed by two bridges, control of which is the objective for both sides.  

In the spirit of keeping things simple, I've also gone for symmetry in the opposing forces - which will represent the French and the Imperialists.  Here is the Imperial contingent: 


 It consists of :

        Two  Pike and Shot Infantry Regiments ( 'Grun' and 'Blau' ),  rated 'Trained',                                             each 4 Strength Points (SP) 

        One  Pike and Shot Infantry Regiment ( 'Rot'  ), rated 'Elite', 5 SP

        One unit of  Cuirassiers  ( Horse ), rated 'Trained' , 3 SP

        One unit of Dragoons, rated 'Trained',  3SP

        One unit of Artillery, rated 'Trained', 2SP  

A total of 21 SP. Alan's rules the army has a Break Point, equal to half its total SPs rounded up. So the Break Point for this army is 11 SP. When casualties reach the Break Point, the army must test each turn to continue fighting. For those interested in such things, the figures are 15mm scale and mostly from Mike's Models, Frei Korps 15 and Minifigs - as far as I remember, given they are some decades old! 

Obviously the French force is similar, though I made a slight variation in the morale ratings - all three French infantry regiments will be 'Trained', but their cavalry unit will be 'Elite'.  I have a shortage of Dragoon figures, so I have drafted in some of MacFarlane's Scots cavalry to represent Dragoons. Here is the French force


     which consists of :

        Three Pike and Shot Infantry Regiments ( 'Rouge', 'Vert' and 'Bleu' ),  rated 'Trained',                                             each 4 Strength Points (SP) 

        One unit of  Horse ( 'Turenne' ) rated 'Elite', 4 SP

        One unit of Dragoons ( 'MacFarlane' ), rated 'Trained',  3SP

        One unit of Artillery, rated 'Trained', 2SP 

Giving a total of  21 SP and Break Point at 11 SP.  Figures mostly a bit more recent, from Essex Miniatures, except the Scots and the Artillery which  Ross told me were 'old strip Minifigs' ( I think their first 15mm range ) from the late 1970s - real veterans!  

This is a simple  'encounter battle'  - at the start, neither side has troops on the table. The French represent 'Red' who will enter from the Northern ( top ) table edge on Turn 1 , while the 'Blue' Imperialists enter from the Southern table edge at the same time. It should be a nice straightforward scenario, and I hope an easy introduction to the rules.  Next time, we'll  see how it goes. Meanwhile keep well, everyone.

Tuesday, 3 January 2023

D-Day Dodgers : Operation Ponte Natale

Happy New Year to one and all.  Now let's go back to just before Xmas - 1943, that is, 'somewhere in Italy'.  British forces launch an operation to secure a vital ( yet entirely fictitious ) river crossing at Ponte Natale; German forces mount a hasty defence. 

The explanation for this: I fancied to do a quick and simple game before Xmas, and I thought it was time the 'D-Day Dodgers'  WW2 Italian campaign forces had an outing. I thought Bob Cordery and friends 'Fast Play 3X3' version of The Portable Wargame might  offer something very simple, so I consulted his recent book The Portable Wargame Compendium.  I was in luck: see page 47 for 'Fast Play 3X3 Portable WW2 Operational-Level Wargame Rules' by Mark Cordone - for fighting the major battles of World War Two.  Essentially a combination of the '3 X 3' system  and the WW2 rules in Bob's  Developing the Portable Wargame book.  That should do nicely. 

The Compendium also has a chapter containing a selection of '3X3'  terrain set-up suggestions - I chose number 20, which features a river with a bridge,  and hills overlooking them, which seemed suitably Italian and a good defensive position for the Axis forces. I kept it very simple, as you can see:

The Bridge at Ponte Natale

Armies in this variant are of 6 units plus an HQ each side, available  unit types being Airborne, Armoured, Artillery and  Infantry all with 2 Strength Points (SP)  each ,  plus some special units:  Assault Guns/Tank Destroyers, Self-Propelled Guns and Heavy Armour which have just 1 SP each. ( I am assuming that the basic (2SP) units represent Brigades, or perhaps Divisions? )  There must be at least three Infantry units in each  army. 

With that in mind, I selected an attacking British Force : 

General Badger and 'Badger Corps'

Three Infantry units, 1 Armour, 1 Artillery, 1 Self-Propelled Gun  : total 11 SP

and a defending German Force :    

Her General Von Kleist and Kampfgruppe Kleist
 

Four Infantry Units,  1 Artillery, 1 Assault Gun : total 11 SP.

Each side also has its HQ, of course, and the ability to conduct airstrikes, for which the model aircraft make a rather extravagant 'marker' (all that is required by the rules, simply to mark the grid area under air attack) . I decided that all units would be 'Average' quaility, just for simplicity (  if 'Airborne' had been in use by either side, it would have been only fair to make them 'Elite' ).

Allowing 6 SP for each side's HQ, the total strength was 17 SP each, therefore 'Exhaustion Point' would be reached at a loss of 6 SP. 

Deployment is Defender first, in his baseline or middle row grid areas ( or Reserve ),then Attacker in his baseline or Reserve areas only ( both sides' Artillery units are placed in 'Reserve' area  ). I duly deployed both sides: 

Iniital Deployments

Notice a single brave German infantry deployed in front of the bridge, the other three remaining behind the river. Perhaps unfortunately for the defenders, I forgot to allow any of them to be 'dug in' at the start - perhaps the defensive position was only a very hasty one, having just rushed to the area in response to the British advance! And so to battle. 

The  sequence of each turn starts with initiative die rolls (1D6) - highest roll  moves first, and the die score gives the number of units that can move. Then 'Airstrikes' : again 1D6 each, highest score gets an airstrike - if a tie, both get strikes. If one side is deemed to have air superiority, they get two dice and use the highest score - I gave this advantage to the British, as befits Italy in 1943. A nice touch was that the 'Initiative' die rolls could give a result which indicated bad weather - so no airstrikes. Then both sides Artillery get to fire simultaneously, followed by the player who won the initiative moving his units, then combat, then the other player moving, and combat again.   That's the end of the turn, and we go again for the next turn.  

Victory is achieved by one side if they can occupy one of the opposing side's baseline grid areas at the end of the opponent's combat phase - so obviously the British needed to cross the river to win. If neither side achieves victory that way, battle continues until Exhaustion Point(s) are reached.  There can also be a designated terrain objective that must be taken to achieve victory - though  in effect that would be the same, the British would need to cross the river and reach the German baseline. By default I assumed  the Germans would win if the British did not reach their baseline - it seemed unlikely that the Germans would try to counter-attack to reach the British baseline!


Airstrike! First blood to the R.A.F..

I won't give a blow-by-blow account, partly because despite the simplicity of the rules, I still managed to miss vital points on several occasions, so I may have played them completely wrong at many points! Suffice it to say it lasted eight turns, and was pretty 'ding-dong' back and forth stuff. Airstrikes and Artillery had a big role right from the start, on Turn 1 a British airstrike hit the German  infantry defending  the bridge, taking 1 SP and 'pinning' it,  only for the German artillery to mete out the same treatment to the British infantry advancing to attack the bridge, and forcing the supporting Self-propelled guns to retire!

The British made a general advance to  keep pressure on the defenders across the board, even though the bridge was obviouly going to be the focal point ( I decided that the river could only be crossed there).  The Germans hastily 'dug in' their infantry where possible, and brought up their Assault Guns to back-up the bridge defenders. British airstrikes wiped out the forward defending  infantry unit as early as Turn 2, while British artillery concentrated on counter-battery fire on the German artillery - without  much success, it has to be said.  German artillery focussed on trying to break up the British attacking formations, with quite destructive effects. This was lucky for the Germans, as  they knew they would have fewer opportunities for airstikes.

British SP guns go 'up in smoke'
 

The British central  thrust at the bridge struggled from the start, with their Self-Propelled Gun unit destroyed  by defending Assault Guns  quite early on, but their infantry fire kept the pressure on by destoying a second German infantry unit - at the end of Turn 3 losses were British 3SP, Germans 4SP.

Turn 6: the Luftwaffe makes an appearance
 

Inevitably the British armour had to move to the centre to spearhead the attack on the bridge - probably should have done so from the start!  British armour and infantry repeatedly tried to advance to assault the bridge, but defensive fire from the German infantry and Assault Guns kept knocking them back. Finally the British armour and Infantry attacked across the bridge on Turn 7, taking 1 SP and 'pinning' the defending infantry, but themselves having their infantry forced back - attack stalled! 

Turn 8: the final British 'push'


In the next turn, the British won the initiative and pushed forward again for another assault - defensive fire damaged the British armour, but in the ensuing close combat the British finally prevailed, the defending  German infantry and Assault Guns both being destroyed. The British infantry was forced to retreat, however, leaving their Armour, with only 1SP left, sat unsupported on the German baseline... thus the Germans on their turn had to kill the British armour to save the game. They brought their last Infantry unit down from the hill, attacking the British tanks from the flank - and just couldn't kill them. The infantry lost 1SP and ended up pinned down, the British armour held position on the defenders' baseline, and the day was won. 

German Infantry's desperate counter-attack ( 2p coin for 'pinned', 1p for 1SP lost )
 

Final losses totals : British 5 SP,  Germans 9 SP  - only 1 German infantry unit and their Artillery remained in position, both having only 1SP each remaining.  So, a pretty thorough bashing received by the Germans, but they made it pretty tough for the attacking Brits.  As I've said, I think I managed to play the rules wrong in several ways - a salutory lesson in just how easy it is to overlook or misinterpret even the simplest rules! In paricular I got the characteristics of the 'special units' (SP Guns and Assault Guns)  wrong, and even worse I only allowed firing to occur about half as much as it should! I think if played correctly, it would have been a much more 'quick and dirty' battle, but all the same I had a throughly enjoyable time, and the balance of the game  swayed back and forth throughout before that decisive last assault over the river.  A nice simple little game for a pre-Xmas afternoon, before the eating, drinking and gifting took over - and it gave the D-Day Dodgers some table time, of which there needs to be much more, I like these 'old-school' forces.  I plan to review them and organise them  a bit more formally - probably making formations suitable for the 'Rapid Fire Reloaded' rules. does that count as a New Year's Resolution? 

I hope everyone had a good festive season, and are not too downcast by the return to normality and (for those in the Northern Hemisphere ) dreer January.  The answer is of course, to cheer ourselves up with hobby activities... Meanwhile, keep well, everyone. 


Sunday, 7 August 2022

Der schnelles tragbares 'drei-mal-drei'-Kriegsspiel..

..which should, more or less, mean 'Fast Play 3 by 3 Portable Wargame' :  Thanks to Google translate for the title of this post. I leave it to proper German-speakers to decide whether it is sensible, or if as John F. Kennedy famously said, 'I am a doughnut!'.  I suppose the following might be the battle of 'Dreimaldrei'..

As introduced in my last post, I thought I'd get back into the gaming habit by trying out Bob Cordery and friends'   'FP3x3' variant, with my  7YW Prussians and Austrians - see that post for forces and initial setup.  I thought I'd use my usual 'Portable Seven Years War' variant rules for formations, firing, close combat etc, fitting them to Mark Cordone and Bob Cordery's basic '3x3' system, and essentially 'kriegspeiling' anything unexpected that came up - i.e. make it up as you go along! If I'm honest, a few things did 'come up', and what with those, taking ( too many ) notes and taking (also too many ) pictures, I wouldn't say I actually achieved 'Fast Play'!  But next time, it will be quicker. The game ran to eight turns before a decision was reached, though that  could have been sooner had the dice landed a little differently. A brief turn-by-turn summary follows:

TURN ONE:   Austrians are attackers, so go first - but only roll two unit activations. Their field gun opens fire on its opposite number, - and misses. Their Grenzer light infantry advances and  skirmishes against Von Kleist Frei Korps in the wood, score a hit and take 1 SP - a good start! Prussians roll a six and can activate up to 6 units - their whole force, if required. Their gun does better, forcing the Austrian gunners to retreat. Prussian Uhlans decide that attack is the best form of defence, coming out of the  reserve area and charging at the Austrian Cuirassiers on their left - get stuck in! The resulting  melee is inconclusive, neither side suffering any hit.

Turn 1 from Prussian side: cavalry fight, top centre

TURN TWO: Prussians win initiative roll, and go first with five activations. Their gun hits again, taking 1 SP from 1st Botta d'Adorno infantry. The Uhlans, however are thrown back by Austrian Cuirassiers. Two battalions of von Kleist Frei Korps in the wood do a 'one-two' on Austrina Grenze Light Infantry, who are forced to retreat AND Lose 1 SP.    Austrians roll only two activations again, not very good when they are supposed to be attacking!  1st battalion Botta d'Adorno charge the pesky Prussian artillery, but the combat is inconclusive - the gunners have a supporting unit, and their commander present to gee them up.  

Turn 2: Austrian foot charge gun, but Lights being pushed back

TURN THREE: Austrians win initiative, but only three activations. 1st Botta retire from the combat, allowing Grenze Hussars to charge the Prussian guns! Resulting melee still inconclusive - gunners obviously dived for cover successfully.  Light infantry hang in there,  skirmishing versus Von Kleist. Prussians have only two activations, 2nd Von Kleist goes at the Light infantry with the bayonet, but rolls low, takes another SP loss and is destroyed! Prussian gunners manage to disengage, but are forced to retreat into the Reserve area. I 'kriegspeiled' that, by ruling they have to stay there, inactive,  on the next  move. 

Turn 3 : Grenze Hussars 'charge for the guns'!

 TURN FOUR:  Prussians win initiative again, so much for Austrian 'attack'! Uhlans charge Cuirassiers again, but take a hit and lose 1 SP.  1st battalion 44th Fusiliers try to repel Grenze Hussars, but with no effect.  Austrians have only one activation, but use it well - their gun opens up on 1st von Kleist foot, forcing it to retreat to the Reserve area. That means there are no Prussian units in their right-hand grid areas.  The rules say that 'if, at the end of a player's turn, one or more of his columns does not have at least one unit in it, his army is defeated'.  Luckily for the Prussians, this is at the end of the Austrian player's turn.. but prompt action will be required!

TURN 4: Prussian right flank in danger!

TURN FIVE:  Austrians gain initiative, can they finish the job? Their Cuirassiers keep slashing and thrusting at the Uhlans, but neither gives way. 1st and 2nd Botta foot attack 1st Prussian Fusiliers in the centre, but outnumbered Fusiliers hold firm. Light infantry advance unopposed on the Austrian left, but can't make the Prussian baseline - which would have been a winning move,  as Prussian units can't advance from Reserve into a square occupied by the enemy.  So, on the Prussian turn 1st von Kleist manage to get onto their right-hand baseline square - and force the Austrian Light infantry to retreat - thus Prussians avoid defeat.  Fusiliers and Botta foot continue their struggle, with no hits to either, but Cuirassiers lose 1 SP in melee with Uhlans. This will lead  to  drastic effects on the next turn..

Turn 5: Prussians recover ground on their right, phew!

TURN SIX:  Prussians win initiative: the Uhlans inflict another SP on the Austrian Cuirassiers, who are destroyed. Uhlans can follow-up, that allows them to hit the Grenze Hussars in flank, Grenzers retreat - Uhlans can follow-up again! this time they attack the Austrian light infantry - who retreat. Three combat wins on the trot for Uhlans, chaos in the Austrian ranks! Only the presence of the Austrian gun prevents a further follow-up. Elsewhere, 2nd Fusiliers are able to turn on the flank of Botta infantry, though Botta holds OK , and finally Von Kleist foot charge the poor Austrian gunners, who are unable to retreat, as their Reserve area is already full, so must lose 1SP.  Near disaster for the Austrians!

Turn 6:   Uhlans (centre) create havoc!

But the Uhlans' mad charge leaves  them vulnerable, and on the Austrian turn the Grenze Hussars charge their flank, inflicting 1 SP loss, and the Uhlans are destroyed! 1st Botta d'Adorno fights back aganst the flanking 2nd Fusiliers, push them back and follow up to extend their line to the right. The Light infantry having been forced back into reserve, now re-appear on the Austrian right. Things look a lot more stable for the Austrians, much to their relief. 

End Turn 6 : Austrian stability restored

TURN SEVEN: Prussians win initiative -  Fusiliers keep fighting Austrian infantry, but no hits. 1st Von Kleist attacks Austrian gunners -but again, no hits. Prussian gun takes position in the wood. Austrian Grenze Hussars charge 1st von Kleist on the left, saving their gunners. In the big infantry fight, Prussian 2nd Fusiliers lose their 2nd SP and are destroyed , and 1st Fusiliers are then attacked in the flank by the Austrian follow-up They hold, but the Prussians now have only three units left, and none on their left flank. It could be the end this time..

Turn 7: beleagured Prussian foot, and left flank empty..

TURN EIGHT:  at this crucial  point, the Prussians win initiative; they must get troops back to their left flank on their turn, or lose the battle. They have their gun and von Kleist foot on their right - too far away.  1st Fusiliers in the centre, already engaged by two enemy units, must fight and win! They attack 1st Botta - and roll a '1'!  The Fusiliers must retreat into the Reserve area,  the Prussian  left cannot be saved, and indeed their centre is now gone too!  So, the game ends in a crushing Austrian victory.    

Turn 8: how it ended. Prussian collapse!

Well, that was actually a lot of fun! As I said before  I was very slow,  too busy taking pictures and making copious notes as it was my first attempt, but I reckon a game played under more 'normal' conditions would have needed less than one hour. I had a few issues come up that had to be resolved on the hoof, so to speak, as follows: 

(1)  Skirmishing - I wanted the Light Infantry to be able to skirmish, i.e. shoot up enemy units without making close contact, but the '3by3' rules simply merge shooting and melee into 'combat' for any unit adjacent to the enemy. In effect I simply allowed Light Infantry to use the musketry procedure from my 18th Century rules ( max range 1 square only, though ) rather than 3by3 'combat' - so they could shoot and inflict hits with no comeback from the target. But of course, I had to allow opposing infantry to fire back in the same way on their turn - OR declare a charge and go for 'combat', which they usually did. I wonder if it might be better to allow the Lights, if in skirmish order, to roll a dice for an 'evade', allowing them to cancel any hits when attacked, or reduce the likelyhood of hits? I'll think a bit more about that.            

(2) Two units in a square: with 18th Century units mostly deployed in line, they occupy the full width of a grid square. So if there are two units in the square, it sort of implies one is in front of the other. If an enemy unit attacks, is it assumed to attack the 'front' unit? Or maybe it can choose which?  Important if there are, say, an infantry and a cavalry unit sharing the grid square. I need to think about that, too- I rather 'bluffed it out' on a couple of occasions. 

(3)  Supporting units - Mark Cordone's original 3by3 variant says if two units are in a grid square and one is attacked, one unit fights but gets a plus one for the supporting unit. Bob's 19th Century version in the next chapter of his 'Compendium' book rules that supporting units must be of the same type to give the 'plus 1'.  Hmmm... I think I'm with Mark. I wasn't sure how to handle artillery as a 'support' in close combat - artillery are obviously useless in melee, but if this is more generic 'combat' over a short range, then canister should be allowed for - that must be a significant bonus?  Again, some thought required. 

Apologies to seasoned players who have discussed and settled all these issues on-line - I'm afraid I don't do Facebook, so I haven't seen the 'PW' group there! Maybe I need to sign up with Mr. Zuckerburg, however reluctantly. 

 Anyway, I thoroughly enjoyed the game, the '3x3Fast Play' concept is great for getting an easy game on the table when you don't have the time or space for something more serious, and there's got to be scope for 'mini-campaigns' where the battles can be quickly fought out this way - as I think fellow blogger Maudlin Jack Tar is indeed doing.  I commend this idea to The House.. 

Hope you've enjoyed reading this, as I did playing and writing it up.  If you haven't already, why not give it a go?   Thanks to Bob, Mark and all the other contributors to the '3x3Fast Play' idea.    Keep well, and safe, everyone.  


Sunday, 31 July 2022

One door closes..


The slightly grubby rucksack in the picture ( it's been carried between my house and my partner's,  weekly for several years ) contained my 'work PC' and phone- a nice man from DHL came to collect it last week, finally ending my 24 years supprting  IT systems for a major UK supermarket.  Five different employers in that time, mind you - oh, the joys of outsourcing and  'TUPE' transfers.  What does this mean? In the short term,  an email bombardment from an outplacement agency re:my 'jobsearch',  and would I please upload my CV? To which I answer 'what CV?'  I haven't had a job interview since 1997... I think I'm going to be a disappointment to them.  

It's surprising just how much mental effort and 'bandwidth'  is required by the process of  being made redundant, and the result is clear from the reduced frequency of blog entries here and the total absence of gaming in the past few months. But now it's done, I think I may have a bit more hobby time, which is very welcome.  I need to have a bit of a think about how to use that - expect some sort  of  'thinking aloud' post on future plans quite soon. 

The good news is, some gaming has indeed occurred - the first instance of which was a 'Command and Colours' Austerlitz extravaganza,  which has been covered by the host, Liverpool Dave, on his St Cyr on Wheels blog,    It was a brilliant  afternoon, and a great pleasure to meet fellow blogger Nundanket again too. Cheers guys!

I've been mssing getting actual figures onto a table too, and I wanted a quick and easy way of getting back into that habit. Something 'Fast Play', on a small gaming area ( say, a 3 by 3 grid? ).. I think we can see where this is going, Having prepared a pinboard gaming 'table' for 'The Fast Play 3 by 3  Portable Wargame' not long ago, it was high time to give it a try. Everything required was to hand, in Bob Cordery's recent The Portable Wargame Compendium, as follows: 

(i) Terrain:  see page 92,  Pre-Generated Terrain by Mike Tabor - just roll a D20. It came up '7' which gave me this very simple terrain: 


Just one wooded area, on the defender's baseline, right flank. 

 (ii) Forces : page 85,  Army Composition by Mark Cordone. Each side will have six units plus a commander, simply roll a D6 for each and select the suggested numbers of common unit types. I used my Seven Years War forces, and rolled as follows: 

Prussians rolled a '6' and got 

-  Four Line Infantry units ( 2 battalions 44th Fusiliers, 2 battalions Von Kleist Frei Korps ) ,

- One Cavary unit  ( 1 squadron Von Kleist Uhlans ) 

- One Field Gun and Crew. 

Austrians rolled a '1' ,  resulting in

- Two Line Infantry units   ( 2 battalions Botta d'Adorno foot )

- Two Cavalry units ( 1 squadron Cuirassiers, 1 squadron Grenze Hussars ) 

- One Field Gun and Crew

- One Light Infantry Unit ( 1 squadron dismounted Grenze Hussars ) 

Plus one commander for each side. All units have 2 SPs ( Strength Points ) and I decided that all units would be 'average' quality. So, an interesting mixture! 

Lastly dice for attack/defence, and the Prussians were deemed Defenders - which seemed quite appropriate given their infantry-heavy array. Both sides set up, as seen below: 


Prussians on the right. The units are set up on their respective baselines, with some held back in the 'Reserve' areas behind.   Prussian infantry covers the whole front, with their Uhlans held in reserve: Austrians have their Cuirassiers massed on their right, and Light Infantry  ready to skirmish in front of the woods on their left. Attackers move first on Turn One, after that dice for initiative each turn. So, Austrians to start Turn One.  And that's where we'll leave it for now: a full battle report will be the next post on this blog. Meanwhile, keep safe, and well, everyone. 


UPDATE : thanks very much to all for sympathetic comments re: the redundancy. It wasn't voluntary, but it wasn't entirely unexpected either, and I think I am at an age and situation where I can accept it and move on to a new stage in life.  It is rather strange thinking 'what to do today?', and little things like not having to finish my morning walk ( habit acquired in lockdown) in time for the 'daily stand-up' meeting!  

One very sad aspect, though: back in May, on a day walking by the Thames near Richmond, I had a very useful conversation with an old friend, Kevin,  who had much experience of working through TUPE/redudancy processes, also in the IT sector, from both worker and manager point of view. What I mainly got from him was 'don't take it personally, don't get angry, they are only working to a budget, good luck to them if they are making a mistake, on their heads be it. Make the best of it, take the (hopefully  generous)  payout and enjoy life'.  That helped me quite a lot, and I looked forward to meeting him again now, to tell him I had gone through the process OK and was looking forward to the future - he had himself managed to retire about 6 months before. But that was not to be, Kevin passed away suddenly in June, and today his family and friends gathered to mark his passing and remember him. Cheers, mate, and thanks, I won't forget.


Tuesday, 24 May 2022

Now there was a painter... two coats, one afternoon!

Having acquired a copy of Bob Cordery's 'Portable Wargame Compendium', I thought I might try out the '3 by 3 Fast Play' game setup that features heavily in the book. This  would  require a suitable gaming board/table, and I happened to have a cork noticeboard, originally bought for possible boardgame use. Assuming a grid of 6-inch squares with 'reserve' areas at each end, I needed an area of 30 inches by 18 inches, and the corkboard was amply sufficient.   So, taking advantage of a sunny Saturday:

Take a cork pinboard..


prime with diluted PVA glue..


apply green paint ( two coats )..


Mark the grid corners


Ready for battle!

All done in an afternoon, and I think it will be fine! The green paint is artfully the same shade as I use for figure bases  ( from B&Q, it glories in the name 'Ribbit' ), and the grid was marked with a permanant marker pen.  The grid squares will easily take two units as specified in the rules - or even two for each side at a pinch, I hope.  Bob's book has a section with many suggested terrain setups, so I borrowed one of them for the trial layout above - the board easily accomodates six units per side.  I am thinking of maybe painting the other side too, in some sort of sand shade,  for possible Ancients or Western Desert type games.   

Next, I'd better try actually playing a game..


p.s. need I explain the title?  ( though I admit I only knew it from Peter Sellars on Parkinson - I didn't realise he'd nicked it.. )   


Friday, 13 May 2022

Perks of the 'Job'

This is by way of a thank-you  note to Bob Cordery  of Wargaming Miscellany and The Portable Wargame renown :  last week I received a copy of his latest publication, The Portable Wargame Compendium.  And a splendid work it is, too,

100 pages of fun..

This is a softback, about 100 pages, in 'American Letter' format ( 8.5. x 10.5 inches ) which is new to me, but nice and roomy, and pleasant to handle.  It's a collection of pieces exploring variations on Bob's  Portable Wargame format,  dominated by the 'Fast Play 3 x 3'  variant suggested by Mark Cordone, which is of course included here.  There is an array of 'FP3x3' variants:  Colonial , WW2 (both small infantry actions and Operational level), a Punic War campaign, ECW, 'Little Wars'  H.G. Wells style ( with a 3 x 3 Hooks Farm Scenario ), and Sci-Fi - and then ideas on Generalship and Army Composition, Flank Marches, and a Terrain Generation system.  I can't fault Bob's work rate ( and the other gamers and bloggers involved ), given that I gather Mark C only put his '3x3' idea onto social media in about January of this year!  There are also three chapters not related to '3x3',  including   one very useful one describing the  Snakes and Ladders Campaign System devised by Peter from Grid based wargaming - but not always  blog,  and one giving a Fantasy rules variation on The Portable Wargame (step  forward, Maudlin Jack Tar and  Tradgardmastare ). Finally, The Portable Eighteenth Century : Horse and Musket Wargame Rules, by - well, modesty forbids.. 

There are battle reports for three of the 'FP3x3' rulesets, and nice colour pictures of  the resulting quick and simple games. Here is Bob's WW2 Infantry Combat game,


   and one of Martin Rapier's 1st Punic War battles, using 20mm figures originally based for DBA. 

I could be tempted by the Ancients version - there's a 'Command and Colours Ancients' set around here somewhere, which would provide instant armies.

I can see that the Fast Play 3x3 versions could be great for those times when you just fancy a game to 'scratch the itch',  but haven't got a lot of time, or as an introduction for gaming beginners, or for smaller actions in a campaign that maybe don't warrant a large setup, so I'm sure it will interest a plenty of people ( it already has, of course!).  One of the most interesting ones for me is Arthur Harman's ECW variant - Arthur has sagely spotted that a frontage of three grid areas is highly appropriate for armies which had a quite rigid order of battle consisting of an infantry centre, and two wings of cavalry. His set looks to be among the most detailed, and may thus be a bit more than a quick and dirty game - intriguing. 

So, thanks very much indeed Bob, for the excellent book and for including me in - in reality, Bob did all the work, I just agreed that I'd be honoured if he put my 18th Century amendments to his rules in his book!  The whole thing has a rather nice feel  of variations on a theme, which reminds me of some of Donald Featherstone's collections such as Advanced War Games , War Game Campaigns and Solo Wargaming, bringing together a pot-pourri of ideas around a central concept - there's bound to be something that gives you some inspiration. Given that Bob has  been having some health issues recently too,  I reckon he's done a great job! Well worth a look. 

Now I am casting around for a '3x3'  grid, and have just noticed an unused cork pinboard . width 22 inches, so should easily fit a grid of 6-inch squares.. now where's that green paint I use for basing? Watch this space..

Thanks again, Bob!   Meanwhile Keep well, and safe, everyone.