Saturday, 21 August 2021

Al Murrays and Aquisitions..*

Well now, where were we?  Several weeks seem to have gone by, and nothing from The Ragged Soldier - sorry about that.  I'm afraid real life ( work, mainly ) got in the way. As a result, no gaming took place, but I did manage some reading,  and some acquisitions, that will feed into future campaigning. 


Al Murray's 'Watching War Films With My Dad' was a charity shop find ( for £1! ) which turned out to be a great fun read.  It's a sort of memoir - taking us from Al's WW2-obsessed 1970/80s childhood with Airfix kits and Action Man ( shades of Harry Pearson's 'Achtung Schweinhund' )  up to his attempts to present  military history to his own children.  He's a massive enthusiast for military history, he positively fizzes with it, with the result that he jumps  from topic to topic with dizzying speed. Obviously there are  a lot of jokes too,  but  (as listeners to his 'we have ways' podcast will know )  he is very well-read and knowledgable.  I was particularly interested in his views on Arnhem, which I confess I have little knowledge of myself  -  and of course the film 'A Bridge Too Far' gets a fair amount of discussion in the book. Did they really use Leopard tanks? Oh no!  He doesn't seem to have tried wargaming , though - should someone be inviting him to a show?       
 

Having enthused about a year ago over the joys of the local model shop, I'm afraid I didn't get back to Model Junction in Bury St. Edmunds until the other week. But I found them trading OK, and as friendly and helpful as ever.  They have a pretty wide selection of modelling paints ( at least 4 or 5 brands ), and a room full of plastic kits. I've been wanting to add some anti-aircraft capability to my 'D-Day Dodgers' Italian campaign forces, so the Airfix  Bofors AA gun will do nicely, and I couldn't quite resist the Sd Kfz 234 'Puma'  for the Germans. Worthy additions to the 'plastic pile',and it's about time for another go at a WW2 game and a trial of Bob Cordery's 'Portable Wargame'  rules for aerial attacks and AA guns. 


Another great book find was courtesy of an antique shop in Lavenham which includes a couple of shelves of history books curated by someone who clearly has a military bent ( so to speak, missis!) - and there was Geoffrey Parker's 'The Military Revolution'. I know I'm about 30 years behind on this one, though I do have his books on The Thirty Years War and The Army of Flanders and the Spanish Road - the latter read a memory-wiping long, long time ago.   As a paid-up member of the Pike and Shot Society, I'm really looking forward to reading this and bringing my knowledge of theories of military history bang up-to-date - albeit the 1980s date..


One aspect of The Military Revolution being the Trace Italienne and new fortification techniques culminating in Vauban's  formidable legacy - so it was a very pleasant surprise to coincidentally  receive a splendid gift, from a modest and retiring fellow blogger, of a seriously impressive resin model of a Vauban fort!  It's actually 15mm scale, I am told, but I think it should pass muster in  my Seven Years War campaigning, on the principle of 'under-scale' buildings and scenery. I can see it as a small fortified outpost being fought over  in my central European backwater, or cunningly deployed along the edge of the table to suggest a section of the walls of some larger defended place. Whatever, I am very chuffed indeed with this lovely piece of generosity. No payment was required - I will compensate with a suitable charity donation, perhaps to MSF. 


Finally, an update on another generous gift, which I had received from RossMac of 'Battle Game of the Month' fame.  Here is MacFarlane's Scottish regiment of foot, with their associated troop of 'border horse'  Lancers , their  prized regimental cannon, supply wagons and self-propelling food supplies ( i.e. livestock ! ). I've given the foot and the horse new bases to fit my system, and given the horse back their missing lances, but left Ross' 1970s paintwork untouched, it's just fine as it is. The infantry have a preponderance of musketeers and very few pikes, so they may find themselves used as 'commanded musketeers', but there are some splendid axe- and sword-wielding highanders, and even a bagpiper! Also a couple of kilted  musketeers with socket bayonets, who look distinctly 18th century, but I couldn't separate them from their fellows after the long voyage,  so they stayed in the ranks. Their comrades may be bemused by 'Hamish and Dougal, with all  their new-fangled ideas'. 

The bases are just thin card, since the plan is to fit magnetic strip underneath, and use steel paper movement trays, which will add to the thickenss. Maybe I need to texture them a bit, to match Ross' bases for the wagons, gun and livestock. Though I am an adherent to minimally plain basing normally, a bit of texture would be true to their original spirit, I think.  Now they will be needing an excuse to get to grips with the Imperials, or the French, depending which side offers the best pay, of course.. 

That's enough for now, I'm glad to have got back onto the blogging bike, so to speak, and there's lots of gaming posibilities to be thinking  about in the near future.  Meanwhile keep well, and safe, everyone.


* title loosely inspired by that good old standby of adventure-story writers - 'Alarums and Excursions', of course !  I'll get my coat..

Thursday, 29 July 2021

Hussars! Hussars!

Last time we set up the Austrian cavalry raid on Prussian-held Piesport in my 'Soldier King' 7YW campaign; so let's see how it turned out.  I used Bob Cordery's 'Portable Napoleonic Wargame' with my own home-grown 7YW modifications, and some tinkering with the close combat rules based on modifications by Mike Lewis. 

where we left off - first combat
 

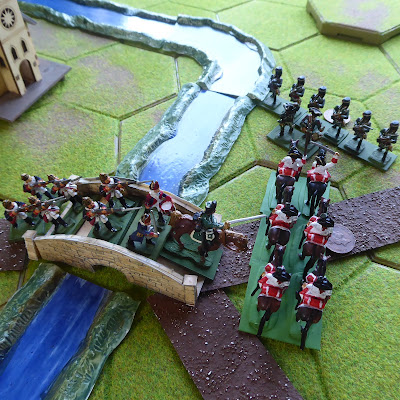
We left the game at Turn 4, as the leading squadron of Grenze Hussars charged over the bridge  and crashed into the Prussian Fusilier battalion.  The dice were rolled, and the Fusiliers ( helped by the presence of their commander, Oberst von Fruhling ) came out on top. The Hussars  took a 'retreat' result and were thus repulsed by the steady Fusiliers, and back over the bridge they went. To add to their discomfort, the Prussians' activation phase came next, and the Fusiliers gave them a musket volley for good measure,  and took 1 SP: not the best start for the dashing Hussars. Meanwhile, the Prussian supply convoy with its escorting von Kleist Frei Korps battalion  plodded warily along the road towards safety.. and realised that 3rd Squadron Grenzers was in front of them. 

trouble for the convoy?
 

Next turn, Von Fruhling  won the initiative roll for first activation , and his trusty Prussian foot used musketry to good effect again - both Hussar units forced to retreat further by steady fire from Fusilier and von Kleist battalions.  The Austrians rolled hopefully for their next unit's arrival - and scored a '1' -  their comrades must have stopped to water the horses..


A different approach from the Grenzers

Having failed with a dashing charge on solid Prussian Fusilers, with no reinforcements nearby,  and  no way of getting around the enemy flank,   the 1st squadron Grenze changed their approach. They dismounted, and prepared to use their skirmishing fire to pin down and annoy their opponents ( handily, when I bought the figures from Eric Knowles colleciton, the Austrian Grenze Hussars had both mounted and dismounted contingents - at last, they can be used properly! ). And so commenced a firefight across the river,  Prussian volleys versus a 'popping fire' from the Grenzers,  the Fusiliers getting the best of it, repeatedly hitting and forcing  retreats on the Grenzers, whose own shooting was distinctly lacklustre. 

Convoy escort outflanked!

On Turn 6, the next Austrian unit failed to arrive yet again, but 3rd Squadron Grenze Hussars (though raw recruits)  used their speed and the cover of the woods to surprise  von Kleist foot with a flank charge - and the dice were with them, von Kleist losing 1 SP.  The men of the Frei Korps tried to stand and fight in their turn, but were  disadvantaged by losing the first round of melee,  and were forced to retreat, deserting  the precious wagons!  The Hussars gleefully fell back and captured the wagons, shrugging off a long-range volley from the dispirited von Kleists.

Austrian Cuirassiers charge..
 

Further good news for Austria, as the 3rd Hussar squadron began escorting the captured wagons away. Finally on Turn 8 their next unit (of newly-raised Cuirassiers) arrived on the table, closely followed next turn by the last cavalry unit,  2nd Squadron Hussars.  The Cuirassiers were keen to make up for their later arrival,  immediately charging the unfortunate von Kleist battalion in the flank as they made for the bridge. The dice rolled - a draw - von Kleist held steady.  The Cuiraissiers charge had brought them next to the bridge, and von Fruhling saw his chance - 'My Brave Fusiliers - charge!' The Fusiliers swarmed over the bridge, took the Austrian Horsemen ( already embroiled in combat with Von Kleist ) in the flank, and took 1 SP off them.  This put the heart back in von Kleist, who fought back ( and rolled a 6 to the cavalry's 2 ), and took another 1SP from the Cuirassiers.  Being a raw unit, the Cuirassiers onlt started with 2 SPs - so they were destroyed, on their first turn of combat!   A bitter blow for the Austrians, and at the end of Turn 9 their losses were 3SP to Prussia's 1 SP. However,  those captured wagons kept plodding away, under escort..


...but meet their Fusilier-shaped doom

Over the next few turns, the stout  Prussian infantry kept up their fire against 1st and 2nd Grenze Hussar squadrons, but could not prevent the supply wagons being shepherded away: and I had decided that if the wagons were captured and escorted off the table, each one would cost 1SP loss to the Prussians.  


Supply wagons hurried away

This was their downfall, hastened by the dismounted 1st Grenzers finally managing to shoot straight and take 1SP from the Fusiliers - this left the losses  at end of Turn 12 as Austrians 3SP, Prussians 4SP , and Prussian exhaustion point was reached. Defeat loomed  for von Fruhling. Sadly he ordered his men to fall back, the von Kleist battalion almost reaching the bridge - only to be charged in their flank by the fresh 2nd squadron of Hussars!  The Frei Korps were forced to retreat, whereupon the Hussars followed up, and inflicted a further  1 SP loss. To add insult, 3rd Hussar squadron, returned from escorting wagons, piled in and charged von Kleist in the rear! But the dice were with the Prussians (who had been joined by their commander), and the combat was drawn. With great relief, the Prussians won the initiative roll on Turn 14, and the battered von Kleists made it across the bridge to safety, while their Fusilier comrades gave covering fire, taking 1 SP from 3rd Hussar squadron. 

The last charge at the bridge
 

And there it ended, the Austrians deciding to retire with their prizes, not fancying further Prussian musket vollies.  Losses were Austrians 4SP, Prussians 5SP,  thanks to the capture of the supply wagons.   But the Austrians had lost a vital part of their force,  the newly-raised Cuirassiers being destroyed, and thus removed from the campaign game. The Prussian infantry had acquitted themselves well, apart  from  the loss of their vital supplies. They may be hungry, but they are still in the game!  

Given the small forces and the lack of  'balance' in them, this turned out rather an intriguing game; I think largely due to the fall of the dice, which kept half the Austrian cavalry force off the table for no less than eight turns.  Perhaps it was harsh to penalise the Prussians so heavily  for the capture of the wagons - with their exhaustion point at 4SP, it only took a loss of 2 SPs  in addition to the wagons to defeat them, which was perhaps too easy.  But were  they were too timid? Perhaps the Fusiliers should have taken the offensive rather than sheltering behind the bridge?  I was pleasantly surprised by how challenging the game was for both sides, and how it wasn't, as I had feared, all over and done with in a few turns.  With a little thought, and the interesting way the dice seem to help things along, even a small and limited  game can be a bit of a nail-biter! 

I hope this has been interesting and fun to read, as it was to play. I feel the result favours the Prussians in the overall campaign, and that a climactic 'big battle' may be approaching. We shall see ; meanwhile keep well, and safe, everyone.

Thursday, 22 July 2021

Here come the Cavalry!

At last, back to my 'Soldier King' Seven Years War campaign, and the cavalry raid on Piesport that resulted from the recent map moves.  Four units of Austrian Cavalry are about to  descend upon the junction and river crossing town, which is held by two rather lonely units of Prussian foot. 

The Hussars are coming..

How to make an interesting game out of a very 'asymmetric' (and quite small)  pair of opposing forces?  I decided to use Bob Cordery's 'Portable Napoleonic Wargame' , with my home-grown 7YW adaptations, and so  those forces became : 

Prussians  : 

            Oberst von Fruhling :   3 SP 

            One battalion Fusilers,  rated Average , 4SP 

            One battalion von Kleist foot,  rated Average, 4SP 

            Two supply wagons 

             Total : 11 SP,  Exhaustion point 4 SP

Austrians: 

             Oberst  Knurrer :  3SP 

            Two squadrons Grenze Hussars, rated Average  each 3SP

            One squadron Cuirassiers , rated Poor ,  2SP

            One squadron Grenze Hussars, rated Poor , 2SP. 

            Total :  13 SP,  Exhaustion Point 5 SP. 

( I decided that for such small forces the commanders would be quite 'junior' and therefore only worth half the normal 6SP. )

Each side has its challenges : the Prussians could just hunker down in the town and be untouchable, so they have to be given a reason to be out and about. The Austrians could just sweep in, line abreast, and ride 'em down, so they have to be strung out on the road, at least, and not certain of timely arrival. 

So I decided that the Prussians would happen to be escorting their regular supply wagon convoy into town that day.  The Von Kleist foot would accompany the wagons, which would enter from the Northern road;  meanwhile the Fusiliers would guard the town and bridge. There would be some uncertainty over the arrival time of the convoy - a die roll would decide when it arrived on-table, with a 5 or 6 needed on turn 1,  4/5/6 on turn 2, and 3/4/5/6 on turn 3 or later. The wagons would aim to reach the bridge and cross into the town and safety - presuming that the bridge  was still in friendly  hands when they arrived!

Meanwhile the Austrians would enter from  the South-Eastern road, but would also not necessarily be punctual : again on turn 1,  a roll of 5 or 6 would be required for a unit to enter, then 4/5/6 on turn 2, and 3/4/5/6 on turn 3 or later - and only one unit could arrive each turn.  I decided in advance the order that the squadrons would arrive. In the hurry along the roads, with some units of lower quality or less experience, they may have  become somewhat separated. In this way I hoped to inject some random chance into both side's situation.     Finally, regarding  the wagons : if captured by the Austrians and escorted off the table at the Austrian entry point, each wagon would cause the loss of  1 SP  to the Prussians. 

And so it began - or rather, it didn't. On Turn 1 the Prussian Fusiliers kept a watch from their sentry posts, looking forward to the arrival of the convoy with welcome supplies and news, but also alert to the rumours of the dreaded enemy Hussars in the vicinity.  But both sides rolled a '1' for unit entry, so nothing happened!  Oh well, Turn 2 : Prussians rolled '1' again, no supply train. But the Austrians scored a splendid '5', heralding the clatter of hooves and the arrival of 1st Grenze Hussar Squadron on the South-East road. Prussian sentries couldn't miss that..

Arrivals - that convoy is rather late
 

Turn 3 came, the Austrians rolled high again, and their 3rd Grenzer squadron ( an untried, new-raised unit ) appeared, while the first squadron made all speed for the bridge. Prussians finally got their convoy onto the table , with  Von Kleist foot leading it, while von Fruhling in the town chivvied his Fusiliers into firing line, covering the bridge.  And without further ado, on Turn 4, 1st Grenze Hussars put spur to flank, and charged over the bridge! 

Grenzers charge!
 

So, first combat - how will it go? Will the Hussars sweep all before them and capture the bridge, or will the Fusiliers hold their nerve and inflict a bloody repulse?  We shall see.  'Tune in next time,  folks...'

This would be too long a posting if it covered the whole game, so we'll be back next time with the conclusion.  Until then keep well, and safe, everyone.


Friday, 9 July 2021

More Italian reading, with some help

Briefly, back to the 'D-Day Dodgers, in sunny Italy': I am trying to soak up some of the atmosphere, through reading, of the Italian campaign of 1943-45.  Recently the  Naval and Military Press had one of its periodic and very tempting sales - and I was indeed  tempted.  I acquired the four books you see below for about £20, which I count as a bargain for a total of 800 pages and perhaps nearly as many 'rare photographs from wartime archives'.   

All from the 'Images of War' series by Pen and Sword, we have three by Jon Diamond (  'a kidney specialist in the USA with a deep interest in the Second World War' ) and one - 'Monte Cassino' -  by Jeffrey Plowman ( 'a research biochemist by profession, and he has had a keen interest in military history for over thirty-five years' ).  as many will know, the USP of this series is the numerous contemporary photographs, and in that respect I think they are really interesting, the pictures give a  great panorama of the troops, the  equipment and vehicles they used, and the terrain they fought in. Admittedly this is very largely from the Allied point of view, but plenty of German kit appears, albeit often when wrecked or captured.  It's good to see the polyglot range of gear that was in use, the multi-national nature of the Allied forces,  and especially to see the landscapes that they operated in. 

Is the text only secondary? Well, maybe slightly, but so far ( I am almost at the end of the first book - Salerno to the Gustav Line ) it gives a reasonably clear and brisk narrative of the campaigns, without excessive detail, and I'm grateful for that at this stage.  A typical chapter starts with about 10 pages of text outlining the progress of the armies, followed by perhaps 30 pages of photographs, the latter having quite large captions which tend to reinforce the main text.

I've always struggled with campaign narratives, due to all the place names - there are never enough maps with enough detail in such books to be able to 'follow the action'.  The maps in this first volume aren't bad at all, with usually one at the start of a chapter ( so we have a couple for the Gulf of Salerno area, and one covering the whole width of the peninsular and the advances October 1943 to January 1944 ) but  there are always names in the text that are not on the maps. So, I have invested in visual aids.   

The W.H. Smith stationery and bookshop chain is a bit overlooked these days, but maybe unjustly - I went to my local ( not large ) branch in Sudbury, and found a pretty good selection of maps of other  countries - plus impressively, a full set of Ordnance Survey Landranger maps of the UK.   

Amongst all those, I found 1:400,000 ( 1cm to 4km ) scale Michelin series maps ( 'carta stradale e turistica' )  of South and Central Italy - just the thing. Maybe they had plenty in stock because  not many people are planning driving tours this summer.  Just the right sort of scale, most of the places named in the book are indeed shown on the maps.

So, equipped with these, I can read the books and (mostly) keep up with the locations on the maps. This I find much better - I think without a decent map, the narrative tends to just become a bit of a blur when you don't have an idea of the places mentioned. I really don't know  why I didn't think of this before - Michael Howard's history of the Franco-Prussian War is still a painful memory.   I'm not quite at the stage of making little flags on pins to stick in the map and indicate the different formations - but can it be far away? 

I rather look forward to some summer weekend afternoons sat in the garden with books and maps - if we actually get a decent summer here, which at the moment seems a bit doubtful.        

Salerno - where the story starts

This is a bit of an interim posting, sadly not a lot of hobby activity has been possible recently owing to various real life stuff,  but I hope to get back to the 7YW Campaign quite soon, that cavalry raid scenario needs to be played out. Hopefully I can report on that soon; in the meantime, keep well, and safe, everyone.                      

Monday, 28 June 2021

A Small Campaign Conundrum

 I have returned to my Seven Years War period campaign using  the 'Soldier King' boardgame: we are in the Summer of 1757,  with the Prussians sweeping forward into Austrian territory following their great victory at Rahden, and having expelled the Austrians from the town of Wittingen, albeit at some cost. 

Summer 1757: situation after Wittingen battle
 

Roughly translating losses at Wittingen from  the Arthur Harman 'SHAME' rules Combat Value (CV)  points into Bob Cordery's 'Portable Wargame' Strength Points (SP)  values, the Austrians lost the equivalent of only 3 SPs to the Prussians 11 SPs - quite a margin. But most  Austrian units were forced to retire, because they took many more 'Falling Flag' hits which lowered morale rather than strength - an interesting feature of the 'SHAME' combat system, and one which seems to ring true, even though just a result of random dice rolls. One could perhaps characterise it as the weaker Austrian force tending to be 'looking over their shoulders' and more easily persuaded to retire faced with more  numerous assailants, while the Prussians were confident in their superior strength - perhaps over confident - and prepared to stand more losses without their morale suffering.  That's my story, anyway! 

So, it was now the Austrian turn in the campaign game, and they rolled three 'marches', so three units/stacks can move - and each unit can move no more than twice. The first priority was to get the two rather isolated infantry units in the western province of Upper Waldow into some sort of safety - so two marches were used, allowing them to join the main body ( recently expelled from Wittingen )  at Zauche.  So at least they bolstered the main defence,  but the whole army could not then attack - and didn't really feel strong enough to do so, anyway.  With one move remaining, what to do?  Austrian eyes were drawn to the small detached  Prussian infantry force at Piesport - perhaps they could at least do some damage there?  Four Austrian cavalry units were within striking distance;  an opportunity for a classic cavalry raid, striking at a detachment on the enemy flank.   And so, the order was given, and the third Austrian 'march' unleashed the cavalry to attack.


The Austrian cavalry raid..

This is all good fun at the 'strategic' campaign level, but it does leave me with a bit of a conundrum  when it comes to the 'tactical'  aspect,  and how to play out the scenario on the tabletop. We have a small force of line infantry, threatened by a larger force made up of only cavalry. It's certainly not a 'balanced' scenario, to say the least!  On the face of it, scary for the Prussians, who are outnumbered two-to-one in units, and they certainly cannot simply withdraw, as they would be overtaken. But it's not all positive for the Austrians - two of their four units are lower-quality 'Levies' ( including the single Heavy Cavalry unit ), whereas the Prussian foot are all 'Veteran'.  And if the Prussians simply hunker down behind defences in Piesport town,  how can  their attackers make any headway against them? 


A very 'unbalanced' fight - or is it?

 I confess I am a little unsure how to play this out. I will be doing a little thinking, looking at scenario ideas and books - I wonder if Donald Featherstone's 'Wargame Campaigns'  might give me some hints? One approach might be to think of a range of possible scenarios, from 'Prussians panic and attempt to run for it'  to  'Austrians make foolhardy frontal charge'  ( with more moderate setups in between ), then decide on the relative likelyhood of each, and let the dice decide?  It should be an interesting exercise, albeit probably not crucial to the whole campaign,  more a small and entertaining sideshow. I have just enough Austrian Hussars and Cuirassiers to make up the raiding force in 'Portable Wargame' units, so here they are, assembled and ready to move off..

Daring  Austrian raiders
 

Of course I'd welcome any reasonable suggestions, hints etc on how to approach this - feel free to comment!  I hope to get this played through in the next few days  ( which look to be distinctly rainy - I wonder if the 'variable' weather we are having here in England could be incorporated in the game? ).  So, back soon with a report, I hope. Meanwhile keep well, and safe, everyone. 

**UPDATE** As Neil Patterson pointed out in his really excellent comment, the situation of the town of Piesport is distinguished by its riverside locaiton, so there really  should be some 'river crossing' element in the scenario. Here it is on the map: 


  Thinking cap well and truly on..


Saturday, 19 June 2021

Much-travelled Veterans

I have once again been the recipient of  a lovely piece of generosity, this time from no less than  Ross Macfarlane of 'Battle Game of the Month' fame. 


Back in March, I showed a picture of my 15mm Thirty Years' War period French troops, including some 1980s vintage Minfigs and Mike's Models/Essex.  Ross spotted that picture and  commented as follows: 

if you're interested, I believe there are some 15mm 17thc Highland mercenaries lurking in my cupboard. Old strip minifigs painted in my cabin on HMCS Ottawa in 1977 and a few of their friends that haven't seen action in ..maybe 40 yrs? I think they would be happy to cross the ocean to see action, checkout the local damsels and whiskey etc.

Let me know and I'll send the provosts to round them up.

Well, that sounded very interesting, and of course very generous of Ross. He sent a couple of pictures (including the one above)  which looked even more interesting, and I was happy to accept his kind offer.  A bit more description from Ross :

I'm not sure how many there are and suspect a careful inspection would find the occasional scrape or broken something (eadily fixed or possibly excused) but they are escorting some obviously  not highland cattle and some carts. There are some conversions in there Heritage mounted napoleonic landwehr lancers now wearing bonnet and plaid though they seem to gotten tired of carrying their lancers. 

 Anyway, they are 49!! Years old (how is that possible) but have been sleeping in a cave for decades now after many victories over the Sassanachs so hopefully they have earned some lenience and maybe even gloss varnish if suitable .

All very good stuff, and lovely to have a bit of provenance. I hope the sea wasn't too rough during the painting sessions all those years ago..  I also liked the cattle, wagons etc, those are bound to come in handy - the troops come with their own supply train and food 'on the hoof'! Most appropriate for 17th Century forces. 

I was able to reciprocate to some extent, as I had a set of good old Airfix 1:72  ACW Artillery which Ross liked the look of,  so back at the end of March we wrapped and posted our respective parcels, and the two contingents began their journeys between Suffolk and Nova Scotia. About a week later Ross confirmed the ACW gunners had reached him safely, and I waited for the Scots to arrive.. and waited.. After several weeks, sadly I became resigned to the poor wee chaps ( and livestock ) being lost and/or binned somewhere in the postal system ( being low-value items, we had agreed not to waste money on expensive delivery tracking ). No loss to me, I suppose, but it was very sad to think of them being dumped somewhere.  However I should have had more faith in them, because one day in late May (2 months on!)  I arrived home to find a parcel from Nova Scotia on my doorstep - hurrah!  Labelled as 'By Air', by the way - they must be using some slowish 'planes these days... but they got here in the end.   

So now I am pleased to introduce these much-travelled veteran Scots. 

the full complement on parade
 

I think these must inevitably join my forces as  Macfarlane's regiment, a much-travelled and battle-hardened body of men on hire to the highest bidder - initially augmenting the forces of the French and/or Bernadines in their campaigns against Bavaria and the Empire.  As you see, the regiment brings its own artillery and a troop of horse,  and those wagons and livestock, which turns out to include  cattle,  goats and a faithful hound.  

the supply train
I think those will be very useful,  I forsee some sort of convoy escort/ambush scenario  being played out.  It's making me think of the game described in  George Gush's  brilliant little 1970s   'Airfix Guide' to the ECW.

regimental artillery
 

As described, there is an interesting mixture of figures, indeed I think mostly Minifigs early 'strip mounted'  15mms of 1970s vintage, mostly musketeers but some sword and axemen, officers and even a bagpiper! And I like the  painting - even some colourful tartans being worn ( sadly I think Humbrol's tartan paint range is long discontinued ) .

They make me think that for a bit more inspiration, perhaps  I can use this:


'The Lion of the North. a tale of the times of Gustavus Adolphus'  by G.A. Henty ( 1886 ),  which follows the adventures of Munro's regiment in the Swedish service.   The style is, well, rather Victorian, and I suspect his views on Empire, race and nationalism may look quite dodgy these days ( I think in this case,  the muscular  Protestantism of Gustavus was thoroughly approved of ). But I'll give it a go sometime, bearing all that in mind, and I think there might be some good  scenario ideas..

Meanwhile,  I need to get the wee men onto proper bases - I think I will resist glossy varnish at the moment, I think they look fine as they are. Once that is done, they can take their place on the battlefield for the first time in a long while, albeit quite a distance from their original home - just like  their real-life counterparts from the highlands, campaigning in  far-off  'higher Germany'.  Let's hope they fight as well as they look.  When they do get into action, you can read about it here, of course.

Many, many thanks of course to Ross Macfarlane for a terrific piece of wargaming generosity, very much appreciated! 

Keep safe, and well, everyone.

Monday, 14 June 2021

Post-game thoughts on Arthur's SHAME

Having played out a game using Arthur Harman's SHAME ( 'Simple Horse And Musket Engagements') rules from Miniature Wargames issue 457,  I promised to share my thoughts on the rules. So, here we are. I wouldn't go so far as to call this a review,  it's just some musings, a few points that cropped up during and after the game, which I reported a couple of posts back.  

I also could hardly presume to question Arthur's rules-writing ability, ( 'we're not worthy! ) and he will of course always have The Last Word  - but I can at least report on how I got on with the rules.  


Getting stuck in : Cavalry vs Infantry line

I suspect rules-writing is much more difficult than many imagine, especially if you are writing for publication. If you put together some rules just for your own use, or for your local group of gaming friends, then the standard of  writing is less important, becuase if something is misinterpreted you can simply say 'no, I meant this..' and if something is missing, you can add it on the spot, and your authority as creator is probably not challenged.  But if writing for publication, where strangers will be trying to use the rules, and they only have your text to help them, then you'd better write very clearly and you'd better have thought of as many situations that might crop up as possible. But you must also keep it as simple as possible, for fear of producing the dreaded 'WRGese'  ( see section 32 (b) 'a unit may be  be disordered if it is Austrian ( except Hungarians ) and the day of the week dice roll ( see section 29.2.2 ) specified 'Friday' and  the time of day dice roll ( 29.2.3 )  specified a time later than the Central European 'opening time' - see Appendix L, 'miscellaneous Hostelries' )..   

It all reminds me of a reliable favorite feature of  'Systems Analysis for Beginners' type  training courses back in the day ( the late 1980s sort of day, in my case )   -  'write a set of  instructions for making a good cup of tea'... 

'OK, so this is easy, here we go  (1) put the kettle on...'

- 'Excuse me, do I need to put anything in the kettle? You haven't specified..'

and so on.  If you really want to complicate things, introduce the 'Cream Tea scenario', with its hotly-disputed jam first/cream first dilemma.. 

In Suffolk we follow the Cornish protocol: jam first!

Oops, I seem to have digressed. Just a bit of fun.

I did enjoy using the rules - I should say that straight away. Being pretty simple they produced a fairly fast-moving game, and  units could take  damage and get knocked out of action quite quite quickly once they 'got stuck in' to combat, which seemed about right and kept things going on at a good clip. Given  lucky dice rolls, a well-delivered musket volley,  round of canister or  cavalry charge  could shatter an opposing unit in a satisfying way - and if the dice did not oblige, the enemy would shrug off that ragged volley or half-hearted charge. 

The rules are definitely pitched at the  Napoleonic  period - there are skirmishers and Horse Artillery, and  infantry are expected to form square if attacked by cavalry. Wanting to play a Seven Years War period encounter,  I made some changes , the biggest being to abandon the use of square. So if cavalry attacked infantry in line and did not break them, then rather than 'flowing around' a square, I decided the horse would 'bounce back' to reform and perhaps try again - and they would suffer a penalty on their attack dice if charging frontally at all those disciplined volley-firing musketeers.    I simply did not use Horse Artillery or Skirmishers -  the latter are optional, anyway -  though I suppose I could have fielded some light infantry in open order. One query I had was that early on, it's specified that troops should be on 20mm x 20mm bases with 4 infantry per base, but in the section on skirmishers it's stated that they should deploy 'in a line of single figures, one to a square'.. hmmm.  I did like the relatively short musket range - from what I've read, effective musket range was actually frighteningly short. Arthur specifies musket range is  'one square between units' which is  a neat way of explaining it to a child or beginner.  And then artillery canister range is 3 times Musket Range, which I take to be '3 squares between units' (i.e. up to  4 squares, hope I got that right! ) . 

The main thing to master is the combat system, with dice results designated rather like 'Command and Colours' games - the attacking ( fire or close combat ) unit rolls a number of dice based on its quality, and then different dice scores inflict commander hits,  musketry/canister hits, artillery hits,  close combat hits or 'fallen flags' . The 'hits' from fire or close combat reduce the target's 'Combat Value' (CV) in effect its strength or fighting power,  but the 'Fallen Flags' have a separate impact, on the unit's  morale. This can have some interesting effects - the very first piece of firing in the game by the Austrian artillery inflicted two 'flags' on a Prussian cuirassier unit, which brought it to a halt, despite no loss of CV. That seemed entirely feasible - I assumed that  the unit's beloved commander may have stopped a cannon ball, in full view of his men!  The 'Fallen Flags' can be removed by a commander figure joing the unit and rolling a die to rally them,   whereas the CV hits are for ever, and  if the unit loses all its CV, or a number of flags equal to its troop quality, it must withdraw.   I thought this system gave quite interesting results, although it does require you to track two different factors ( CV and Fallen Flags ) for each unit, which some might find a bit fiddly. 

The charging/close combat system I also liked, in that when a unit declares a charge, it rolls its 'attack dice' , and the number of flags and/or hits decides the outcome - with a very good attacking score, the defenders may simply break and run for it!  Or they may be shaken, and roll less dice in response, or be resolute, and roll as normal. That seemed quite a  smart approach, cleverly combining morale effect and casualties, and fun too.  I can well imagine a raw defending battalion, charged by a determined-looking  elite attacking unit, who might give a feebly ragged and inaccurate volley and then turn on their heels; or a steady, experienced defender waiting  'til you see the whites of their eyes, lads!', giving a terrifying  volley that mowed down and halted less motivated attackers!  Another nice touch was the cavalry vs. cavalry mechanism, specifying that if neither unit is halted or broken, they pass through each other, turn, and may charge again next turn.  That seems just right, if my memory of  Mr. Duffy's works is correct. 

 Prussian General wasted many turns failing to rally Cuirassiers


Commanders/officers I didn't quite 'get'.  I think I made a mistake by choosing only one commander figure per side - as a result, both sides' commanders got stuck trying and failing to rally off 'Fallen Flags' from important units, when perhaps they should have been lending their motivation to attacks.  I think I should have had several officers per side, and indeed Arthur's presumed setup involves several players on each side, each having  their own commander figure.  The rules don't actually say a lot more about commanders and ADCs - the latter can apparently 'deliver messages/orders from one General to another, or orders from a General to a unit or formation..'  but there's nothing else I could see about orders, which raises questions.  Can units move at all without having received orders, and must they follow those orders until new orders are received?   As far as I can see in the rules,  they say nothing more  on the subject  (hmm...'Put the kettle on...?').  In effect I answered my own question by assuming telepathic control of units by players, without the need for specific orders to be delivered to them - very 'old school' on my part, perhaps?

That's probably enough for now, I should conclude by saying that I did enjoy using the rules, and they gave a suitably fast and fun game, as promised, with some interesting and thoughtful features that succeed in providing a flavour of the period. Arthur Harman certainly has nothng to be ashamed of.   A few questions came up, and I suspect I will have to think a bit more about suitable adjustments to reflect Frederician warfare - but that's all part of the fun, isn't it?   I think these will make a nice occasional alternative to Bob Cordery's 'Portable Wargame' rules that I have mainly used up to now. I know Bob and Arthur are old friends and wargaming comrades, so that seems rather appropriate.  I hope you've enjoyed reading about the rules, the game and the post-mortem, as I have enjoyed them all - maybe some of you have given them a go too, or will do so.  

This post was a bit delayed by 'real life' but also by glorious weather over the weekend here - not a time to be sat indoors typing on a computer! But I did get a little painting and relevant reading done in the sunshine, of which more later.  Meanwhile keep safe and well, everyone.