Saturday, 28 January 2023

Trying out the Portable Pike and Shot

Having given my Pike and Shot armies a couple of goes recently with different rule sets and enjoyed those games, I thought I'd like to have another game in the same period. I've been reading Bob Cordery's (and friends)  book The Portable Pike and Shot Wargame, which has several sets of rules, including two variants for ECW/30YW forces. Having looked through them, I was interested by Alan Saunders' ECW variant, which seems to have some good ideas which Alan explains in his Design Notes. 

Alan's rules are strictly 'ECW', but I think they'll stretch to being used with my Thirty Years War armies representing French and Imperialists - I tend to think that by the 1640s, a lot of the features of earlier 30YW armies such as 3/4 armoured Cuirassiers, mounted Arquebusiers and larger Tercios would have fallen out of use, even if some units still carried those names. Admittedly my armies of vintage figures maybe look a bit more 1620s/1630s, but I am choosing to overlook that! 

I'm going for a simple setup, from an old favourite source: Neil Thomas One Hour Wargames. I selected Scenario 3: 'Control the River'. Neil Thomas summarises as follows The Red and Blue armies represent portions of much larger forces. Their commanding generals have ordered them to seize two strategic river corssings, as a base for future operations.   As typical for OHW, there are six units per side, which is  within my reach. It's a simple, symmetrical layout, with a river dividing the field, crossed by two bridges, control of which is the objective for both sides.  

In the spirit of keeping things simple, I've also gone for symmetry in the opposing forces - which will represent the French and the Imperialists.  Here is the Imperial contingent: 


 It consists of :

        Two  Pike and Shot Infantry Regiments ( 'Grun' and 'Blau' ),  rated 'Trained',                                             each 4 Strength Points (SP) 

        One  Pike and Shot Infantry Regiment ( 'Rot'  ), rated 'Elite', 5 SP

        One unit of  Cuirassiers  ( Horse ), rated 'Trained' , 3 SP

        One unit of Dragoons, rated 'Trained',  3SP

        One unit of Artillery, rated 'Trained', 2SP  

A total of 21 SP. Alan's rules the army has a Break Point, equal to half its total SPs rounded up. So the Break Point for this army is 11 SP. When casualties reach the Break Point, the army must test each turn to continue fighting. For those interested in such things, the figures are 15mm scale and mostly from Mike's Models, Frei Korps 15 and Minifigs - as far as I remember, given they are some decades old! 

Obviously the French force is similar, though I made a slight variation in the morale ratings - all three French infantry regiments will be 'Trained', but their cavalry unit will be 'Elite'.  I have a shortage of Dragoon figures, so I have drafted in some of MacFarlane's Scots cavalry to represent Dragoons. Here is the French force


     which consists of :

        Three Pike and Shot Infantry Regiments ( 'Rouge', 'Vert' and 'Bleu' ),  rated 'Trained',                                             each 4 Strength Points (SP) 

        One unit of  Horse ( 'Turenne' ) rated 'Elite', 4 SP

        One unit of Dragoons ( 'MacFarlane' ), rated 'Trained',  3SP

        One unit of Artillery, rated 'Trained', 2SP 

Giving a total of  21 SP and Break Point at 11 SP.  Figures mostly a bit more recent, from Essex Miniatures, except the Scots and the Artillery which  Ross told me were 'old strip Minifigs' ( I think their first 15mm range ) from the late 1970s - real veterans!  

This is a simple  'encounter battle'  - at the start, neither side has troops on the table. The French represent 'Red' who will enter from the Northern ( top ) table edge on Turn 1 , while the 'Blue' Imperialists enter from the Southern table edge at the same time. It should be a nice straightforward scenario, and I hope an easy introduction to the rules.  Next time, we'll  see how it goes. Meanwhile keep well, everyone.

Saturday, 14 January 2023

Fnurban #23 Rainy Day Miscellany

The other day I had the good fortune to be in London for the afternoon, before an evening of boardgaming with friends: the only drawback being that it was a rather wet afternoon in the Great Wen. Since the gaming was due to take place in the  Borough area, what better place to visit beforehand than the nearby Imperial War Museum? 

With those 15-inch guns, this is surely the best-defended property in the city, as long as any assailant remains about 15 miles away.  I had about 90 minutes in the museum - not really enough to  tour the whole thing properly, so contented myself with looking at a few old favourites. I may not have been there since the pandemic, but I had previously seen the fairly recent WW1 gallery, which is well worth a tour.  The temporary exhibition space sounds promising in that the current show is called 'War Games' - but that is all  about computer/video games, not my sort of thing at all.  I looked in at the Lord Ashcroft Gallery and its display about 'Extraordinary Heroes' :  This display houses the world’s largest collection of Victoria Crosses, alongside a significant collection of George Crosses. Discover over 250 stories of people who faced adversity and performed acts of bravery. All were awarded either a Victoria Cross (VC) or George Cross (GC) - the highest recognitions of bravery that can be given by Britain and, for many years, the Commonwealth. On display, for each recipient, are the medals belonging them, usually with a photograph ( even for the Crimeam War awards ) and   description of their act of bravery - a high proportion  of which resulted in posthoumus awards, which was  a sobering realisation. Sadly there is a distinct  'plus ca change' aspect too, when neighbouring exhibits relate to the long-dead heroes of the Third Afghan War ( 1878-1880 ) and those recently deceased in Helmand Province.   

Prominent among the 'old favourites' is Spitfire Mk 1A,  serial R6915, which saw action in 1940 with 609 Squadron RAF and is now suspended above the main hall.


By coincidence, only a few days before I had listened to Al Murray and James Holland discussing this very machine on their 'We Have Ways..' podcast, with special guest James May They had observed that though the Spitifre is undoubtedly a visually beautiful aircraft, when you get closer to it there is a distinctly rough-edged quality to the construction, with all the rivets and panel joins -  and I had to agree with them.  Beautiful maybe, but very much still a workmanlike tool for a particular job. 

Given that admission is free, one should find a way of giving some money, even if only for a cuppa in the cafe; on this occasion the museum shop ambushed me, with a display of books in a fine new 'Imperial War Museum Wartime Classics' edition, and a 'three for two' offer.


 Oh dear, more for the books backlog pile - which is considerable and probably unmanagable.  In my defence, I have been looking for a copy of Alexander Baron's  From the City, From the Plough for a while now, and the other two also look promising - all are fictional accounts of the British Army's 1944-45 campagn in NW Europe following D-Day, written by men with first-hand experience of their settings.       

There followed a fairly short walk to a pub in  Borough Market, to meet my friends Dave ( aka  St Cyr on Wheels ), Paul and Rupert  for a boardgame evening. We had agreed to keep things simple, so Dave tried out SQPRisiko  on us -  this is basically a version of the old favourite Risk  produced in Italy, with a Roman Empire setting, some new features such as naval fleets and battles, and amphibious attacks.

I haven't played Risk in decades, but I used to love it as a child;  all that time spent during school (and college!)  holidays came flooding back, and a thoroughly good time was had (one of the players, all well over 50, and a very keen boardgamer, had never played Risk - amazing!).  The addition of fleets worked well, allowing seaborne invasions of enemy territory  - so don't leave any coastal areas weakly-defended! There are also a number of territories with neutral garrisons, which are quite strong and can be expensive to conquer - if you attack one and don't quite manage to  wipe it out, you may leave it an easy target for the next player.  I think the Risk combat system is genius, and it's fascinating to see how different playing styles work out - in our game, two players went for slow and steady build-up of armies giving strong defences and gradual expansion, while the other two relied more on rapid attacks and didn't worry too much about in-depth defence - unfortunately the latter two tended to fight each other, allowing the 'slow and steady' players to build up strength. Victory points are scored for holding the most territory or controlling sea areas each turn, which gives an idea of who is winning or losing.   Almost inevitably there was no 'finish' to the game, but when we called time Paul was winning , having built 'slow and steady' in Northern Europe, and wisely invested in some fleets in the  Channel and Biscay. Overall, I'd say the game is a nice twist on a vintage classic, I enjoyed it very much! 

Many thanks to Dave 'St Cyr' for the below picture of our game in its early stages, before Red and Blue started building big armies while Yellow and Black tore lumps out of each other..

Early stages - I am blue, building up in Iberia


That's all for now, next time back to the toy soldiers I think. I've been looking at The Portable Pike and Shot Wargame, and also Rapid Fire Reloaded - which to try next? Meanwhile, keep well, everyone.


Friday, 6 January 2023

Fnurban #22 : Does Anyone Want These ?

Hello all, I've been having a bit of a new year tidy-up and came across the following - sprues of hard plastic 28mm WW2 figures.  Freebies from hobby magazines in the past year or two - probably Wargames Illustrated. They are as follows: 

(1) Warlord Games 'Bolt Action'  Late War British and Canadian Infantry(2020), There is a code number : 4030300011. 


(2) Warlord Games 'Bolt Action' Afrika Korps (2018) Code number 4030100016.


(3) Wargames Atlantic Panzer Lehr  ( 2021 )  Code WAAWA002

There looks to be the potential to make 6 figures for each sprue - though I wouldn't swear to it, as there are just so many pieces!  I don't need them, as my small WW2 collection is good old-school 20mm, and I don't have the patience for assembling these before even getting an undercoat on them!  But of course, they may be right up someone else's street - at the very least there are lots of potential 'spares' here - and it would be a shame to just throw them away. 

SO - if you are in the UK and can find a use for any of these, please get in touch via the comments, just give me your email address ( I won't publish the comment ) and I'll be in touch to get your postal address. There's no charge, it'll only need a second class stamp so I'll cover that, just to see these go to a good home. First come, first served..  BUT as I say, UK only please, sorry it will be too expensive to   post them abroad.  Also bear in mind that I was told by a friend today ( 6th January ) that they had just received my Xmas card, which I think posted on about 9th December... so we won't assume quick delivery in the current climate. 

If you are also a blogger, I hope you can show the world what a splendid job you make of  painting and assembly, and maybe even how they subsequently perform on the battlefield.. 

I'll wait for the comment(s)  to flood in ( Mrs Trellis, are you out there ? ). Meanwhile keep well, everyone.   

*** UPDATE: I'm glad to say Mark 'Man of Tin'  has taken up my offer of these,  says he hopes to transform them into VBCW / Imaginations troops in due course this year as a small ahistorical Skirmish Force , and that  he will eventually post on his blog describing what he does with them. I have posted them off, hopefully they will arrive OK and be of some use to Mark!  ***


Tuesday, 3 January 2023

D-Day Dodgers : Operation Ponte Natale

Happy New Year to one and all.  Now let's go back to just before Xmas - 1943, that is, 'somewhere in Italy'.  British forces launch an operation to secure a vital ( yet entirely fictitious ) river crossing at Ponte Natale; German forces mount a hasty defence. 

The explanation for this: I fancied to do a quick and simple game before Xmas, and I thought it was time the 'D-Day Dodgers'  WW2 Italian campaign forces had an outing. I thought Bob Cordery and friends 'Fast Play 3X3' version of The Portable Wargame might  offer something very simple, so I consulted his recent book The Portable Wargame Compendium.  I was in luck: see page 47 for 'Fast Play 3X3 Portable WW2 Operational-Level Wargame Rules' by Mark Cordone - for fighting the major battles of World War Two.  Essentially a combination of the '3 X 3' system  and the WW2 rules in Bob's  Developing the Portable Wargame book.  That should do nicely. 

The Compendium also has a chapter containing a selection of '3X3'  terrain set-up suggestions - I chose number 20, which features a river with a bridge,  and hills overlooking them, which seemed suitably Italian and a good defensive position for the Axis forces. I kept it very simple, as you can see:

The Bridge at Ponte Natale

Armies in this variant are of 6 units plus an HQ each side, available  unit types being Airborne, Armoured, Artillery and  Infantry all with 2 Strength Points (SP)  each ,  plus some special units:  Assault Guns/Tank Destroyers, Self-Propelled Guns and Heavy Armour which have just 1 SP each. ( I am assuming that the basic (2SP) units represent Brigades, or perhaps Divisions? )  There must be at least three Infantry units in each  army. 

With that in mind, I selected an attacking British Force : 

General Badger and 'Badger Corps'

Three Infantry units, 1 Armour, 1 Artillery, 1 Self-Propelled Gun  : total 11 SP

and a defending German Force :    

Her General Von Kleist and Kampfgruppe Kleist
 

Four Infantry Units,  1 Artillery, 1 Assault Gun : total 11 SP.

Each side also has its HQ, of course, and the ability to conduct airstrikes, for which the model aircraft make a rather extravagant 'marker' (all that is required by the rules, simply to mark the grid area under air attack) . I decided that all units would be 'Average' quaility, just for simplicity (  if 'Airborne' had been in use by either side, it would have been only fair to make them 'Elite' ).

Allowing 6 SP for each side's HQ, the total strength was 17 SP each, therefore 'Exhaustion Point' would be reached at a loss of 6 SP. 

Deployment is Defender first, in his baseline or middle row grid areas ( or Reserve ),then Attacker in his baseline or Reserve areas only ( both sides' Artillery units are placed in 'Reserve' area  ). I duly deployed both sides: 

Iniital Deployments

Notice a single brave German infantry deployed in front of the bridge, the other three remaining behind the river. Perhaps unfortunately for the defenders, I forgot to allow any of them to be 'dug in' at the start - perhaps the defensive position was only a very hasty one, having just rushed to the area in response to the British advance! And so to battle. 

The  sequence of each turn starts with initiative die rolls (1D6) - highest roll  moves first, and the die score gives the number of units that can move. Then 'Airstrikes' : again 1D6 each, highest score gets an airstrike - if a tie, both get strikes. If one side is deemed to have air superiority, they get two dice and use the highest score - I gave this advantage to the British, as befits Italy in 1943. A nice touch was that the 'Initiative' die rolls could give a result which indicated bad weather - so no airstrikes. Then both sides Artillery get to fire simultaneously, followed by the player who won the initiative moving his units, then combat, then the other player moving, and combat again.   That's the end of the turn, and we go again for the next turn.  

Victory is achieved by one side if they can occupy one of the opposing side's baseline grid areas at the end of the opponent's combat phase - so obviously the British needed to cross the river to win. If neither side achieves victory that way, battle continues until Exhaustion Point(s) are reached.  There can also be a designated terrain objective that must be taken to achieve victory - though  in effect that would be the same, the British would need to cross the river and reach the German baseline. By default I assumed  the Germans would win if the British did not reach their baseline - it seemed unlikely that the Germans would try to counter-attack to reach the British baseline!


Airstrike! First blood to the R.A.F..

I won't give a blow-by-blow account, partly because despite the simplicity of the rules, I still managed to miss vital points on several occasions, so I may have played them completely wrong at many points! Suffice it to say it lasted eight turns, and was pretty 'ding-dong' back and forth stuff. Airstrikes and Artillery had a big role right from the start, on Turn 1 a British airstrike hit the German  infantry defending  the bridge, taking 1 SP and 'pinning' it,  only for the German artillery to mete out the same treatment to the British infantry advancing to attack the bridge, and forcing the supporting Self-propelled guns to retire!

The British made a general advance to  keep pressure on the defenders across the board, even though the bridge was obviouly going to be the focal point ( I decided that the river could only be crossed there).  The Germans hastily 'dug in' their infantry where possible, and brought up their Assault Guns to back-up the bridge defenders. British airstrikes wiped out the forward defending  infantry unit as early as Turn 2, while British artillery concentrated on counter-battery fire on the German artillery - without  much success, it has to be said.  German artillery focussed on trying to break up the British attacking formations, with quite destructive effects. This was lucky for the Germans, as  they knew they would have fewer opportunities for airstikes.

British SP guns go 'up in smoke'
 

The British central  thrust at the bridge struggled from the start, with their Self-Propelled Gun unit destroyed  by defending Assault Guns  quite early on, but their infantry fire kept the pressure on by destoying a second German infantry unit - at the end of Turn 3 losses were British 3SP, Germans 4SP.

Turn 6: the Luftwaffe makes an appearance
 

Inevitably the British armour had to move to the centre to spearhead the attack on the bridge - probably should have done so from the start!  British armour and infantry repeatedly tried to advance to assault the bridge, but defensive fire from the German infantry and Assault Guns kept knocking them back. Finally the British armour and Infantry attacked across the bridge on Turn 7, taking 1 SP and 'pinning' the defending infantry, but themselves having their infantry forced back - attack stalled! 

Turn 8: the final British 'push'


In the next turn, the British won the initiative and pushed forward again for another assault - defensive fire damaged the British armour, but in the ensuing close combat the British finally prevailed, the defending  German infantry and Assault Guns both being destroyed. The British infantry was forced to retreat, however, leaving their Armour, with only 1SP left, sat unsupported on the German baseline... thus the Germans on their turn had to kill the British armour to save the game. They brought their last Infantry unit down from the hill, attacking the British tanks from the flank - and just couldn't kill them. The infantry lost 1SP and ended up pinned down, the British armour held position on the defenders' baseline, and the day was won. 

German Infantry's desperate counter-attack ( 2p coin for 'pinned', 1p for 1SP lost )
 

Final losses totals : British 5 SP,  Germans 9 SP  - only 1 German infantry unit and their Artillery remained in position, both having only 1SP each remaining.  So, a pretty thorough bashing received by the Germans, but they made it pretty tough for the attacking Brits.  As I've said, I think I managed to play the rules wrong in several ways - a salutory lesson in just how easy it is to overlook or misinterpret even the simplest rules! In paricular I got the characteristics of the 'special units' (SP Guns and Assault Guns)  wrong, and even worse I only allowed firing to occur about half as much as it should! I think if played correctly, it would have been a much more 'quick and dirty' battle, but all the same I had a throughly enjoyable time, and the balance of the game  swayed back and forth throughout before that decisive last assault over the river.  A nice simple little game for a pre-Xmas afternoon, before the eating, drinking and gifting took over - and it gave the D-Day Dodgers some table time, of which there needs to be much more, I like these 'old-school' forces.  I plan to review them and organise them  a bit more formally - probably making formations suitable for the 'Rapid Fire Reloaded' rules. does that count as a New Year's Resolution? 

I hope everyone had a good festive season, and are not too downcast by the return to normality and (for those in the Northern Hemisphere ) dreer January.  The answer is of course, to cheer ourselves up with hobby activities... Meanwhile, keep well, everyone. 


Friday, 30 December 2022

Fnurban #21: a little quiz

 I hope everyone had a pleasant Xmas, if you celebrate it.  Now, one evening over the holiday period we watched a DVD ( yes I know, a bit old-school, no streaming services here ) - 'Knives Out' ( 2019 ) by Rian Johnson, starring Daniel Craig, Christopher Plummer, Jamie Lee Curtis and many, many more. During the course of the film, something kept nagging at my mind, and at the end I did a little internet searching.. 

The result was that I congratulated myself on one of the few 'film nerd' moments I got right - I love the cinema, but these days I don't know who any of the actors or directors  are any more.  Powell and Pressburger and Kieslowski were my obsessions, and they are long gone  - though Almodovar is still producing his immaculately-mounted twaddle ( I mean that as a compliment!), so there is hope for me yet. 

Anyhoo, having spotted this little detail, I think it might make a festive quiz question for you all - and it has a 'military history' angle : the quesiton being,  what is the link between 'Knives Out' ...


      ...and Ken Burns' classic documentary series 'The American Civil War' ? 


No prizes for this, it's just a bit of festive fun.  I hope it's not too easy, or already widely discussed in the blogosphere - I may have been a bit slow on the uptake! 

Answers in the comments please -  I will use the moderation to hold back the correct answers for a day or two.  Wrong-uns will be published immediately - humourous answers welcome.  And of course, there may be links other than the one I am thinking of - it will be interesting to see if anything comes up! 

Watch this space for answers:  meanwhile keep well, everyone, and have a Happy New Year!  

*** UPDATE ***   The answer was of course, that Daniel Craig based his character Benoit Blanc's accent on that of the historian Shelby Foote, who was prominent among the experts appearing in Ken Burns' ACW series.  

Craig himself says : Shelby Foote was my inspiration. He’s a historian. If you ever saw the Ken Burns documentary, the Civil War  documentary...  It just said a southern accent but then we talked about it, we were talking about oh, we want it to be sonorous and honeyed, we started throwing back and forth references. We didn’t want it to be twangy and annoying so Shelby Foote came to mind.

Congratulations to Jon FreitagEpictetus and Chris aka Nundanket for giving the correct answer - much kudos to them!  Jon was quickest on the buzzer - luckily I didn't offer a prize, or I would now be shelling out for postage to the USA 😀

As Jon says,  Foote’s distinctive drawl is almost immediately recognizable.  He had a very stately, proper, and southern gentlemanly delivery and tone in his voice.  He was a great storyteller and writer too.   Here he is, in a tiny snippet from the series :


If you've not seen the Burns ACW series, I'd recommend it highly.  'Knives Out' ain't bad, either.

Thanks all, hope it was fun! 


Saturday, 24 December 2022

Fnurban #20: Merry Xmas to all!

'Tis the night before Xmas, and the 'Knit and Natter' ladies of the village have excelled themselves:


I'd just like to send my good wishes to all who have read and/or followed my ramblings on this blog over the past year, and especially to thank all who have left such positive and supportive comments - glad you've enoyed reading! 

Meanwhile some gaming has occurred - albeit on a limited scale - which I will report on next time..


Have a great Xmas, one and all!


Sunday, 18 December 2022

Kirchendorf by Twilight: battle report

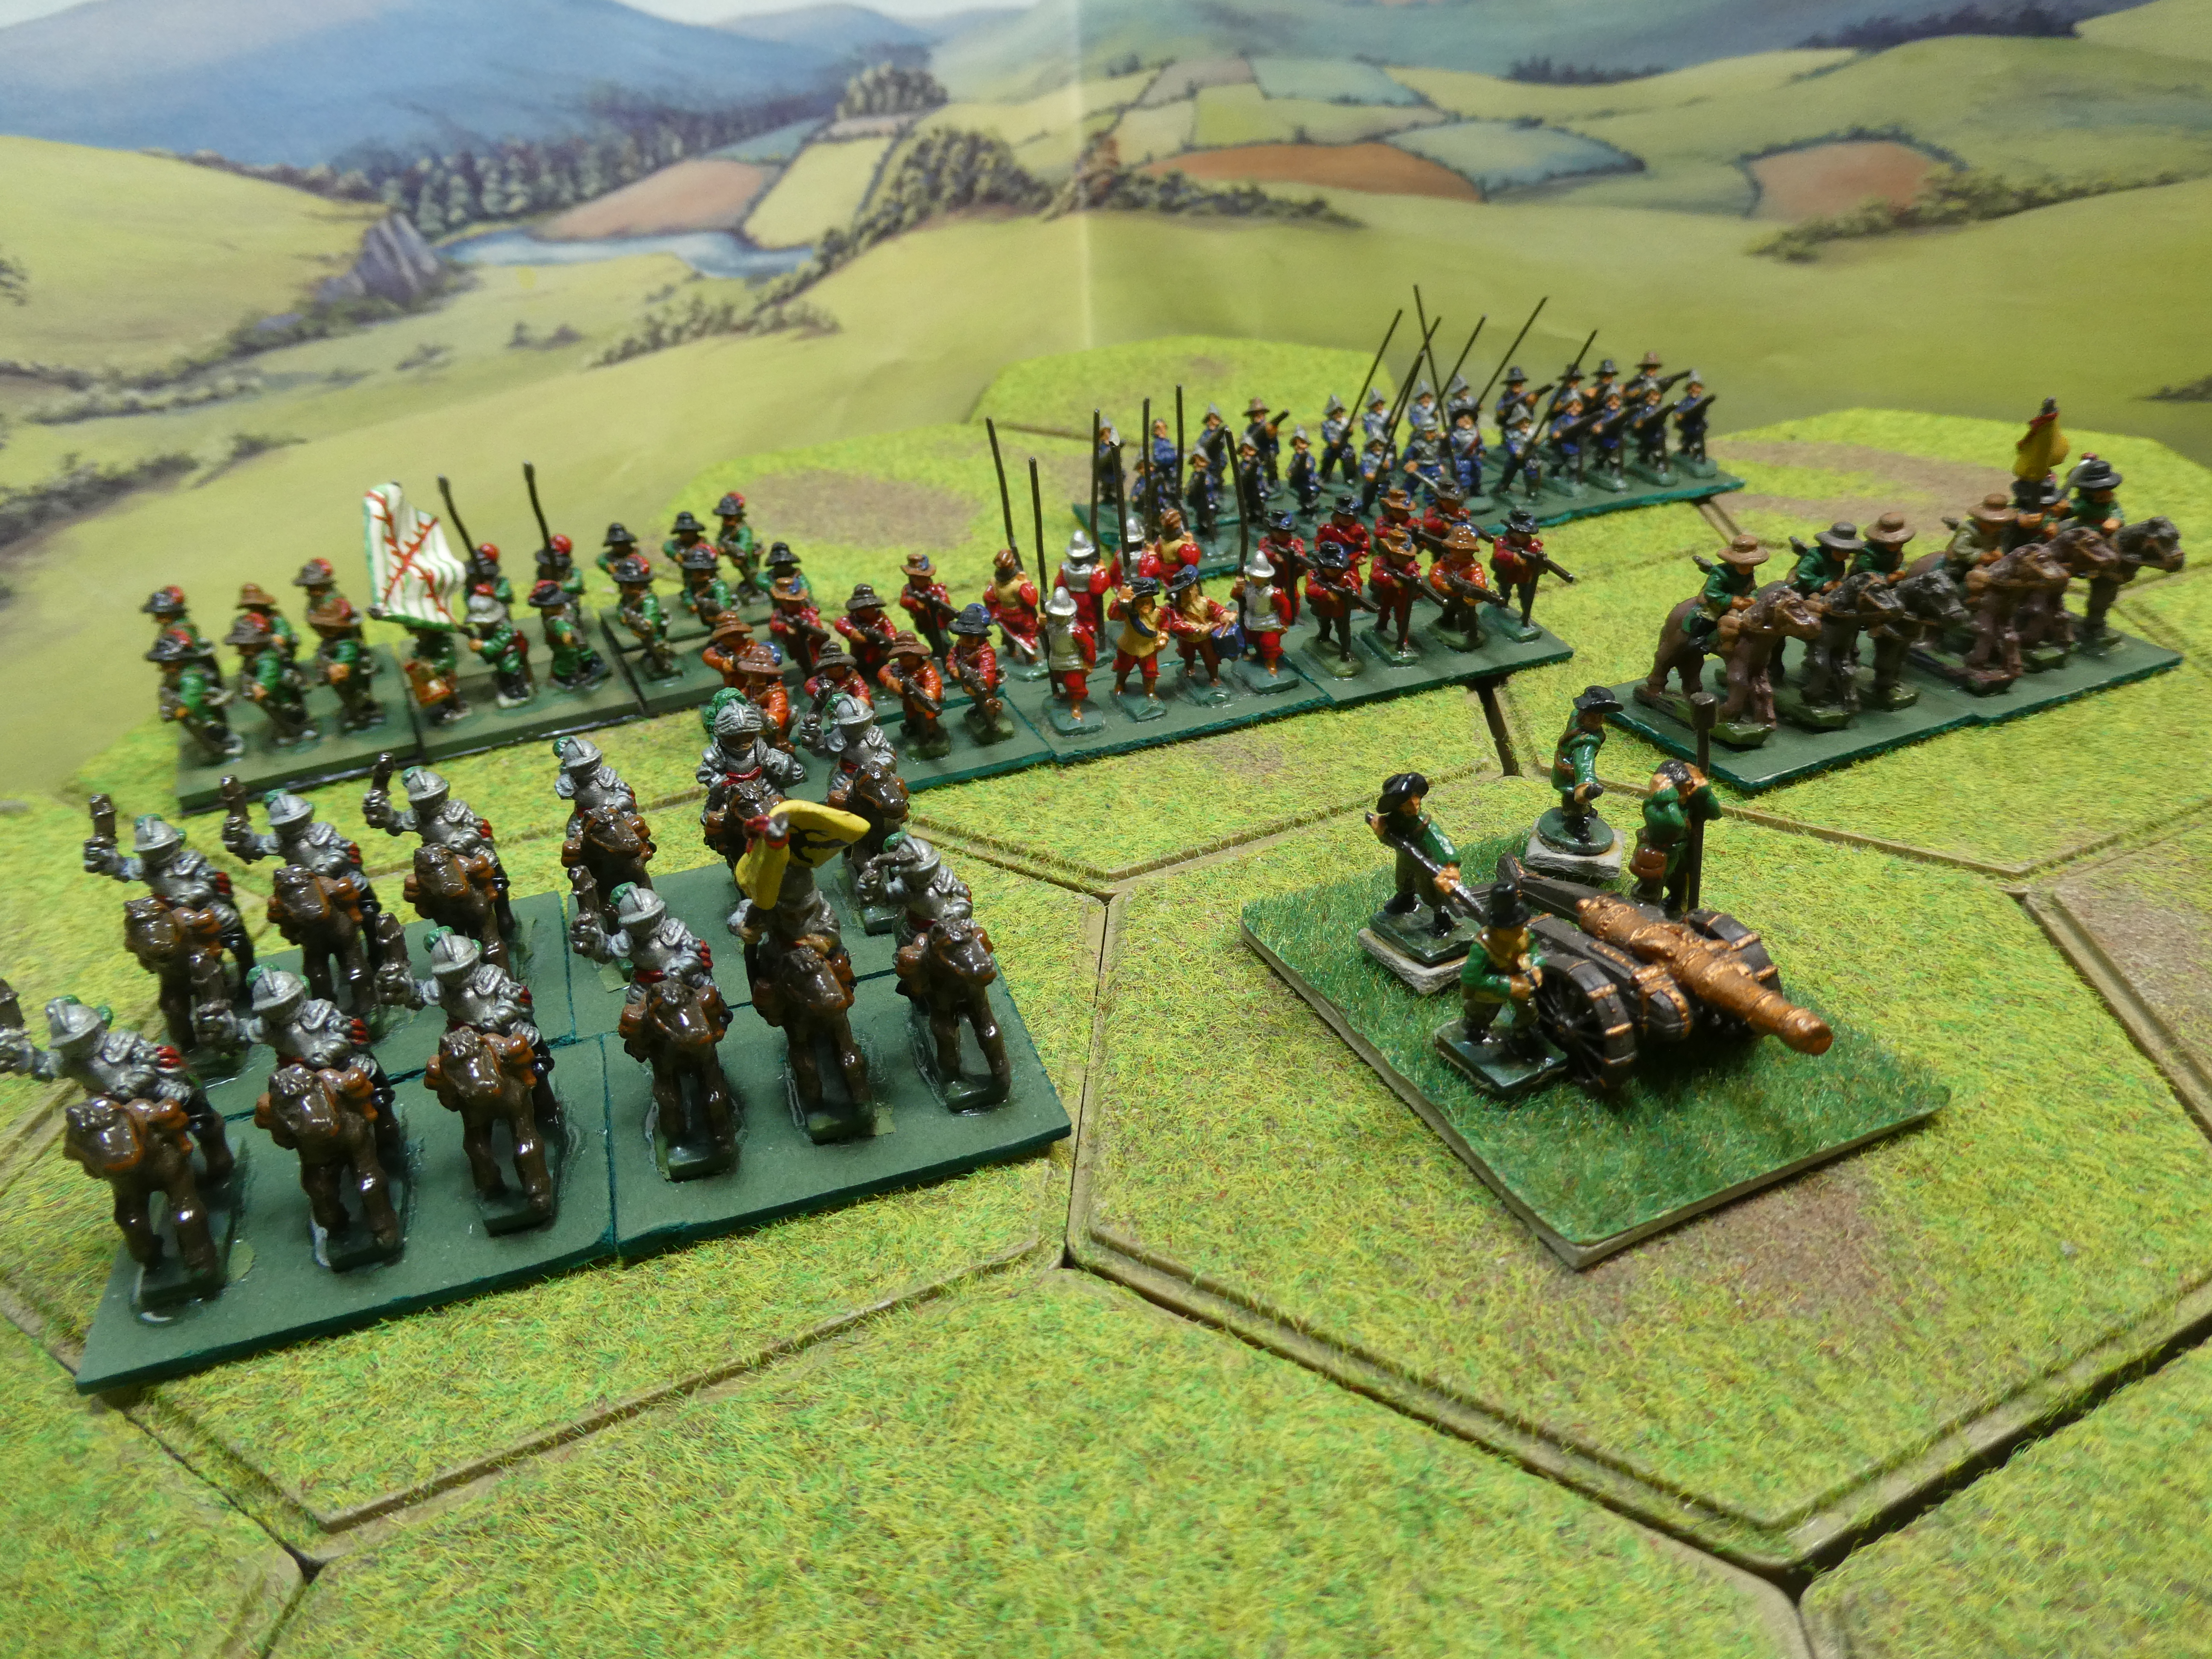
Almost a month ago I set up a game to try out Nick Dorrell's Twilight of the Divine Right rules for the Pike and Shot period, with their scenario for the Battle of Cheriton -  albeit somewhat Germanicised to a Thirty Years War conflict at the fictional 'Kirchendorf'.  Real life rather got in the way in the meantime, but this week I have finally come back to the table, and fought out the battle. The opposing Imperial and French  forces have been described in my earlier post,  now we can see their deployment on turn 1.

Starting positions: Imperialist in foreground
 

It's quite a 'busy' battlefield, but probably the most important feature is the South Spur, running roughly across the middle of the field. This is the highest point and blocks line of sight, so the main bodies of both armies cannot see each other at the start. Note the single French foot regiment ( de Lisle )  on the South Spur, holding the road, and also the body of detached Imperial musketeers placed far forward to hold the woods at top right - they will be hoping their comrades make smart progress to support them.  The Imperial main body is in the foreground, with Mauer (Waller)'s infantry and guns in the centre, and Balvier (Balfour)'s cavalry divided between left and right wings - a unit of Dragoons on the right, who may be able to assist in the woodland.  The French main body is in the distance, with sub commander Le Quatre (Forth)'s wing of two cavalry regiments to the left ( he also commands the advanced infantry on the South Spur )  and the rest under Sautville (Hopton) to  the centre and right - on the end of the line an unit of Elite musketeers (with 'Assault Tactics' characteristic of firing salvee and then charging to contact)  prepares to clear the woodland.  Most regiments started in 'march column', though the Imperial guns were deployed for firing, to bombard de Lisle's regiment on the spur.  Bombardment forces the victim to take an 'Action Test' before ANY move, in effect making it possible for them to be 'pinned down' by the cannonade.  The Imperialists had a slightly larger force and were also a little closer to the highest ground, so perhaps had an advantage, but they would have to turf out  de Lisle's unit from a good defensive position, and the French had dashing 'Swedish' style cavalry,  which may be at an advantage against the more plodding 'Dutch' style Imperial horsemen. So, all to play for..

Turn 2: Imperial guns take aim

The rules assign various characteristics to each unit, such as quality (raw/trained/elite), proportion of musket to pike, cavalry drill type  and  unit size etc - instead of drawing up a roster sheet (which I find I never quite remember to keep an eye on), I  placed small paper labels with each unit giving that information. Admittedly a bit untidy, but useful  for a trial of unfamilar rules. I suspect simple markers could be used, and these could be minimised ( for example no need to mark the cavalry types, as all the Imperialists are 'Dutch style' and all the French are 'Swedish style' ). 

Turn 4: Imperial horse crests the hill
 

By Turn 4, the Imperialist cavalry had more or less reached the high ground of the South Spur . though some units on their left had lagged behind due to their sluggishness in changing from column to line before climing the hill - most moves more complicated than straight ahead require an 'Action Test' roll of one D6, and the dice were not with Balvier's units ( commanders can be used to give an extra attempt if close enough, but even Balvier's encouragement failed this time).   In the centre, the slower Imperial foot approached the hill, where de Lisle's regiment awaited.


Turn 5 and battle joined
 

Turn 5 saw battle really commence, as the opposing cavalry came to grips on both flanks. Given their different fighting  styles, the French attempted to charge while the Imperialists halted and levelled their pistols, trusting to their firepower and uphill advantage. Charging to contact requires an Action Test, and the left-hand French unit failed that test, while their comrades charged home, weathering the volley of pistol shot and contacting their opponents, but not being able to push them back. On the other flank things were more messy, with the leading French regiment charging uphill into contact, but their  second regiment being caught in the flank by Imperial Dragoons, who hastily fired from the saddle. Now these rules have no 'shooting' or 'melee' mechanisms - rather, when fired on or in contact with the enemy, units must take a Morale Test to see how they fare. That French cavalry unit, both under fire and threatened from the flank, rolled low and failed the test. As a 'Large' cavalry regiment they could stand three morale fails before breaking - so, two 'lives' left.  The Dragoons' intervention, plus the rather cramped space between wood and hill, made it difficult for the French cavalry to deploy for a full-blooded attack. In the centre, the Imperial foot closed on de Lisle's regiment on the hill, who gave the leading regiment a volley, which they shrugged off. Over in the wood, the Imperial musketeers had lined the edge of the trees to fire from cover - the French musketeers advanced and gave an opening salvo, but to no effect. 


Imperial Dragoons (upper right) cause chaos
 

Turn 6 brought first blood, rather unexpectedly. On the far left, the French cavalry unit which had failed to charge was in turn charged by the opposing Imperial regiment, clearly encouraged by the Frenchmen's hestitancy. The dice gods then intervened - if the modified roll of two D6 in a Morale Test is 3 or less, the unit is routed, and the hapless French regiment scored '2' and were duly routed. That left only one French cavalry unit against three Imperial on that flank, not good news. On the other flank also the French did poorly, with their unit which had charged up the hill into melee failing their Morale Test in melee and being forced to retreat, while their comrades failed Action Tests ( including  a 're-roll' by their commander ) and were unable to charge the Dragoons, and the regiment under fire failed yet another action test and could not even retreat out of the way! Thanks to those Dragoons and the  dice gods, confusion reigned in the French ranks.  In the centre,  Imperial foot succeeded in charging de Lisle's regiment - the Imperialists had more Pikes in their 'MX' ( Mixed) category regiments than the French 'MH' ( Musket Heavy ) foot, so they needed to get into contact, while the French would have preferred to stand off and trade musket  volleys.  De Lisle took a morale fail and fell back a little, while the leading Imperial unit passed their morale test, albeit requiring their Wing commander to attach himself and give a  re-roll after an initial fail. French infantry from the main body were advancing in support of their hard-pressed comrades, but were still some way back. In the woods, the French musketeers may have been 'elite' but they couldn't roll an Action Test success, and thus could not nerve themselves to charge into melee after giving their salvos.   

Turn 7 : Dragoons swept away by French charges
 

In Turn 7, the French left-wing cavalry pulled itself together, finally rolling good enough dice for a 'Swedish style'  charge  against the plucky  Imperial dragoons. The dragoons had little chance, caught by a solid wall of 'regular' cavalry ( with  the attackers' rear support giving a further bonus ) - with a 'minus 4' on 2D6, they rolled '5' and were instantly routed. The French tested to pursue, and couldn't restrain themselves, dashing forward past the end of the Imperial line, and were joined by their rear support unit too. That left two regiments of enemy  cavalry behind the Imperial flank. and caused some consternation. The French success was tempered somewhat by another of their  cavalry units on that flank failing to charge yet again, allowing their  Imperialist opponents to plod forward and ply them with pistol balls. On the other flank the sole remaining French cavalry held on grimly in melee, as did de Lisle's foot regiment, albeit taking casulaties, while further French foot came up in support and traded volleys with Imperial foot on the hill. Finally in the wood, their much-vaunted Elite musketeers still didn't fancy getting the lace on their tunics caught up in in the branches of the trees, and failed again to charge into contact! 

If the previous turn gave the French some cause for optimism, this was to be cruelly dashed on Turn 8. First over on the left, while Le Quatre's  cavalry unit hung on, de Lisle's foot failed a final Morale Test in melee and were routed. That meant that Le Quatre's wing  had lost two out of three units, and must undergo a 'Wing Morale' test - they passed, but would have to test again every turn, and failure would put the whole army at risk. Worse still was to come on the right, where a French cavalry unit under pistol fire from Imperial cavalry failed its Morale test - the French commander Sautville ( aka Hopton )  attached himself to them and re-rolled - only for the result to cause the rout of the cavalry regiment, and Sautville's own death in the rout! Disaster for the French, losing their army commander! 

The leaderless French tried to press on in Turn 9, despite Imperial pressure all along the line - Le Quatre's  sole remaining cavalry unit failed its morale test and was forced to retreat, and an infantry regiment in the centre,  another cavalry regiment and finally the musketeers attacking the wood  also failed tests under fire - for the musketeers, it was their last 'life', and they routed. On top of all that, what was left of Le Quatre's wing now failed its morale test and was routed, removing its remaining cavalry unit. That in turn triggered a morale test for the whole army - thankfully for them, the dice came up '6' and the army held on. Realistically their best option looked to be to begin to retire, and  with three 'Swedish' cavalry regiments still active on the left flank, there was at least a good chance of covering the retreat of infantry and guns. But even that turned out to be too optimisitic, as the dice gods intervened - two of the three cavalry regiments failed their Action Tests and refused to charge. Sometimes the dice reflect the mood of the army.. At this point, I ended the game - the French army was facing a morale test each succeeding turn, requiring 5 or 6 on 1D6 to stay in the game. With three cavalry and two infantry regiments left facing six cavalry and five infantry regiments, the situation looked pretty hopeless. 

How it ended - Turn 9

So, a second  attempt at Cheriton/Kirchendorf was no more successful for the French/Royalists than the first, and also chimed with the historical outcome.  And what about the Twilight of the Divine Right rules?  I had heard varying reviews, frankly - see Nundanket's and MS Foy's blogs. I have to say, I quite liked them - but with some reservations, and I think MS Foy's analysis in his blogpost linked above puts many of those reservations pretty well.   However on the whole I did like the idea of the  'combat mechanism', whereby  no-one rolls dice for melee or shooting effects, but any unit that is in combat has to take a Morale Test, be they under fire or in close combat. Given the short range of musketry and pistol fire at this period, it seems appropriate to minimise the difference between fring and melee - though there are still defined ranges for firing, hence units can move into musket range and just fire, whereas making physical contact means a melee ( hmm, does that actually undermine  the concept of  rolling-up fire and melee into 'combat'? Pauses to suck a thoughtful tooth.. ).   The 'Action Test' mechanism was interesting, again I liked the idea, as it introduced a fair amount of uncertainty into proceedings - a unit ordered to make an extra move, charge into contact,  or make any complicated manoeuvre ( even a wheel or about face ), might fail their Action Test and remain rooted to the spot, while presumably the officers and  NCOs berated their confused or cowardly charges. Wing and army commanders could  give a limited number of units an 'extra move' - in effect allowing Action Tests to be re-rolled - so failures could sometimes be recovered from. This gave quite a few occasions when things did not go to plan in the heat of battle, which was good from a 'friction' point of view. However, I think the likelyhood of a failed  Action Test seemed too high in some circumstances - a particular example being the French army's 'Swedish style' cavalry failing repeatedly to charge against their 'Dutch Style' opponents. This was because the 'Dutch style' ability to use Defensive Fire modified  the Action Test roll, such that the 'Swedish' horse needed a 4,5 or 6 on 1D6 to charge - a 50% chance of failing the test. Now ( unless I've read the rules wrongly)  I can't really see that Prince Rupert's ECW Royalist cavalry would fail to charge the  Parliamentarian plodders of 1642/43 up to 50% of the time, just becuase of the Roundheads' ability to let off a ragged volley of pistol fire... Admittedly the 'Dutch style' cavalry would suffer a negative modifier in their morale test if they were contacted by the 'Swedish' horse, but that didn't seem to compensate, somehow. Also, I should add that the dice were really not with the French in this game - a real 'anything that can go wrong, will go wrong' situation seemed to occur whenever I rolled dice for the French player!  Anyway, I think a 'house rule' tweak is in order, to allow  'Swedish style'  cavalry to ignore defensive fire when testing to charge.     

My comment regarding reading the rules correctly is also relevant, as I'm afraid I did find these rules rather hard to understand from simply reading them!  This is perhaps  partly due to that novel combat mechanism, but in general I just found that I wasn't easily picking up the 'flow' of the game from simply reading the rules ( whereas the In Deo Veritas rules for the same period were very good in this respect).  What did help quite a lot, luckily, was a series of YouTube videos made by the Twilight  author, whereby he plays out a whole game, with many different troop types, to show how the rules work. Watching those, suddenly the scales fell from my eyes regarding the flow of the game - but of course, when playing one's own game, it's not easy to fire up your computer and then sift through a series of videos every time something in the rulebook is hard to understand. If I persist with the rules, I will need to re-read and re-watch, I think, and take some notes.  Another point ( though no fault of the rules )  was that my small table meant I had to use quite a  small 'Base Width'  of just 40mm, which meant that a regiment of two bases covered  an area of  80mm by  20mm. In 15mm,  that gave me 8 figures for a regiment, in a single line, which didn't look much like a 'Pike block'  to me.  At the recommended 60mm Base Width, I might just have fitted 24 figures in two ranks,  which would be better - but  I wonder if  6mm figures might give a better 'period'  look to the units, which are after all supposed to represent up to 1000 men for an Infantry unit.  

Having played both In DeoVeritas and Twilight of the Divine Right,  which is my preferred set? Well... I'm not sure! Both had many strengths, and both had issues that made me pause. I need to think about this, quite hard - I do think that some of my  issues with both sets would probably be solved by some 'house rules' tweaks - for example by introducing some variation in cavalry types to In Deo Veritas, and by adding some more modifiers to the  'Action Test' rolls in Twilight.   I hope my battle reports have given an idea of how the rules played out, and may have piqued some readers' interest in one or both sets.  I had fun playing both games, of course!   Other rule sets are, of course, available - and I have managed to accumulate quite a few.. There may be further trial games in the near future, though I will have to use another scenario : I think  Cheriton/Kirchendorf has been done to death now! 

We are now in that 'time speeds up' period before Xmas, where one suddenly realises just how much gift-buying and food-shopping etc still needs to be done in the next week. So I can't promise another game will be played before the big day,  though I may be able to squeeze in one more post later this week ( 'twas the night before...').  Meanwhile, I hope you've been interested in my efforts with Twilight of the Divine Right   and enjoyed reading the battle report, as I enjoyed playing the game and writing the report.  I'll sign off here - keep safe and well, everyone.